If you have not read my series of blog posts on how I connected Sitecore SaaS products and chat gpt for a hackathon use case, you can start below and follow along.
Now, after I was done with the use case implementation as I mentioned on my last blog post here, I started thinking can I use Sitecore Connect as my data connection instead of chat gpt directly. I wanted to experiment and I was actually successful, lets see how.
I created a different decisioning model on Personalize instance for this very purpose
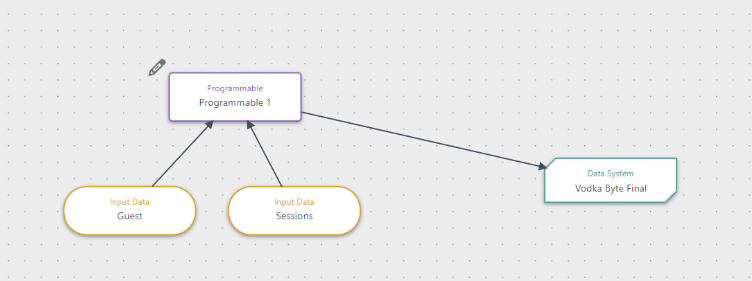
It is pretty simple because all logic for it will be on Sitecore connect this time around. It would look like this
Programmable here is just reading from our event data that we pushed originally and add geo data to the same. You can read about this on my blog post here
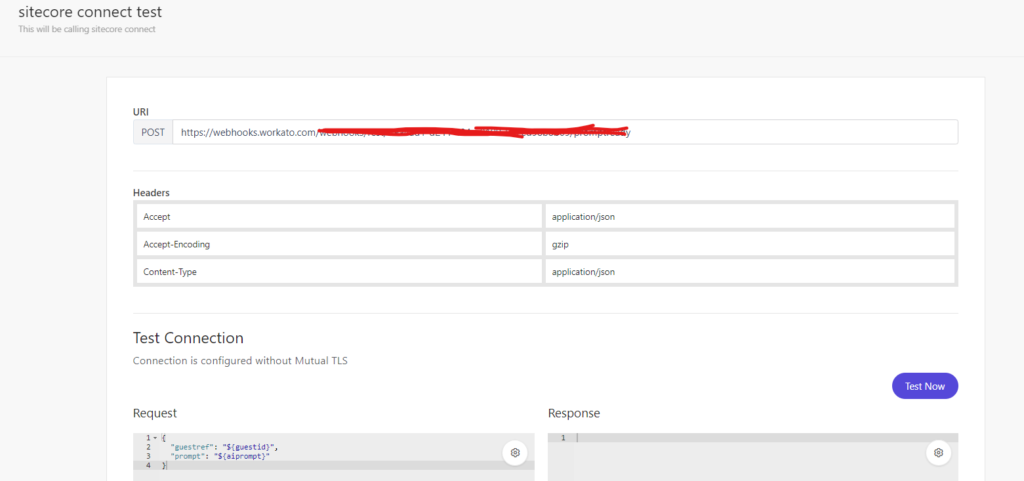
Data system here points to a new data connection created that is essentially pointing to webhook created on Sitecore Connect. It would look something like below
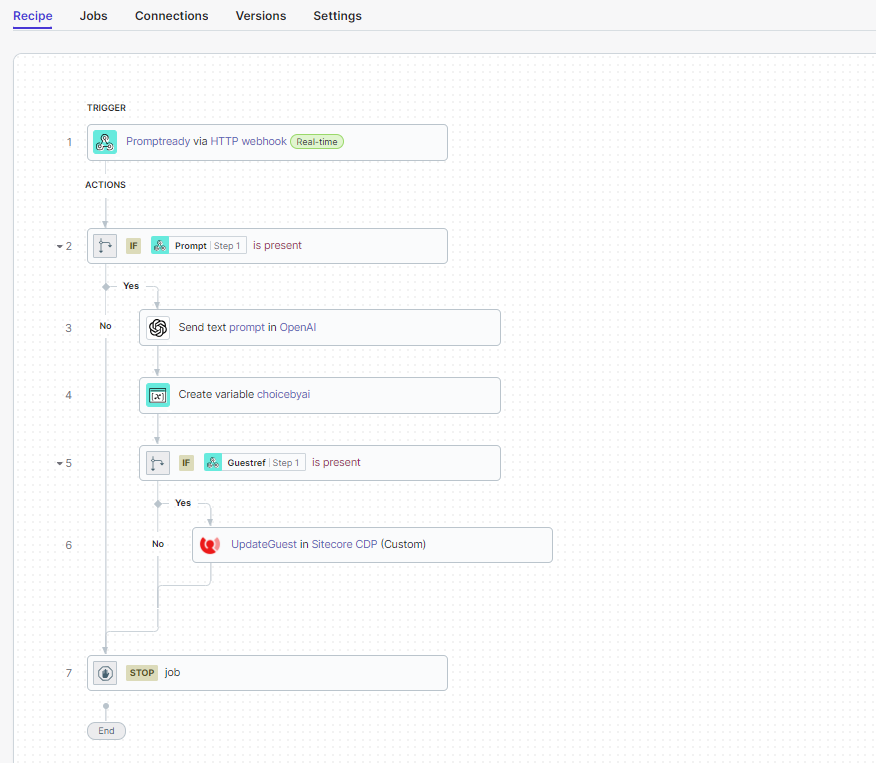
This is how the webhook is configured on Sitecore Connect in recipes
what this hook does is reads the prompt that is read/passed on Personalize data connection, sends that to open AI and then updates the guest on CDP with output from chat gpt.
Do note that UpdateGuest is a custom step I had added though it was very simple and does not have anything crazy in there
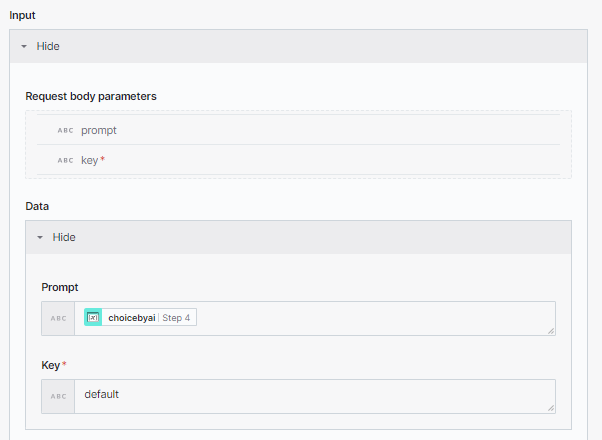
Action Name: UpdateGuest Method: POST Path: /v2/guests/Guestref Step 1/extext -> GuestRef is dynamic from step 1 payload which has guest reference ID that is needed to update guest on CDP and is unique identifier. Request Type: JSON Request Body Response Type: JSON Response
For this flow to work, connections should be in place for both Open AI and CDP account on which user will get updated. This was simple when all information needed is on hand. For instance, for CDP below are needed: Region Client Key API Token You can get these from CDP, developer settings once you are logged in
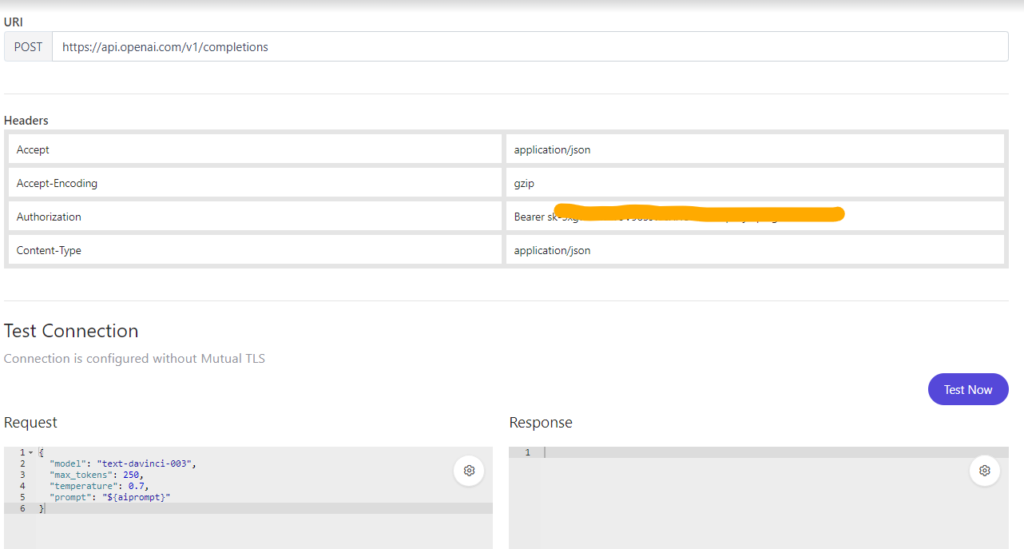
For open AI, you will need API key and that is it!
When you start the recipe and fire off the variant that would fire off decisioning path noted above, the whole flow should work and you should see that on CDP the guest is updated with the output from chat GPT. Of course, this is not perfect, but, this proves that low code/no code is possible!
This post covers one specific aspect that I started talking about in my third post. I will expound little more so you can easily configure a data system in your Sitecore CDP/Personalize platforms.
To configure data system in Sitecore Personalize as a connection there are few pre-requisites to keep handy. In our case it would be:
Request URL for chat gpt completion call based on prompt
Request Body format
Dynamic Request body values that can be passed from Decisioning flow
Follow the stepped form and pass all request related information noted above and once the connection is ready and saved it should look like below.
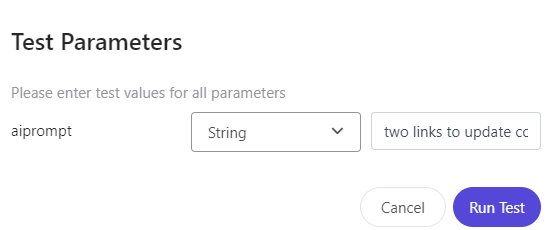
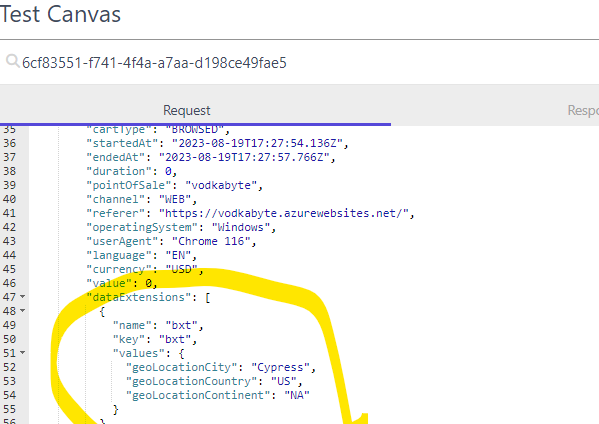
You can see the dynamic request body parameter that is needed to run the call when you click on test canvas.
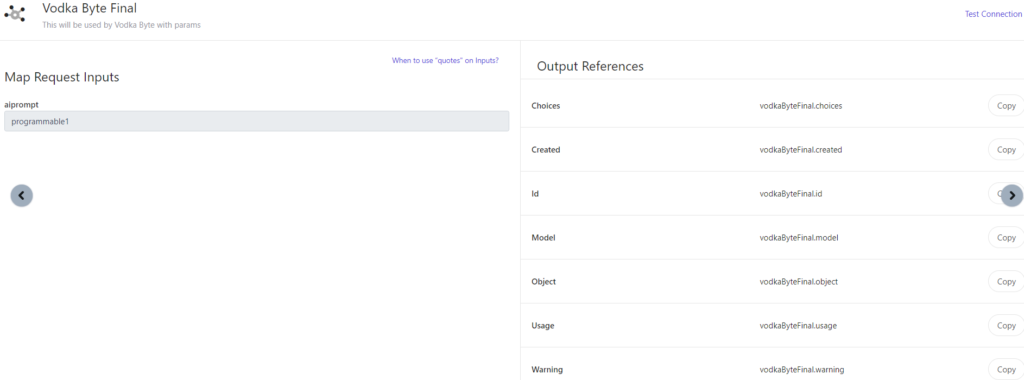
This input parameter will be the prompt that is generated by programmable. If the test is successful, we are now ready now to wire this up on our decisioning as data system. A quick snapshot of how this data system is configured in Decisioning.
The request input named ‘ai prompt’ is read from programmable on the same decisioning canvas and is fed as input via arrow on canvas.
output references noted here can be useful, if these are used on next steps on canvas for instance. May be this prompt might need more massaging or may have to connect to another data system or decision matrix before it is read as response. In our POC case, we are ready. Now, lets run the canvas and examine output from chat gpt in this case for the guest ID of concern.
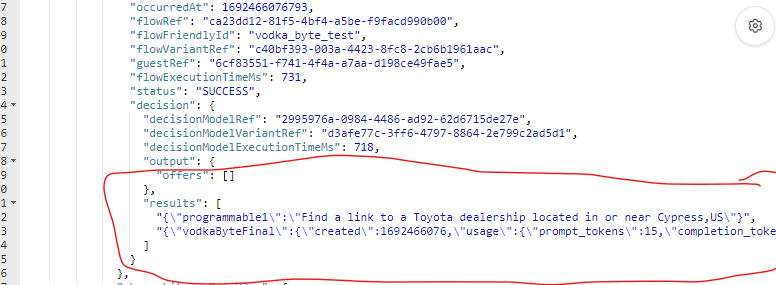
Full Response from test canvas for guest ID that visited the landing page via email looks like below
If you closely examine the outputs section, it has response from chat gpt that carries the link which we will then wire up on experience. Lets take a peek on how to do that
Complete the Variant
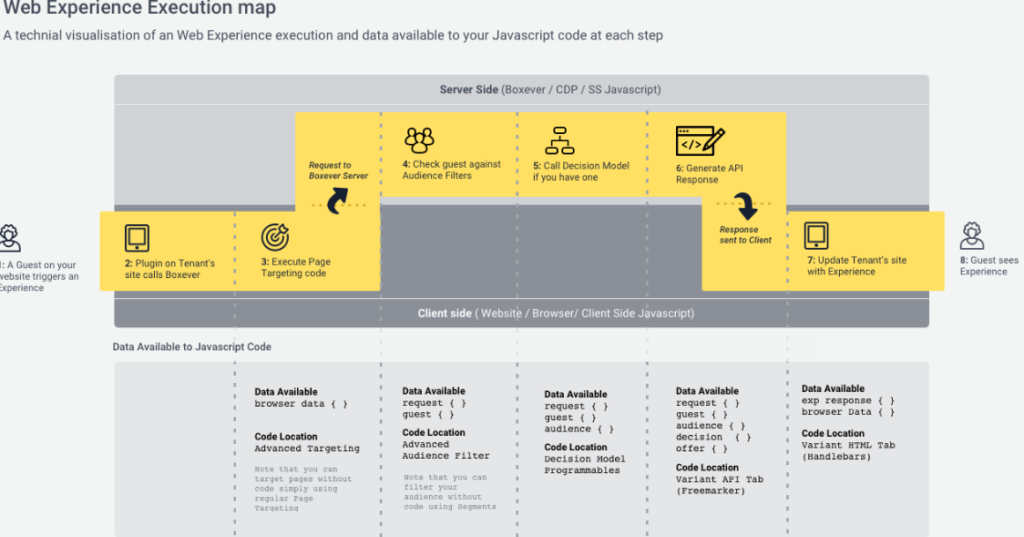
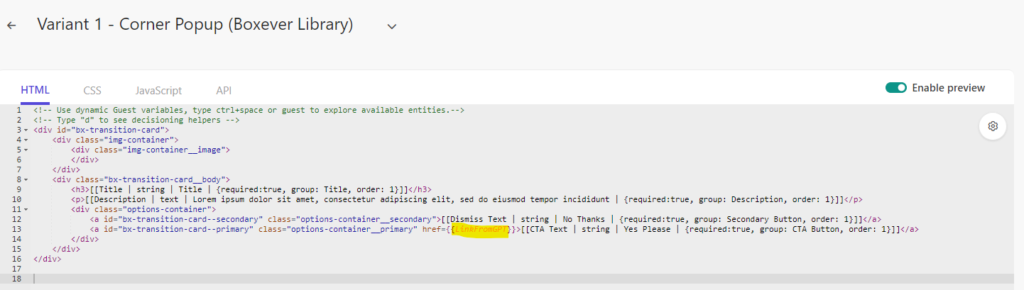
In Personalize, variant has advanced edit capabilities. In that, there is API tab can be leveraged to read information from response noted above from decision model that runs. quick glance of flow of web experience.
In our case, we needed to read the output from chatgpt as noted from decision canvas massage the same in API tab which can then be leveraged on HTML tab. Do note that in javascript tab, we were also able to send more events if the end user interacts with the CTAs in the pop up.
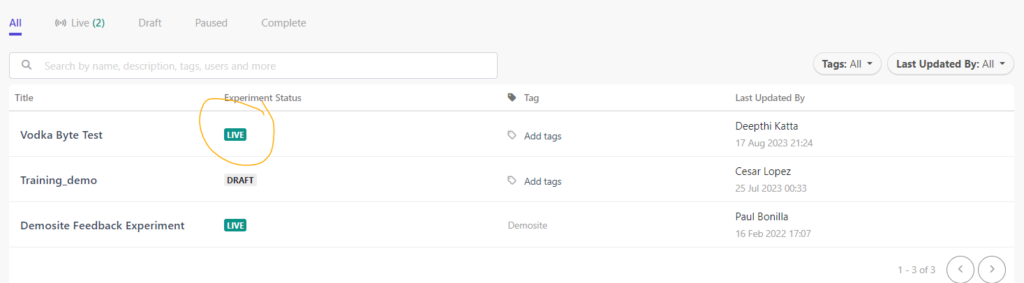
Personalize has preview option to test and ensure the experience looks as planned. Once it is up to expectations, this experiment can be made live. You can see below now that our experiment is live.
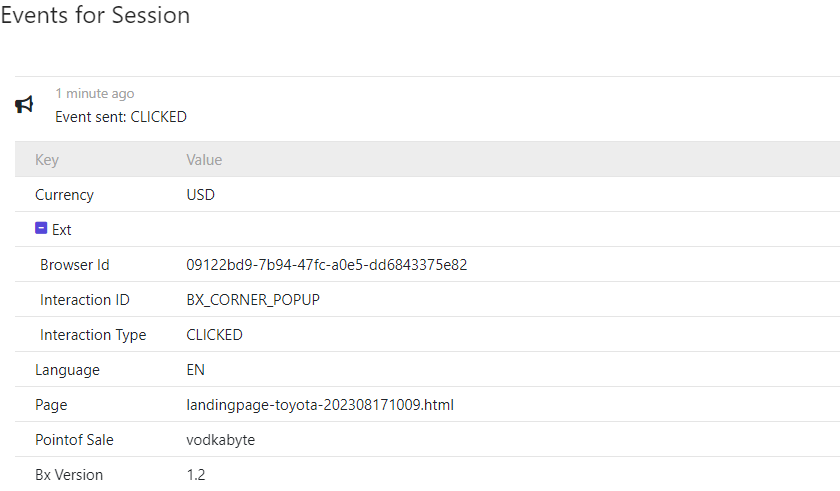
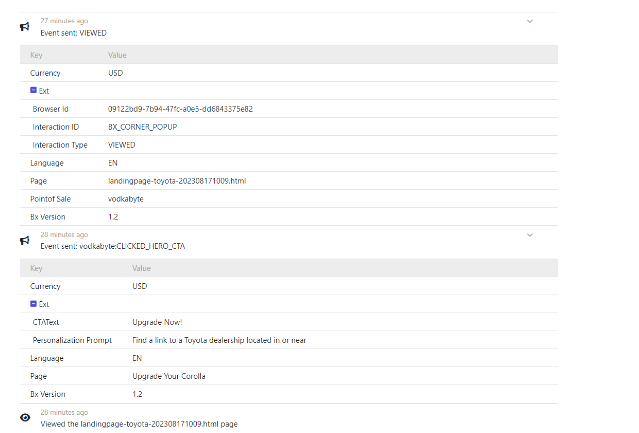
Below is how a whole event stack would look like, lets say if user clicks on our dynamically generated CTA for instance.
That is it!! Web experiment will now capture analytics which will help marketing team make decisions or create more variants leveraging data systems for ease of creation.
Now for the cliff hanger, can we do this using Sitecore Connect instead of using data connection? I thought to myself, I should and I was able to. Next post will be achieving what I did with Data systems using Sitecore Connect instead.
If you have not read my first two blogs on this series of combining two awesome platforms to deliver a personalized experiences, you should start there. Below are the links to the same. This post is the third step of the series that talks about how we can use Personalize to tie everything together.
This is step is all about key functionality of Sitecore Personalize such as web experiments, variants, decisioning and data connections. Lets start getting in to each step here:
Create a web experiment – This is not mandatory, one can also choose experiences, but, we wanted to prove some theories on analytics front, so, we used this. You can read more on how to do this straight in Sitecore documentation.
Add POS filter based on what was sent to CDP. More info on sitecore documentation here as well.
Now, create a decisioning model that has a programmable to read what was sent on custom events from CDP. Have input as Guest and sessions both so we can read what we need on programmable. Also, connect to Data system, in our case it is chat gpt/open AI. I will talk about how to set that up in next post. Below is how the decisioning would look like. Learn how to set them up from Sitecore documentation.
Programmable is a javascript snippet here is used to construct prompt that will then be passed to Data system (Chat GPT) as completion call input. It extracts below information
Custom Event extension data that is added when end user clicks on Landing page link on their email
Current Session data extension that carries geo information on user such as city and country.
Code on programmable looks like below. No, it is not production quality code as I did this for hackathon. 🙂 Please make sure yours is though. LOL
function getLastButtonClickEventText() {
    var lastButtonClickedText  = '';

    for (var i = 0; i < guest.sessions.length; i++) {
        var currentSession = guest.sessions[i];

        if (currentSession.sessionType === 'WEB') {
            var events = currentSession.events;
             var geoCity = currentSession.dataExtensions[0].values.geoLocationCity;
             var geoCountry =  currentSession.dataExtensions[0].values.geoLocationCountry;

            for (var j = 0; j < events.length; j++) {
                var currentEvent = events[j];

                if (currentEvent.type === 'vodkabyte:CLICKED_HERO_CTA' && currentEvent.arbitraryData && currentEvent.arbitraryData.ext.PersonalizationPrompt) {
                    lastButtonClickedText = currentEvent.arbitraryData.ext.PersonalizationPrompt+" "+ geoCity +"," + geoCountry ;
                    break;
                }
            }
        }

        if (lastButtonClickedText) {
            break;
        }
    }

    return lastButtonClickedText;
}

(function () {
  // Add statements here

 var lastButtonClickEvent = getLastButtonClickEventText();

    return lastButtonClickEvent;

})();
Custom event information is available inside the events on the session and looks like below
Next step is to feed this programmable data in to data system. But, first, we have to learn how to set that up. I will talk about that in my next post. Hang tight!
This is part 2 of my series I promised on how to connect Sitecore with chat GPT. If you did not read my first post, please check it out here
Now, to make this happen first we need our events based on user interactions. This is the key to proceed with our next steps to achieve one to one personalization to the end user using chat gpt.
It required below steps in order. I tried to jot down everything I remember.
Create a POS (point of sale)
Integrate and start capturing events using Engage SDK script. This was very simple and super detailed on Sitecore documentation, so, check here
Verify basic page view events are now shown on CDP in guests section. This should be good if you did good with steps noted above.
Ensure custom events when sent should also be visible on user. In our case, we sent a special event that signifies the user clicked on a link from Email for instance. This event is basically our glue and also contains personalization prompt, brand names and anything else that is needed to tailor the experience. Below is a snippet of code that goes any where you would like it to send the event and load up extension data.
const handleClick = async () => {
      const eventData = { channel: "WEB", currency: "USD", pointOfSale: "brandname", language: "EN", page: "landing page"};
      const extensionData = {
        CTAText:"xyz",
        PersonalizationPrompt: "This would be used some where in personalization as prompt for Chat GPT"
      };
      await engage.event("brand:CLICKED_HERO_CTA", eventData, extensionData);
    }
Now that we have all the events and information on the events we need, next step is to either use web experiments or experiences in Sitecore Personalize. I will explain that on my next blog. We will also see where exactly chat gpt comes in to play in the flow.
I’ve had this on my mind since September, but it’s been a hectic period, and I couldn’t find the time to kickstart this series. If I hadn’t delved into connecting Chat GPT and Sitecore, I’d be experiencing major FOMO. Indeed, if you’re in the tech world and haven’t dabbled in the innovation of the decade, you’re missing out.
Verndale, the company I work for, organized an internal AI hackathon program that motivated me to sign up and work on something related to Sitecore.
So, the first step was brainstorming, as always. I had a team for this, but I had a soft spot for my favorite combo, Sitecore + Chat GPT. I started gathering ideas from existing resources. I came across some cool videos demonstrating the integration of Chat GPT with Content Hub, but it didn’t quite align with our project’s objectives. Our project was all about creating landing pages, and my part was to enhance these pages that were already rapidly generated. Then, a lightbulb moment occurred – how could I incorporate CDP/Personalization into these landing pages to attempt one-to-one personalization scenarios using Chat GPT? Bingo!
I believed the idea made a lot of sense and added value, so I delved deeper into the whole workflow. Here are my thoughts, a brain dump, if you will:
Imagine I know this user – perhaps they clicked on an email link. Remember, this is a hackathon, not a real project, so imagination is the key.
Now, I know this user, and since it’s CDP, I potentially know their location out of the box. Can I do something with that?
So, based on this context and location, can I create a one-to-one personalization variant using Chat GPT? I directly experimented with some examples on the completion endpoint using Postman, and the answer was a resounding YES. Chat GPT was able to provide the nearest dealerships based on the user’s brand affiliation. Bingo!
It’s as simple as that but scalable across various scenarios.
In my next post, I’ll discuss how I implemented all of this.
If you have not read my first two posts on Sitecore search, please start there. This is third blog on Sitecore search series as we learn how to embrace this new product on Sitecore Content Cloud stack. You can check them out below:
Now, the next step is to ensure you have good meta data on your Index. Metadata is the super important to ensure the relevancy works as you expect it to. Index with out proper metadata is like pasta with no sauce. Haha
Lets get right in to it. In Sitecore search, metadata can be added to Index in various ways. You can see more on documentation
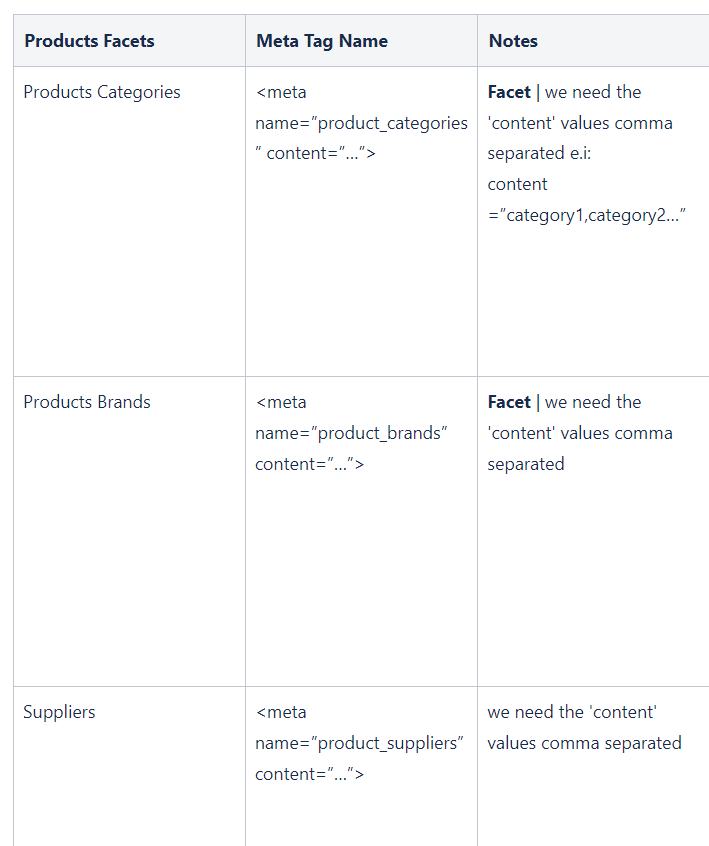
As you can see, there are couple ways of how you can achieve this. We picked JS extractor for our needs. But, do note that before we implemented our extractor on console, there are couple things to be done. First, we ensured all the attributes that are needed to power the search are available on HTML of the page rendered by Sitecore. A simple exercise of gathering what facets, display data and relevance fields are needed for your search experience should really help get this right the first time you attempt to.
We made a simple table such as below to get our team stream lined on steps we got to do.
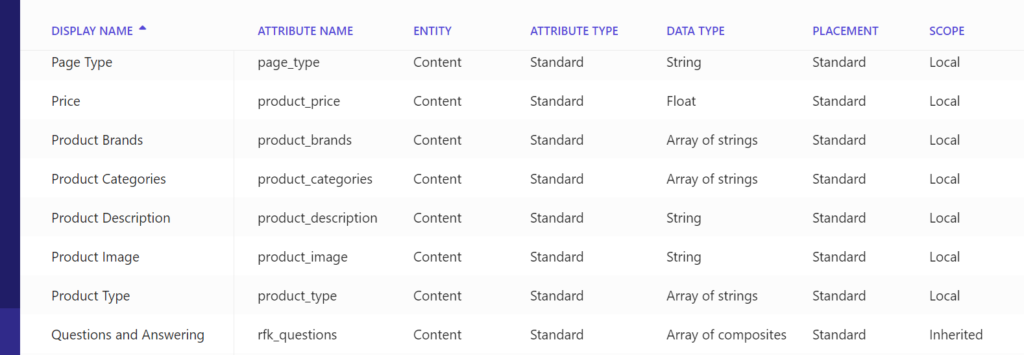
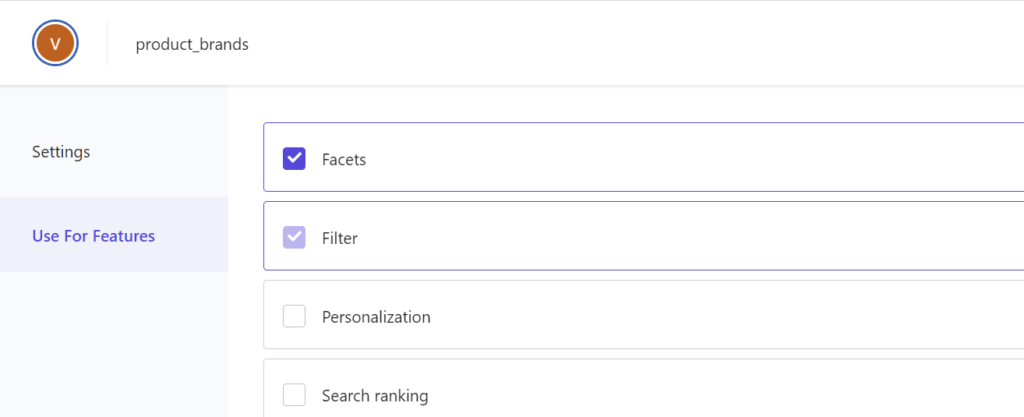
Next step is to create attributes needed in Domain Settings. This is needed for next steps to come.
Attributes once added would look like this. Make sure Use For Features on each attribute is configured properly
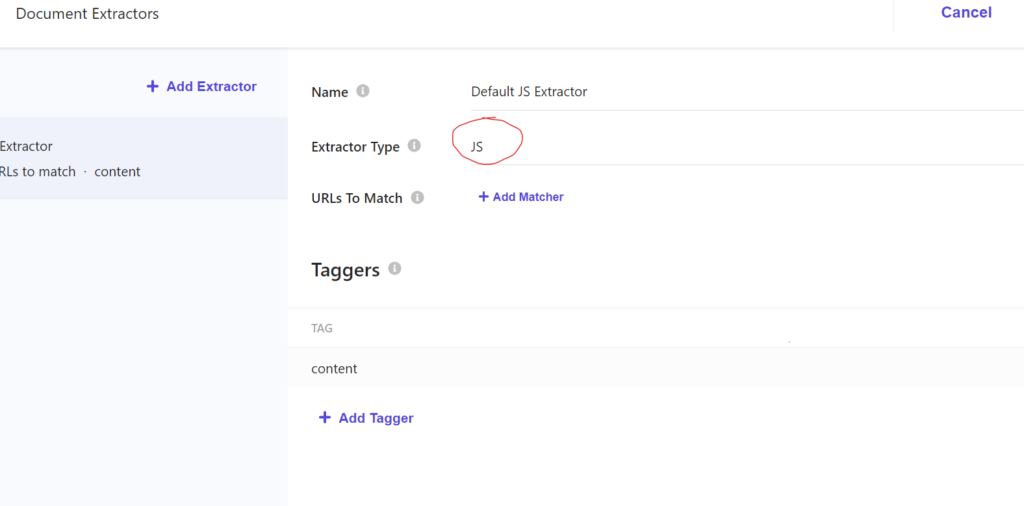
Now, we are ready to add Document extractor. Couple screenshots below.
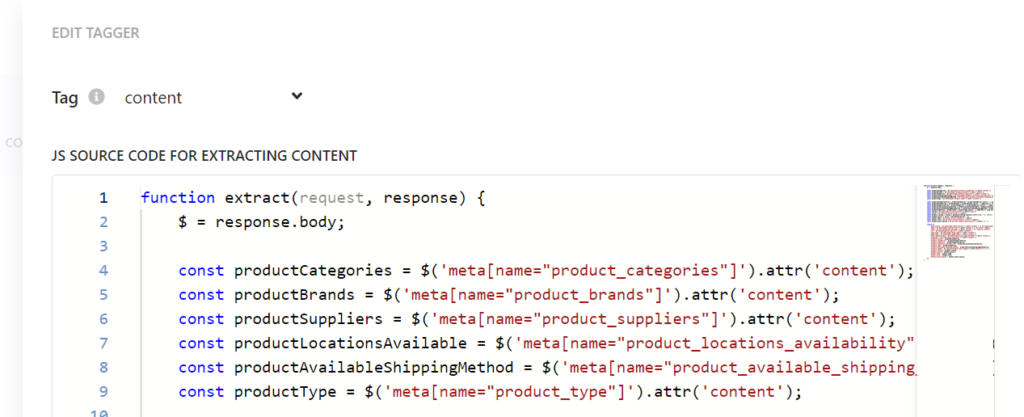
Access Document extractor from Crawler Settings on your Advanced CrawlerClick on content tag to edit/add JS code as needed to extract properties
Now, all you have to do is re-index on the source, if you are a rock star coder as our primary developer for Sitecore Search (https://www.linkedin.com/in/inaki-manosalvas/ ) then you will see all the new properties the search experience would need on your index.
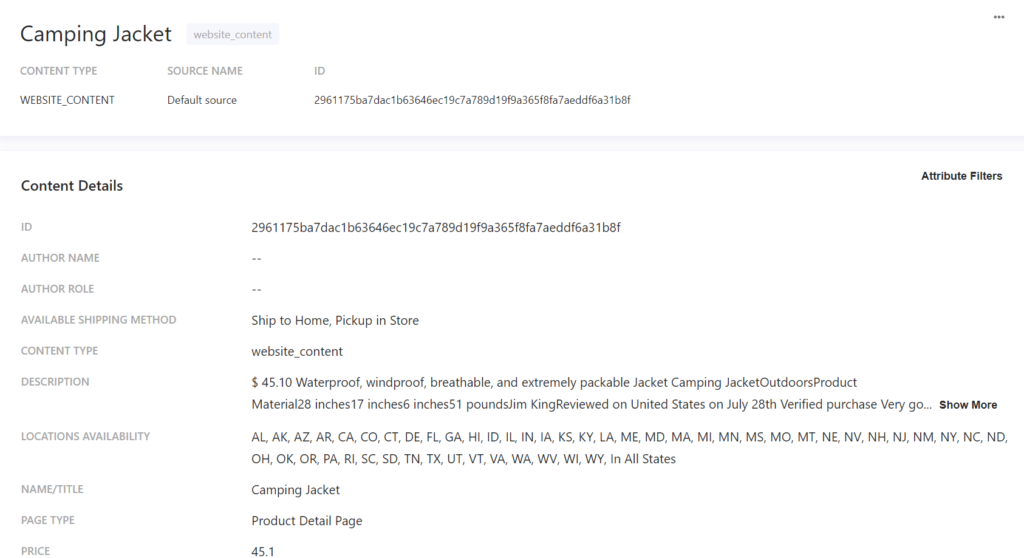
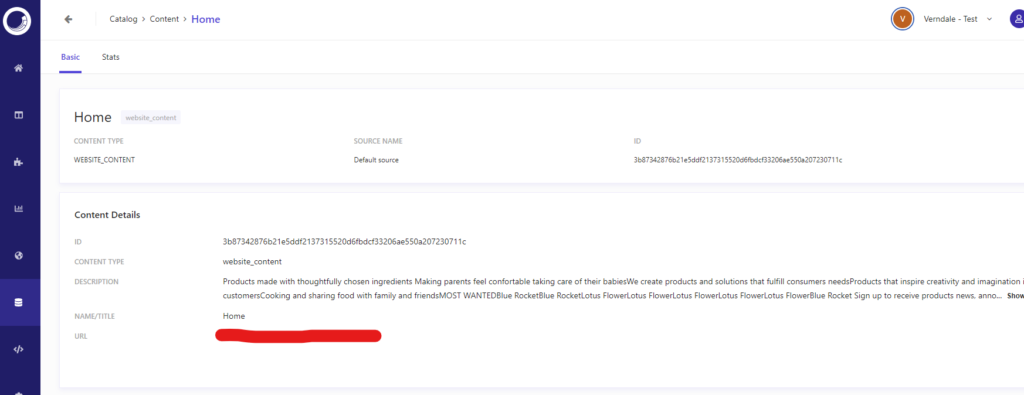
Open an item on your Catalog -> Content section of Search Console to verify after re-index operation
That is it!! You now have all that you need on your index. Can keep moving!!
Next up, we will see some more things you can achieve from your console to boost, add rules and more.
Now that you have access to sandbox and explored the search console as my first blog covers. It is time to configure the web crawler to your needs. Obviously, every instance of the website you would like to crawl has it’s own mini crawler requirements. For instance, the POC I was working with was behind a login, so, it is important that we let the crawler do it’s thing by either skipping authentication or adding some authentication parameters on the request headers. Let’s see how that can done and how we did it.
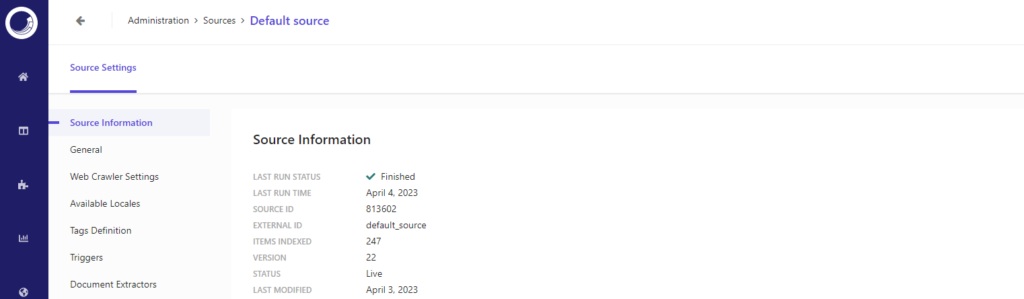
First things first, login on to search console and go to crawler settings. The settings should be located inside sources section under Administrative Tools. Once you open the source of concern, it would look like below. Do note that at least one source should already be set up by search team based on form details I talk about in my first blog here.
If you scroll down, you should see Web Crawler Settings, click on edit icon and you should now see Web Crawler settings. In our case, we did two steps here:
Add best practice security header ‘user-agent’ with value ‘sitecorebot’ that Sitecore recommends in their documentation. Here is the link if you are curious
Add another header to help us detect these requests on application side and skip authentication. Of course there are other ways to do it such as using special Authentication settings on Web Crawler, you can read about that process on Sitecore documentation here
Another few important things to check while you are in Source Settings:
Ensure Trigger/s are set up according to your needs of content to be indexed. In my case, I ensured sitemap trigger is present and has right values.
Check that the scan frequency is according to your needs
That is it!! After these steps, the crawler was able to crawl our website which is behind login. Happy crawler which means we can get to next important part of ensuring Index has all the right data for API calls to function well. Lets get in to that part in our next blog.
It’s time!!! I mean I cant believe that the time has come for me to blog about Sitecore Search. October last year, at symposium I was really intrigued by Sitecore Search and wanted to play with it. You all know and if you do not, I am an ardent Search lover. My love story with search started while I was pursuing my Masters in Computer Science as I embraced Lucene as my thesis topic. From then and until now, my love story has continued on and that even has awarded me with Coveo Search MVP award. Now, when my other product I am so passionate about (Sitecore) is at the door step of it’s own search journey, I have to get my hands on it, right?
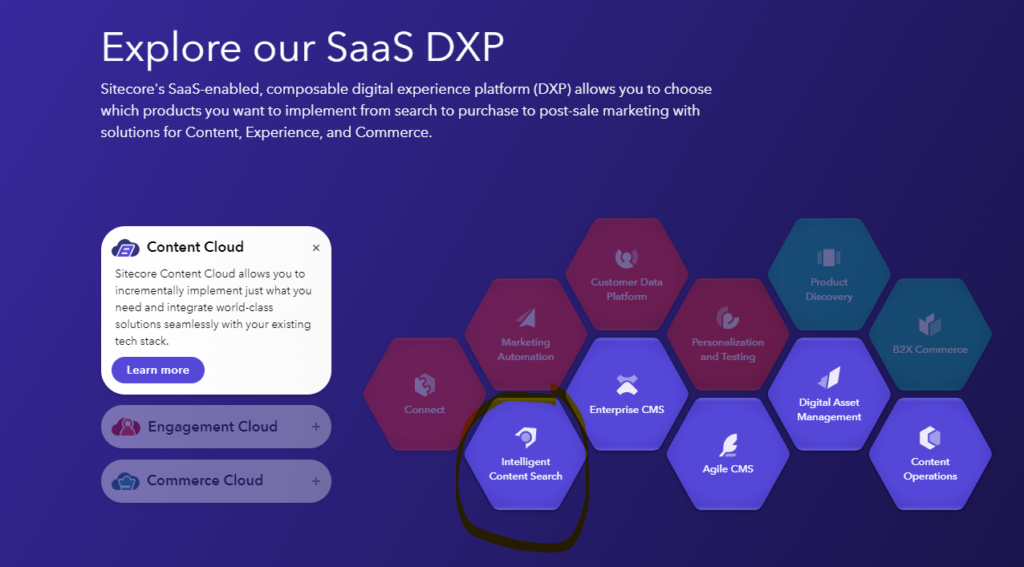
Lets get started! Most important thing first is to understand that Sitecore Search is part of SaaS DXP specifically Content Cloud stack.
To start exploring Sitecore Search, the first step is to reach your Sitecore partner contact or Sitecore representative. They will share a familiar looking form URL (I do not want to share that here as the right thing to do is to reach Sitecore rep :)). The form will ask some basic information like site name, domain, sitemap URL, admin email and crawling method preference for example. Creation of sandbox might take around 10 working days and preference is usually given to real opportunities for all the right reasons.
Now, once the sandbox is ready, an email will be sent with activation instructions. Do note that the email will expire in two days, so, it is important to do it as soon as possible. If it makes it easier, the email comes from ‘no-reply@reflektion.com‘
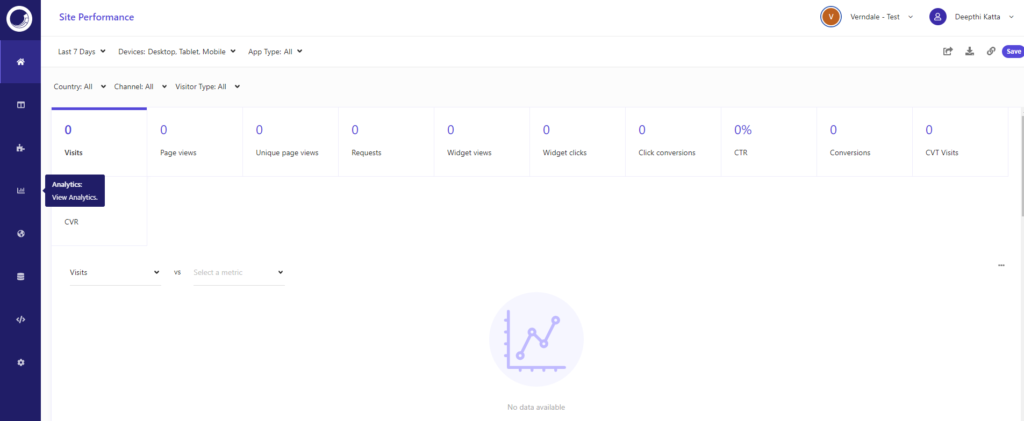
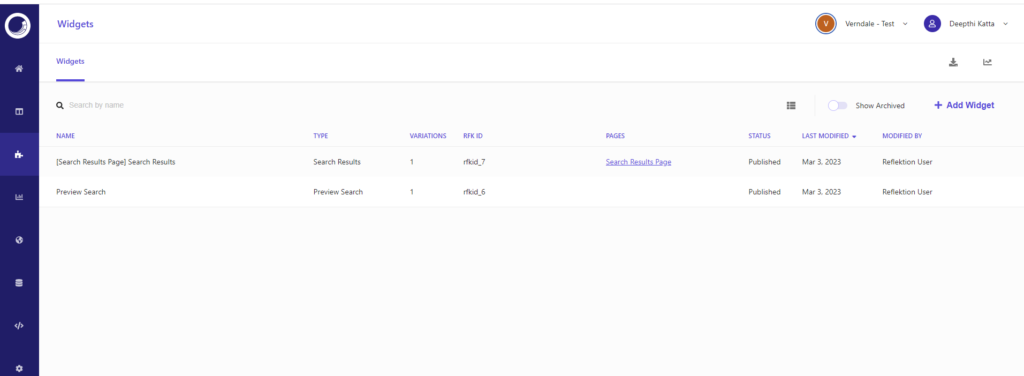
Tada!!! I was so happy to see the sandbox after the wait. Couple screenshots for reference here. With initial set up, if all goes well there should be some content with some basic information on each content piece on Index. Do note that Sitecore is currently doing lot of efforts to get the UI to better place based on feedback they are getting, but, these are the screenshots from the sandbox I received.
Home/Site Performance
Pages
Widgets
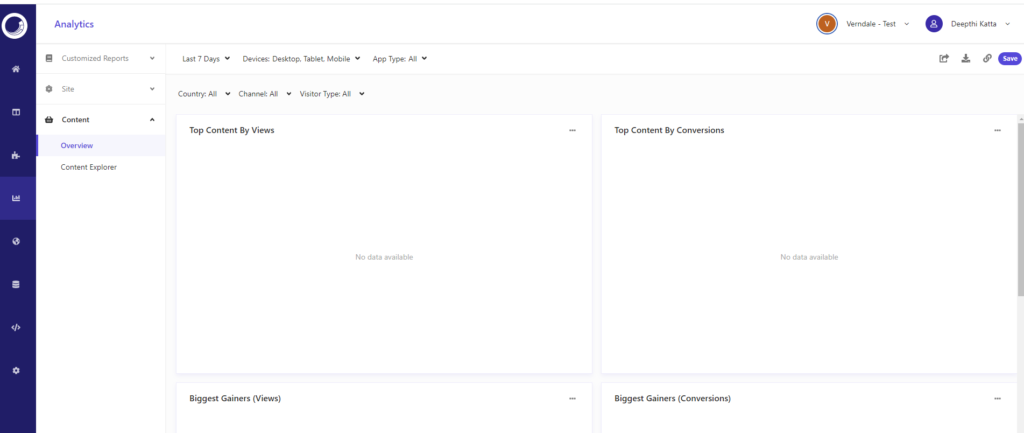
Analytics
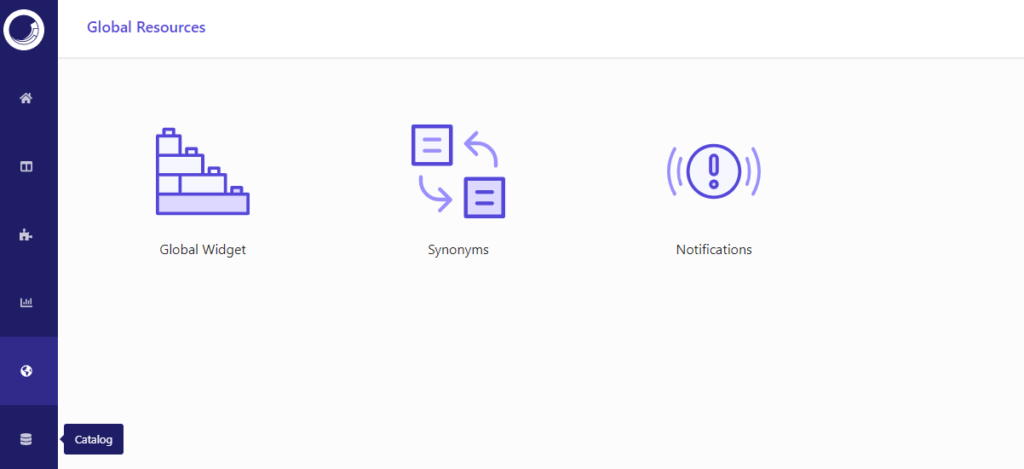
Global Resources
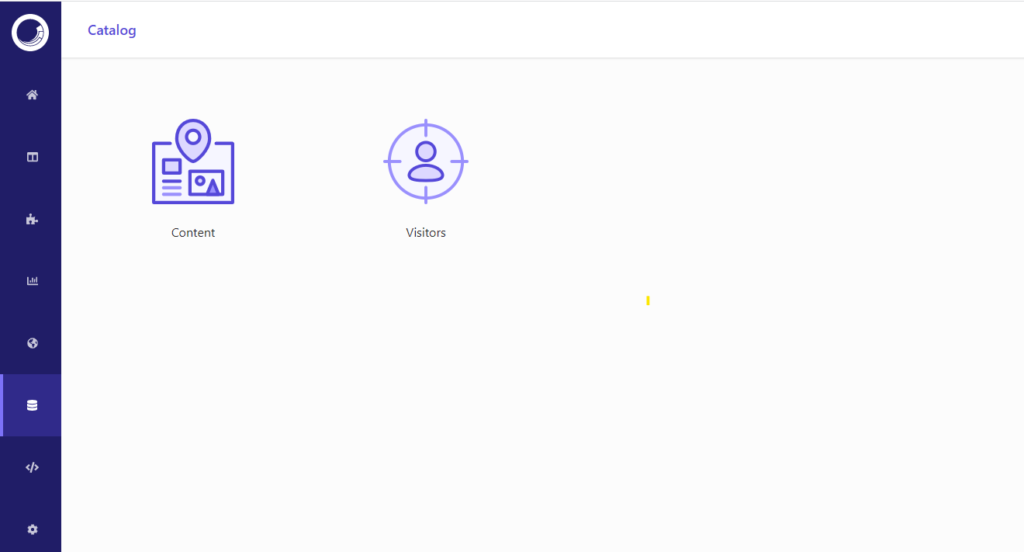
Catalog
This section is where you can explore content on the index and check out specific details on the same.
Developer Resources
This section lists customer key, API hosts, API keys and their scope and also throttle limits. It has various tabs within this area that can help developers play with API, monitor events and also some documentation links (These were discover related and not Sitecore Search related)
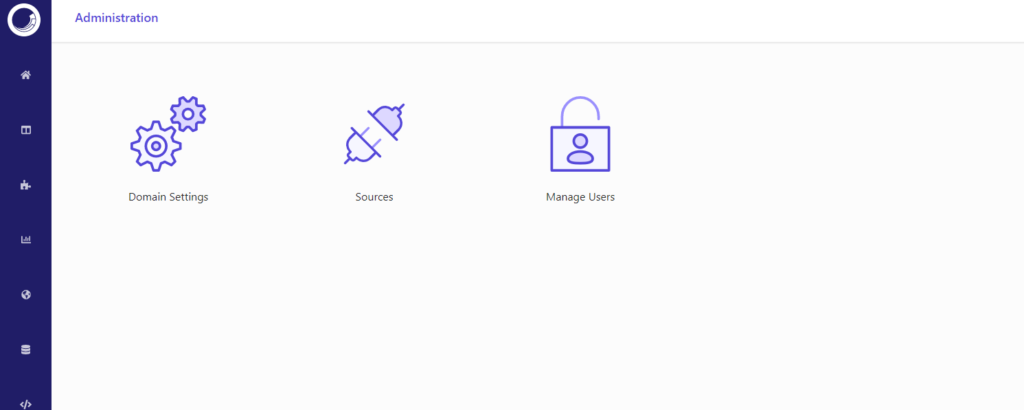
Administrative Tools
This is the section where you can see domain settings, sources (it usually comes with at least one set up based on what you filled in your form) and a place to manage users.
Source should have all the web crawler settings and we will cover some of those in my later posts.
After working with Sitecore Managed Cloud for almost two plus years, my first encounter with managed cloud was in the year 2020. I blogged about all my learnings on Managed Cloud in series of blog posts. After all this time, I still bump in to something new with different implementations across various clients.
For instance, this client had custom indexes. I always frown about custom indexes because I personally think they are only needed in some very specific scenarios and there are bunch of blog posts out there to help you understand when you would actually need them. In this specific Sitecore instance, they need them because.. lol I dont know. We inherited this solution, so, that is that. Now, these custom indexes will not be magically set up by Sitecore when you ask them to create the environments. So, how do you go about it? Here are the steps below.
SOLR credentials are provided to you or your team on the support ticket you may have created for Sitecore to whip up new environment
Log on to that admin console of SOLR
From there – you can create the custom collections you like – Name them with preferably best practices around it
Also, of course your index configurations should be patched well with all that sync strategies per your needs
Now, go to Control Panel and rebuild your custom index – Boom – Yes ? No…wait..but
There is always buts right? Okay, my custom index has custom config set and not the one Sitecore may have created by default when they create your instance. 🙂
So, how do we create new collection on SOLR console using custom schema? It is actually quite simple with some twists. Like I always say, I will not repeat myself on the stuff that is already out there. I followed below references to actually understand the HOW part. Here it goes:
Magic sauce is actually in the second link (section: Upload a SOLR configuration), but, first link is also important because that tells you exactly what options you have and what to do depending on option you picked. I picked option #2 noted on there which is to use zkcli. Yeah yeah, I am lazy you may think, but, I would like to think I am strategic. 😉
In my case option #2 will suffice as I have very simple needs and my managed schema config sets are actually checked in on source control, so, that is better approach than doing gymnastics with API. Most of the steps are clear in the second link above, but, I found their was additional ‘/’ that was throwing off my command. Plus, reminder if you are going with this option, you have to ask Sitecore via support ticket to whitelist your IP Range or IP Address. If you do not do this, command will not work and throw time out exceptions.
Before you run the below steps download zkcli https://github.com/searchstax/searchstax-client/archive/master.zip – Place the extracted version in your drive some where. It does not really matter where as long as you can go there.
I used powershell and I did CD to go the scripts folder inside the zkcli download mentioned above. Run the command that looks like below:
.\zkcli.bat -zkhost {zookeeper ensemble entry I grabbed from support ticket of environment creation details} -cmd upconfig -confdir ../configsets/{custom foldername inside your zkcli download }/conf/ -confname {name for config that would appear in SOLR}
Replace {with stuff in here} -> actual stuff noted (do not use those braces, I used them to suggest it is a placeholder and not real value)
If your IP is whitelisted and if you have JAVA installed with proper PATH variable set and yes if you are lucky, you will see your shiny new config set on SOLR once the command runs successfully. Once you have the config sets available, go back to your basic steps and when you are creating the collection you get to pick the custom config set.
Have fun you all!! I am sure more search stax interactions are yet to come soon. In the mean time, have fun.
Recently I bumped in to this issue escalated from our client side. It seemed although ML models are working way too hard. This is my first experience with Dynamic Navigation Coveo ML model which promises to understand what Facet values and Facets are important based on Analytics data captured. It comes in especially handy for top Facets that are frequently used or expected to be used on search page by most users to drill down to their search results.
We were using Coveo Dynamic Category Facet. As always Coveo does excellent job at documenting what this facet is all about and how you can configure it on Coveo for Sitecore. In our case, it was Coveo for Sitecore SXA. You can read more about this facet here.
Now working with Coveo Hive components all these years, I was 100% confident that I did not mess anything in there when the issue was brought to my attention. So, I decided since I am in fairly new territory with DNE ML model, I tried dropping that to see if issue disappears and yep it did indeed.
So, isolation is done, ML model is injecting that duplicate value, now the question really becomes why? Next step like always in debug mode of self, let us create a dummy page with a facet based on field of concern and reproduce on cloud search page. Did exactly that with help of Coveo technical contact and to our surprise, the duplicate value issue was not reproducible on cloud hosted search page on same facet type and same facet field with same ML model that was causing this issue on Coveo for Sitecore search page.
Hmmm??? Brain is going wild now? What could be it. It does not seem like ML model data is incorrect based on no replication scenario I explained above and neither seems to be index issue because well facet values on facet look just fine minus ML model. I was so confused!
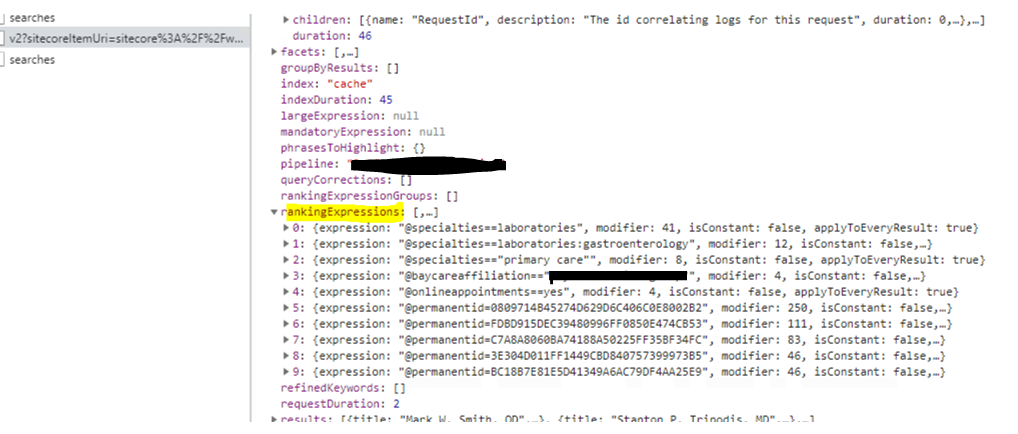
I noticed that in debug mode, I saw ranking expressions being injected which definitely seems to be the culprit, but, was not sure why. Below is how ranking expressions looked like.
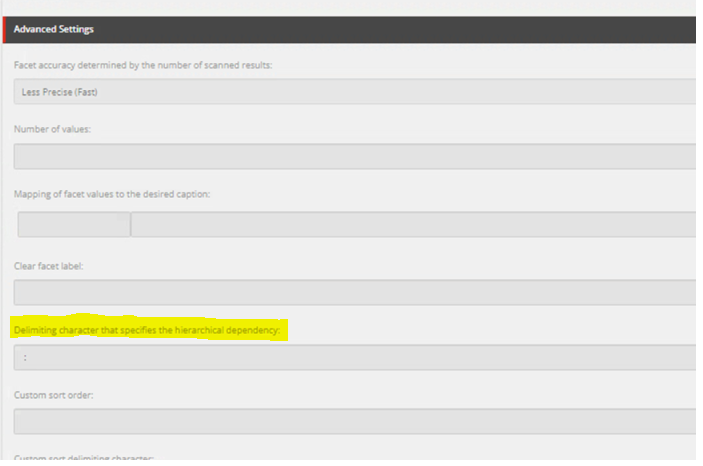
I started digging deep on something that I was hyper confident on – data source – piece by piece. Below highlighted caught my eye for sure.
Delimiting character can be different per Facet Datasource
I decided not to share my hunch with Coveo support team. I have tried sharing my hunches in the past with Coveo and Sitecore team on support issues and that ends up putting us usually on a different path may be because my hunches are not always the right ones. I usually try not to put words/thoughts on to some one who is looking at the problem to understand their perspective and fresh set of eyes with no pre conceived opinions. 🙂
I patiently waited for Coveo to get back to me on this issue I logged since I was going no where with issue on hand. They said the same thing that they were worried about the custom delimiter. To ensure ML model does not throw fits, we had to pass some custom advanced parameters on DNE ML Model. I added below to the model and voila…. No more dups. 🙂
This got me super curious and I wanted to see what else you can do in advanced parameters on ML model. Here is gold mine of good amount of samples. Funny news is none of the examples here could have solved our issue. Coveo promised they will update the documentation to reflect this hiccup. All set and ironed out!
I almost did a party dance. This resolve has gotten us the feature complete sign off. We are set to go live next week. Super excited!
Thanks to Coveo support team who really helped us get over this hump .
On recent adventure with latest and greatest of Coveo for Sitecore version as soon as we put together a dummy page to add couple OOTB Coveo components. We immediately noted that on mobile mode the facets were not grouping behind this button called ‘filters’ like it typically does on Coveo installations.
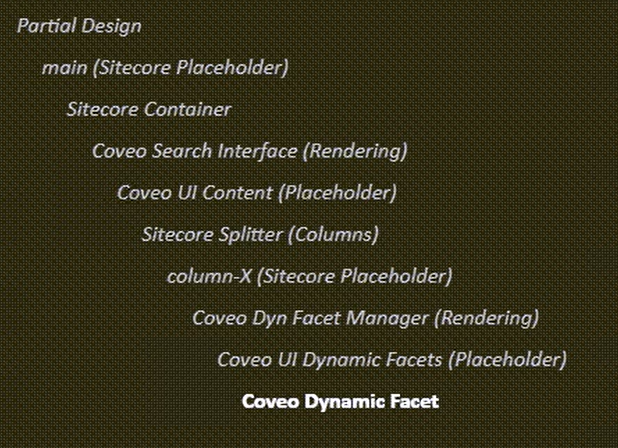
My first guess after looking at few things and trying to ensure I followed all the instructions provided in terms of placeholder hierarchy to follow to inject a Coveo Dynamic Facet is it has to do with SXA usage instead of native MVC Coveo for Hive renderings. Since Coveo mentioned many clients out there have used SXA, we were not worried to leverage SXA as that is direction on the instance we were working with.
I tried couple different things –
Tried verifying data attribute that enables mobile responsiveness. It does suggest that it is true by default, but, no harm confirming again.
When none of the above worked it was time to loop in Coveo team for their input as this should work OOTB. I logged this Q&A on Coveo Connect and collaborated directly with my Technical Architect of Coveo and voila they suggested a very nice work around and Facets now collapse behind ‘Filters’ button and our team is super happy as we can focus more on data/content/index/relevancy instead of UI aspect that should be working with Coveo Platform.
Thank you Coveo team for your prompt responsiveness like always. Here is the link that has the concern and solution for those who stumble upon this issue. Hope this helps!
The feeling you get something live on which you poured hours and hours of work and sweat, priceless! But, what if you are not happy completely? Something is curbing the feeling of being happy a notch or so down? This is exactly what happened to me when I pushed the whole deal of using Tenant Service live. You can read more about how we used Tenant service on my previous blog here
It was just such a relief! Launch was super smooth, I honestly did not expect it to be. Was prepared to be a warrior to fight with any issues that would come by way. But, I was a lucky warrior who simply had to pose with the armor on and no real fight lol
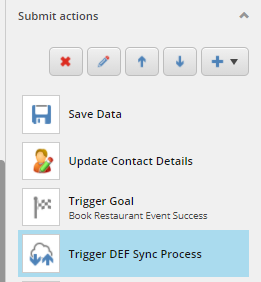
Performance of the form submission after adding ‘Trigger DEF Sync Pipeline’ was bitter. It was taking on average around 8 – 11 seconds for form submission to be successful. Upon more research, turns out custom form submit actions are synchronous, they run one after the other before friendly thank you page or note is shown to end user.
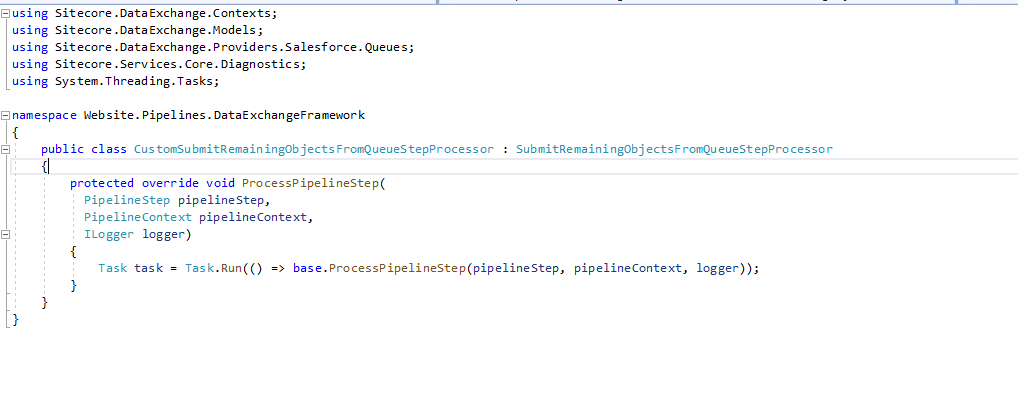
Other way I could think of is to make the most expensive pipeline step Asynchronous. It was easy to point the culprit in my case, it was the step responsible to submit the form submission information to Salesforce that was adding all the time for processing. I logged in a ticket with Sitecore to understand how exactly I can transform a pipeline step to be asynchronous. They suggested that I do something like below:
Make a custom pipeline processor inheriting the OOTB processor for the step of concern
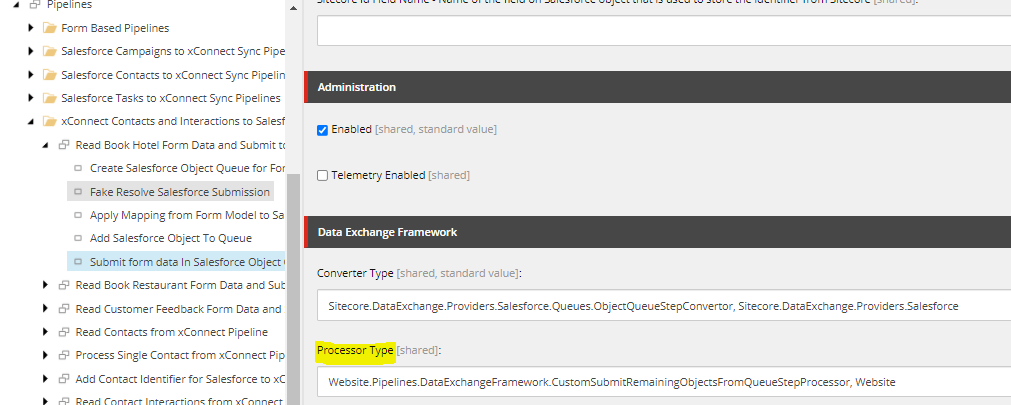
And then, on the pipeline step of concern, point to the custom processor instead of OOTB one. Something like below:
Swap processor type to custom one created on the solution
I was not confident it would work, but, tried my luck and performance was much better afterward. It was averaging between 3 to 6 seconds and later submissions were even quicker. This is a huge improvement from where things were, so, I am one completely happy person after pushing this fix live. 🙂
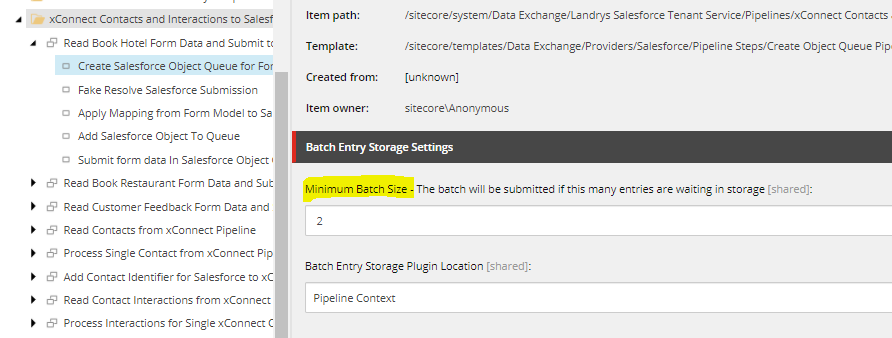
Do note that for this pipeline to fire, on first pipeline step based on template below, ensure the Minimum batch size is set higher than the current scenario. In our case, the queue size will be ‘1’ always because we are firing the pipeline on single submission. In my case, as screenshot shows below, I set that to ‘2’. Only then our custom processor will run, if you are curious decompile the code to see why I said this.
Showing minimum batch size recommended for form submission use case. Value dependent on your scenario.
Now, I can relax and enjoy the successful launch! Also, I can recommend Tenant Service and CRM Connector with more confidence to scenarios that need them.
If you have not reviewed my other blogs on re-inventing the Salesforce CRM connector, I encourage you to give them a read before you jump deep in to this one. It will give an idea as to why we landed at this very solution to achieve our goals and satisfy the requirements. Below are the links to the blog posts for reference –
Now, let us continue where we left off. I really wanted Tenant Service to work since it is a win-win for us. Firstly, we do not have to store all form submission information on Sitecore Contact card. We should strive to keep only useful and personalizable information on xConnect Contact card to keep xDB clean. Secondly, it would be a scalable solution. Let’s say if a new form is added to the website and the information entered need to make it to Salesforce on submission, it does not dev involvement. All it would need is a new Tenant pipeline and bunch of new value accessors for form and Salesforce. Isn’t this much more elegant than extending a custom update contact action every single time a new form is added? An absolute Yes!
Let us see how we made it happen. Do note that the set up is tedious, but, also note that this is one time thing. Once the set up is complete, all you would need is do maintenance by dropping/deploying latest binaries if you have some custom code in action. Alright here we go –
Installation and Setup
There is some good starter documentation out there that will get you started with Tenant Service, DEF and form submit action to fire the tenant service pipeline. Give that a read here.
Our case is more complicated than that, we need to fire a pipeline that would take that form context and submit that information to Salesforce instead, so, it would need bunch of other steps. Below is what was needed on our Sitecore Managed Cloud environment to give you an idea.
A new web app created on Azure environment – Configuration depends on your needs and traffic. On our end, we decided it was a smart idea to match configuration of new web app to other web app’s on the environment such as CM/CD for instance. Once web app is ready, manually deploy the files. You can follow Manual deployment instructions noted on ‘Installation guide for Data Exchange Tenant Web Service’ document here. Another important thing to note here is to add ‘WEBSITE_LOAD_USER_PROFILE’ in Application Settings on web app created and set the value to ‘1’. If you do not do this you will get errors on Tenant Service that suggest data protection was unsuccessful.
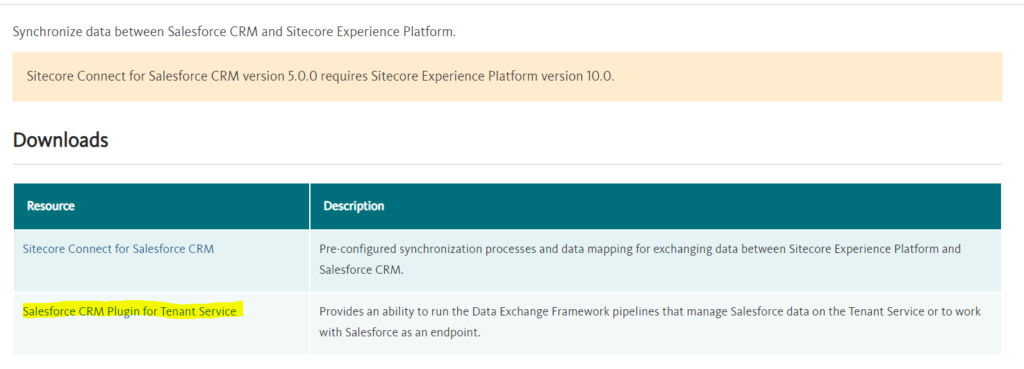
Also drop Tenant Service plugin for CRM Connector on Tenant service root location. Install package for ‘Salesforce CRM Plugin for Tenant Service’ from here and extract files and drop them in your tenant service root folder. Note, it is also required to drop Salesforce.Common and Salesforce.Force dll’s on to your Tenant Service root folder. With out this, you will see some errors when Tenant pipeline runs.
Configure your connection string properly on Tenant Service web application to ensure it can talk to CM server properly.
Ensure DEF and Salesforce CRM Connector both are installed and configured on CM server and CD server of the environment. The instructions should already be documented in corresponding downloads section for Data Exchange Framework and CRM Connector. Also, enable CM to talk to Tenant Service web application created in above steps. It is done via changing Sitecore.Services.Client.config setting ‘Sitecore.Services.SecurityPolicy’ to ‘Sitecore.Services.Infrastructure.Web.Http.Security.ServicesOnPolicy,Sitecore.Services.Infrastructure’.
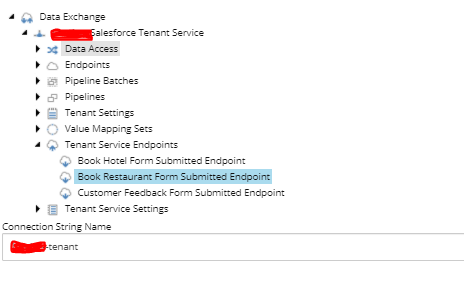
Finally for tenant service communication and SF activation ensure you have connection strings added to both CM and CD servers. Note down the connection string name for tenant service. Publish all core Sitecore nodes and restart all web app’s that have been touched on steps above.
Ensure Tenant Service and CM can communicate well by going to {TenantservicewebappURL}/api/Tenant – If all is well, you should see all tenant service end points under main DEF tenant and if they are enabled
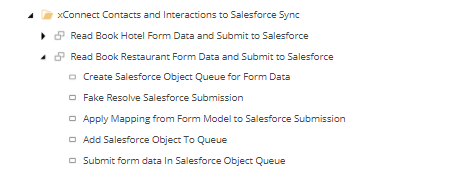
Lastly ensure your form submit actions fires appropriate Tenant Service pipeline which internally has a step to submit the same to Salesforce. Use your connection string name copied on setting in the action. Your pipeline would look something similar to the screenshot below. Most of the pipeline steps are re-used/borrowed from out of the box CRM connector pipeline. All I had to do was to ensure queue settings and objects loaded are correct. Plus create all value accessors and mapping sets needed to ensure I map form data to correct object definition on Salesforce. All of this steps are already noted in my previous blog here
Pipeline that is triggered on form submissionForm submit action to trigger Tenant Service end point
Note: As of this writing and the version of Tenant Service used, there was a bug that was preventing me to select certain field types on Form Value Accessors. I had to edit this item on Sitecore to include the field types that were missing – /sitecore/system/Settings/Validation Rules/Field Rules/Data Exchange Framework/Forms/Required Valid Form Field
If all goes well, you should now see form submission data on Salesforce as intended object. You might not get everything right on first go, so, to debug what is cooking you can go to Tenant Service root folder and check logs up there. You may have to check CD logs as well sometimes if Tenant Service logs are not showing anything useful.
All in all, Tenant Service is a great way to push information to third parties and scalability with zero code needed to do everything I just talked about is just super amazing. It will leave your Marketing team happy for sure. Only issue I found in this is performance impact due to all the processing happening on Form Submission, so, if you or your team is concerned about adding additional overhead/time to process form submissions, then, I recommend looking in to storing the information else where or on Contact. Form Submit Action responsible for triggering Tenant Service currently waits for the processing to complete before continuing with next form submit action step and redirecting the user to thank you page.
There are ways to convert some of this pipeline steps to be asynchronous by making custom processors using Tasks per Sitecore support, but, I have not tried it just yet. May be a post for later when I can get to that.
Hello! If you have not read my first post in regards to challenging new proof of concept we did in order to confirm if we can use Sitecore CRM connector given our requirements, please give that a read here. In this blog post, I will cover first two goals I had on mind to test the waters and see if connector can be leveraged or if we need to switch our game plan. Short answer is, Yes, I was successful and though we had few gaps that needs addressing if we roll forward, it felt doable given the initial findings.
Let us look more deeper as to how I configured Sitecore CRM connector to be able to ship Contacts as custom Salesforce objects. In our case, they were custom Salesforce objects, but, the same steps could be applied to map Sitecore Contact information to any defined object on Salesforce. Below are the steps in order you would need to do in order to ship Sitecore Contacts to Salesforce as specific objects.
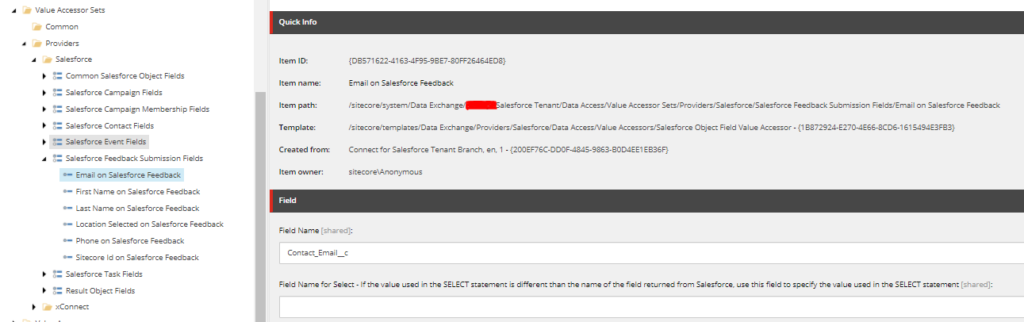
First things first, define value accessors for your Salesforce object and ensure to add proper API field name or any other settings that are needed for every field in question. See a quick screenshot that should help understand this step better
Screenshot depicting value accessors for custom object in Salesforce
Ensure you have value accessors on Sitecore Contact as well if say some custom facet model and properties were defined on your Sitecore Contact. This has been done many times in the past and I have blog posts covering this topic if you like to give that a read. Check out these posts.
Now that you know what data to read and what exactly it maps to both objects in question. Let us define the pipeline steps. It is always best to duplicate default one that comes OOTB when you install the CRM connector. It would be this one in the path below, duplicate and call it your own. /sitecore/system/Data Exchange/Landrys Salesforce Tenant/Pipelines/xConnect Contacts and Interactions to Salesforce Sync
Alright, now below specific steps would need some edits to accomplish what we are after.
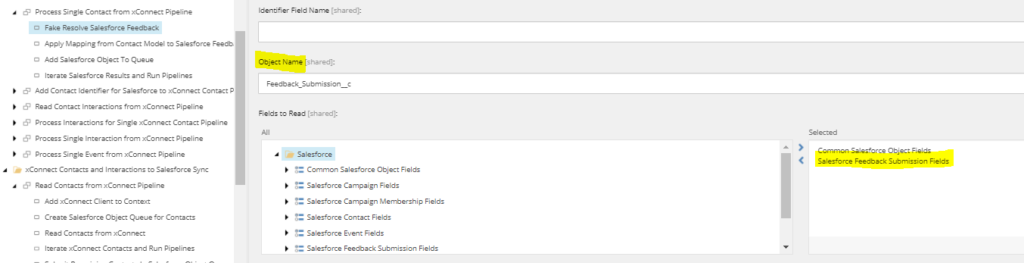
Go to your duplicated pipeline step called ‘Fake Resolve Salesforce Contact’ which should be inside pipeline ‘Process Single Contact from xConnect pipeline. Ensure to give proper name for object and pick your shiny new value accessors defined for Salesforce object. It would look something like below.
depicts pipeline change to read new object fields and object name should be API name for the object of concern in Salesforce.
Create new value mapping set that connects which field from Sitecore Contact should map to which field on Salesforce custom object. Once you have that sorted ensure the step called ‘Apply Mapping from Contact Model to Salesforce Feedback” inside of ‘Process Single Contact from xConnect Pipleline’ has the correct mapping set picked.
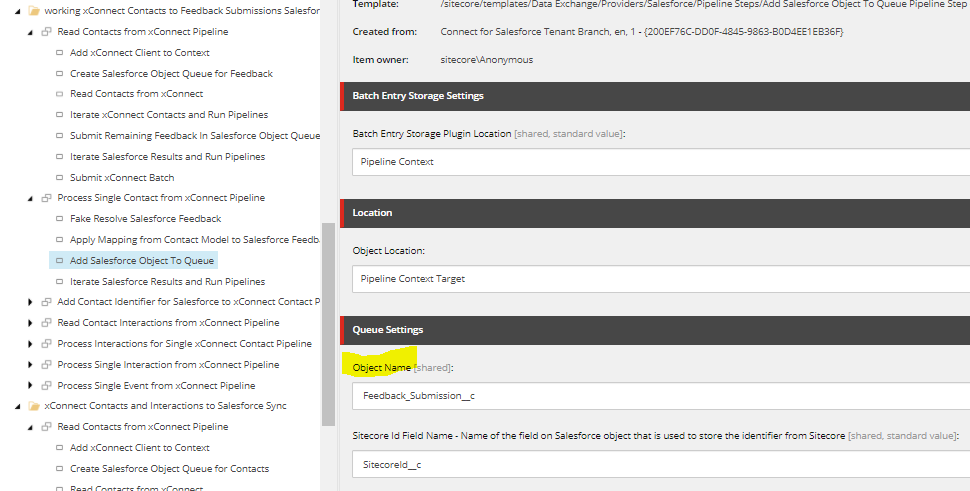
Now, go to pipeline step ‘Add Salesforce Object to Queue Pipeline Step’ and ensure ObjectName is correctly noted on Queue Settings. You may decide to leave this as default, but, it is better to always have different queue names to resonate what truly is present on the queue. It should then look like below.
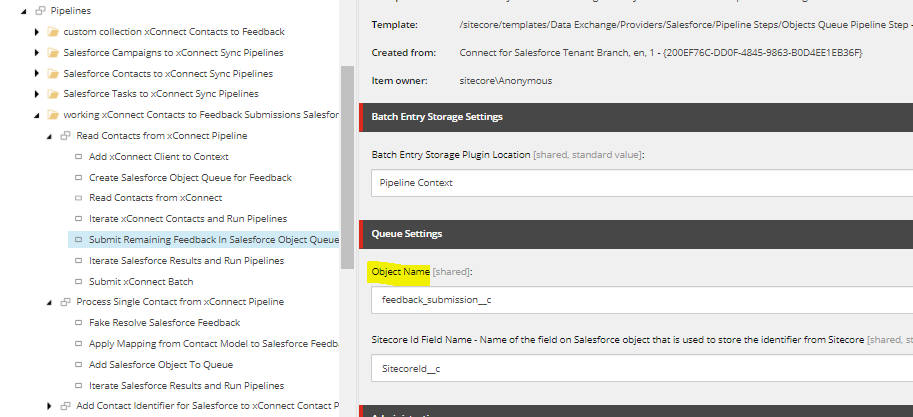
Last, but, important. If you do not do this, only batch size defined number of contacts will be shipped to Salesforce due to bug as of this writing on latest version of Connector. Note the case, it should be completely lower case on highlighted. Go to pipeline step ‘Submit Remaining Contacts In Salesforce Object Queue’ inside of pipeline ‘Read Contacts from xConnect Pipeline’ and ensure ‘Object Name’ field has right settings.
Depicts object name in lower case to avoid missing contacts on Salesforce
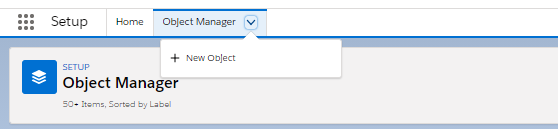
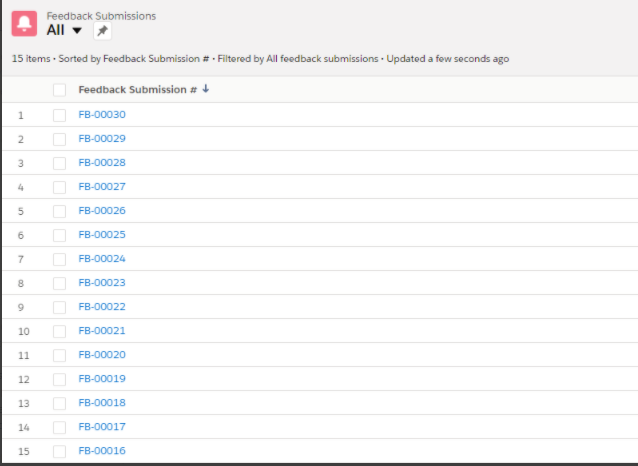
And that is pretty much it, if all goes well if you go to a tab that displays custom objects on Salesforce, you should now see created objects of type you wish for on Salesforce.
screenshot depicting custom objects created
Now, if you have custom facets and fields that would need mapping, it is super important to ensure to load corresponding facets on step ‘Read Contacts from xConnect’ step inside ‘Read Contacts from xConnect Pipeline’
Depicts custom facet that is picked while loading xConnect Contact
Also, it is important to have your custom collection model loaded on end points if you have one. I think I covered some of this in my previous blogs as well. So, you can refresh those up here if needed.
So far so good, I see what I need on Salesforce, but, the solution of stowing away all that information on Custom Facets on xDB contact record seems like overkill and messy. In our case, our goal was to send every single form submission of a Contact on to Salesforce. To do this in the path suggested above which is mapping Sitecore Contact to Salesforce object, we have to store literally every single form submission information on xDB Contact record though doable seemed pointless. We do not see value in what we are storing as we may only personalize on latest form submission and rest of the data is waste of memory and could quickly grow our xDB indexes.
I am all about efficient solution and this did not seem like one. Something caught my eye on Sitecore downloads link -> Tenant plugin for Sitecore CRM Connector.
What does Salesforce CRM plugin for Tenant Service do?
My mind started wondering, what if I can use the connector to push all the information user entered on forms using Connector, but, with out having to save all of it on Contact record. That would be amazing, right?
In my next blog post, I will talk about how far we got on using Tenant plugin and DEF framework submit action to actually do what we had on mind to align with win win solution.
Almost an year ago, I embarked on a journey to explore Sitecore Connect to Salesforce CRM connector. Almost instantaneously, in my first week, one of the initial questions I had was , can I map Sitecore Contacts to some other objects in Salesforce, such as Leads, for example? Upon researching, I figured there is no OOTB way to map to something else other than Salesforce Contact. Back then, the client was okay for us to push Sitecore Contacts as Salesforce Contacts and have a special view in Salesforce to ensure Sitecore pushed Contacts are in their own special bubble inside of Salesforce Contacts, so, their end users on Salesforce view does not get cluttered with Sitecore Contacts. So, that door of if we can push Sitecore Contacts as different Salesforce objects was left unopened.
End of last year, same question came our way during discovery with another client and this time around the client’s data architecture was much more complicated and can not abide to simple workarounds, they wanted us to be able to ship form submission data as custom object/s to Salesforce. This though doable in theory was never tried or never really documented as a use case in Sitecore world. So, the only way to prove the theory is to actually, well, to do it.
We convinced the client to allow us to roll with POC and my gut was I could pull this off based on all the learning I did so far on the connector. Check out my experience with Sitecore connect with Salesforce CRM blogseries and my VDD session on the same.
I was happy and nervous to take up this challenge couple weeks ago. I know there is actually nothing out there that can help me once I go in that path, so, though it was exciting that I will be the potential first one doing this on record, but, at the same time, I could not stop thinking of all the walls that would come by way. 🙂
In coming blogs, I will share the experience with you all what my strategy was, what problems I solved, milestones, happy moments and couple bugs I excavated while I was at it. Let’s get started, to begin with, on such type of projects, I like to jot down my thoughts and an outline that will help me stay focused, but, also helps to look back on steps if need be. It is always proven to be my best friend, staying organized.
Here are the goals for POC I had on my mind –
Prove that Sitecore Connect for Salesforce CRM can ship Sitecore Contact Information as a Custom object/s on Salesforce.
Configure Connector to map Custom Facets on Sitecore Contact and send those Custom Facets as Custom objects to Salesforce. Meaning, no longer Contact to Contact mapping on two systems, it would be completely custom.
Explore ‘Salesforce CRM Plugin for Tenant Service’ option noted on Download section here and see what it has to offer. There was not much documentation on this one, so, it is a bit of suspense, but, again my sixth sense was hinting me that it might prove to be useful.
I got these goals jotted in my document and in my heart and kept moving through milestones. As I passed through every single milestone, I got more and more excited to reach to the end of POC. I will take you through how I achieved each of these goals and hopefully it will help you achieve something similar in future.


