I took my first steps back in February this year with a mission to connect two amazing systems together – Sitecore and Salesforce. Little did I know back then that I will learn so much, get to break so many walls and reach the final(for now) data destination we had on our mind. It was a fun ride! Not only did I learn about the Sitecore Connect for Salesforce CRM and the scope of what we can do with it, but, also learned a ton of other things with Sitecore xConnect, Analytics, xDB SOLR indexes, custom contact facets, Sitecore Forms, Custom collections and models, Salesforce leads, objects and fields in Salesforce, Data Exchange Framework, custom readers and converters, pipeline batches and scheduled tasks. I mean I can go on and on and on. It was awesome and yet quite painful when things would not work. But, hey, I am here writing this last post on this series that covered how and why I did what I did. I made every effort to reference the blogs/links that inspired and helped me solve a problem on hand. But, I also managed to figure some kinks myself and I documented those to potentially help some one else who is amidst of implementing their data journey between the two systems.
Below are links to all of my blog posts that are part of this series. Hoping this would help any one facing similar challenges or potentially kicked off their journey stitching the two most powerful platforms out there – Sitecore and Salesforce.
I was also able to connect with Salesforce Marketing Cloud and do some extensions up there as well. I will talk about that side of things in my next blog post. Until then, take it easy. 🙂
We managed to ship the whole deal of data flow noted so far in my blog posts related to this journey. When you deploy a new system, the journey does not end so soon. Even if you did your best while implementing, testing and deploying, their could still be unknowns which we will need to keep an eye for and solve to ensure the data continues to flow smoothly between the systems. We had couple of such issues that we needed to battle. Gist of problems and corresponding solutions below:
Problem – ‘Contacts stopped syncing to Salesforce’: One not so fine day, the connector broke and contacts did not sync to Salesforce.
Debugging & Solution – This needed a lot of debugging as logs were not helpful. Below is the message on pipeline batch log that is responsible to sync contacts from Sitecore to Salesforce. Lets look at the error
ManagedPoolThread #4 20:05:04 DEBUG [Data Exchange] at System.Threading.Tasks.Task`1.GetResultCore(Boolean waitCompletionNotification)
at Sitecore.DataExchange.Providers.Salesforce.Queues.BaseSubmitQueuePipelineProcessor.SubmitBatch(PipelineStep pipelineStep, PipelineContext pipelineContext, OperationType operationType, List`1 inputList, ILogger logger)
ManagedPoolThread #4 20:05:04 ERROR [Data Exchange] InvalidBatch
ManagedPoolThread #4 20:05:04 DEBUG [Data Exchange] at Salesforce.Common.XmlHttpClient.<HttpGetAsync>d__4`1.MoveNext()
--- End of stack trace from previous location where exception was thrown ---
at System.Runtime.ExceptionServices.ExceptionDispatchInfo.Throw()
at System.Runtime.CompilerServices.TaskAwaiter.HandleNonSuccessAndDebuggerNotification(Task task)
at System.Runtime.CompilerServices.TaskAwaiter`1.GetResult()
at Salesforce.Common.XmlHttpClient.<HttpGetAsync>d__0`1.MoveNext()
--- End of stack trace from previous location where exception was thrown ---
at System.Runtime.ExceptionServices.ExceptionDispatchInfo.Throw()
at System.Runtime.CompilerServices.TaskAwaiter.HandleNonSuccessAndDebuggerNotification(Task task)
at System.Runtime.CompilerServices.ConfiguredTaskAwaitable`1.ConfiguredTaskAwaiter.GetResult()
at Salesforce.Force.ForceClient.<GetBatchResultAsync>d__52.MoveNext()
--- End of stack trace from previous location where exception was thrown ---
at System.Runtime.ExceptionServices.ExceptionDispatchInfo.Throw()
at System.Runtime.CompilerServices.TaskAwaiter.HandleNonSuccessAndDebuggerNotification(Task task)
at System.Runtime.CompilerServices.TaskAwaiter`1.GetResult()
at Salesforce.Force.ForceClient.<GetBatchResultAsync>d__4f.MoveNext()
--- End of stack trace from previous location where exception was thrown ---
at System.Runtime.ExceptionServices.ExceptionDispatchInfo.Throw()
at System.Runtime.CompilerServices.TaskAwaiter.HandleNonSuccessAndDebuggerNotification(Task task)
at System.Runtime.CompilerServices.TaskAwaiter`1.GetResult()
at Salesforce.Force.ForceClient.<RunJobAndPollAsync>d__1e`1.MoveNext()
First look at error, Second look at error, I mean looked at it for like two hundred times, I have no clue why it would break. Log entries were not helpful at all in this case. Since all was well couple days ago, it gives a subtle hint that it could be data. I made reports from Experience Analytics and exported all the data in to excel from the day contact syncing had stopped and started looking for anything offbeat. I found the below two entries with few special characters, I had a hunch that that might be causing issues with pipeline batch. I removed the specific field that had special characters from value mappings and ran the pipeline again and boom, the contacts started syncing back again. Also, identified the special character that the process had problem with is ‘&’.
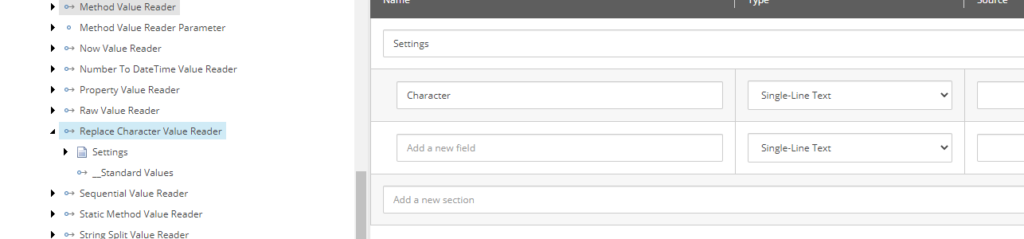
Now, we can not remove the mapping permanently, we need to find a solution to avoid this situation on any other field mappings and data collected on xConnect contact in general. To do this, we need a new reader and converter that do exactly what you are guessing – replace our bad character with space. We would also need a template to make this happen. Below are key components needed for this solution:
Template that has place to enter the character and points to custom reader defined on code.
New Template for reader that accepts character of concernStandard Values of new template which has default character and Converter type that points to custom namespace where model resides and dll corresponding to the same
Next is to actually define the Converter and Reader. I included the code for both below
using Sitecore.DataExchange.DataAccess;
using Sitecore.DependencyInjection;
using Sitecore.Marketing.Definitions;
using Sitecore.XConnect;
using System;
using System.Globalization;

namespace yournamespace
{
    public class ReplaceCharacterValueReader : IValueReader
    {

        public string SpecialCharacter { get; protected set; }

        public ReplaceCharacterValueReader(string character)
        {
            if (string.IsNullOrEmpty(character))
                throw new ArgumentOutOfRangeException(nameof(character), (object)character, "Empty Character");
            this.SpecialCharacter = character;
        }

        public virtual ReadResult Read(object source, DataAccessContext context)
        {
            if (!(source is string str))
                return ReadResult.NegativeResult(DateTime.Now);
            return string.IsNullOrWhiteSpace(str) || !str.Contains(SpecialCharacter) ? ReadResult.PositiveResult(source, DateTime.Now) : ReadResult.PositiveResult((object)str.Replace(SpecialCharacter,string.Empty), DateTime.Now);
        }
    }
}
using Sitecore.DataExchange;
using Sitecore.DataExchange.Attributes;
using Sitecore.DataExchange.Converters;
using Sitecore.DataExchange.DataAccess;
using Sitecore.DataExchange.Repositories;
using Sitecore.Services.Core.Model;

namespace yournamespace
{
    [SupportedIds(new string[] { "{7ABD90E0-5FC4-4547-8962-C0094F8A7CF7}" })]
    public class ReplaceCharacterValueReaderConverter : BaseItemModelConverter<IValueReader>
    {

        public const string FieldNameCharacter = "Character";

        public ReplaceCharacterValueReaderConverter(IItemModelRepository repository)
          : base(repository)
        {
        }

        protected override ConvertResult<IValueReader> ConvertSupportedItem(
          ItemModel source)
        {
            return this.PositiveResult((IValueReader)new ReplaceCharacterValueReader(this.GetStringValue(source, FieldNameCharacter)));
        }
    }
    }
Last piece to the puzzle is to actually use a reader created based on template above as source value transformer on value mappings which could potentially have this special character or where applicable. In our case ‘Title’ field could definitely lead to this character. So, we ensured we plugged above in for this value mapping for sure.
Source Value Transformer injected on mapping of concern
That is it, we finally do not have to worry about this pesky little character stopping the data flow.
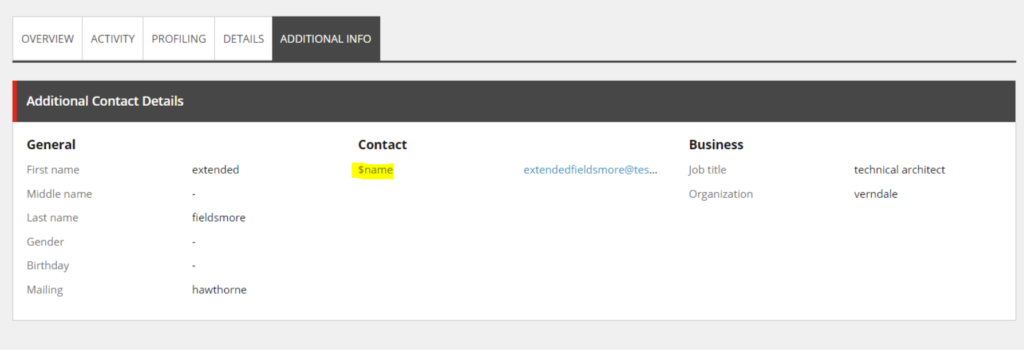
Problem: I noticed an issue on Experience Profile where on contacts instead of seeing ‘Preferred’ on Contact Email address, it started showing $name. Like below:
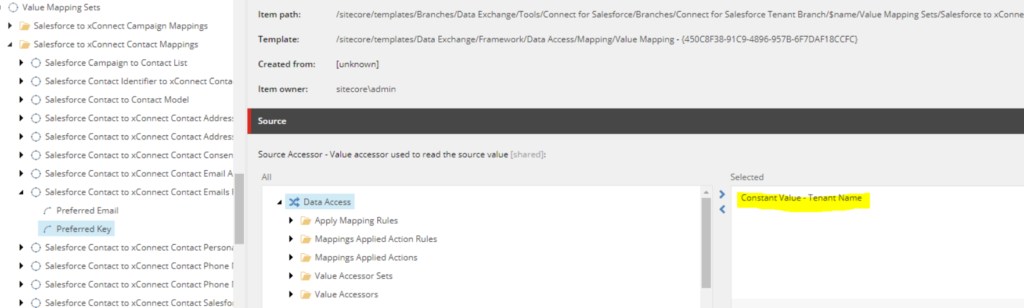
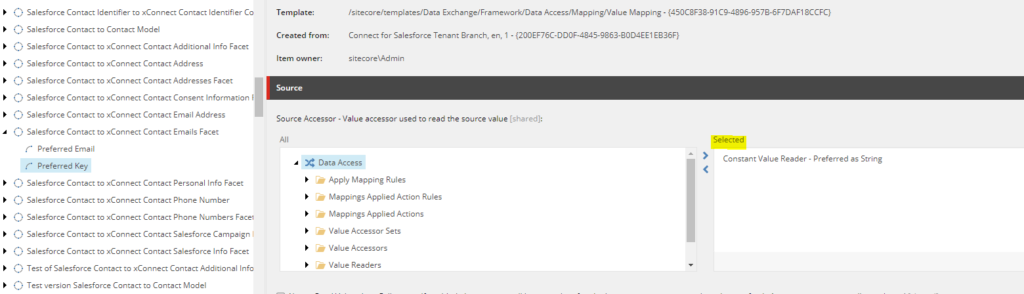
Debugging and Solution: It was important in this case to understand when does the issue happen. Does it happen when we submit a form and load xConnect contact information? or does it happen later when sync job runs. In our case, it was happening when pipeline batch that is responsible to sync data from Salesforce to Sitecore runs. Now that we know this, we have to investigate value mappings and value accessors responsible for this. Upon investigating in that path, below is what I see set on this item /sitecore/system/Data Exchange/my tenant/Value Mapping Sets/Salesforce to xConnect Contact Mappings/Salesforce Contact to xConnect Contact Emails Facet/Preferred Key. This definitely did not seem right, see screenshot below:
Incorrect mapping on Preferred Key
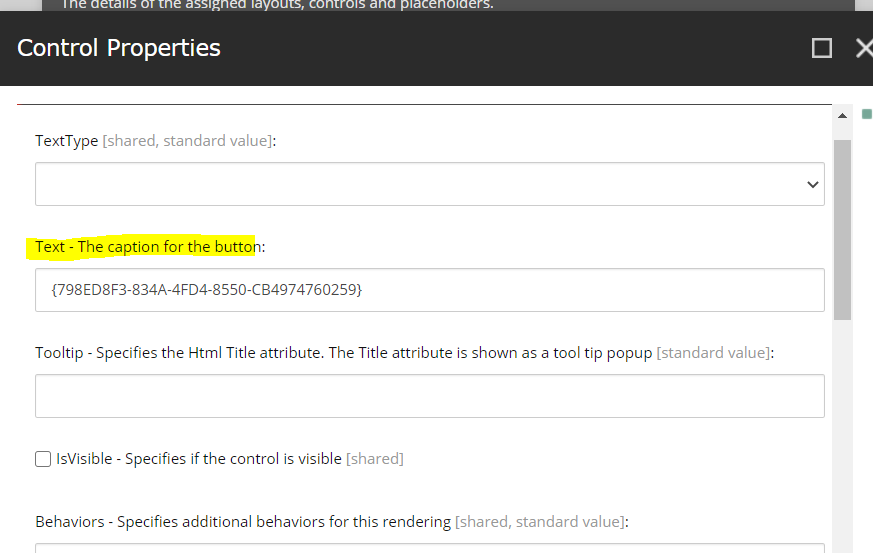
Swapped the above with a new reader created which will constantly return a string called ‘Preferred’ which is what we need. This did the trick and we did not see the ‘$name’ issue any more.
Swapped with new constant value reader that will always return string prefferred
In my last blog, we talked about how we could extend xConnect contact facet with additional information and add details to it when a user submits a form for instance. We can check to ensure the data is saved properly by running few quick SQL commands like below.
SELECT TOP (1000) [ContactId]
      ,[FacetKey]
      ,[LastModified]
      ,[ConcurrencyToken]
      ,[FacetData]
  FROM [notimpossible_Xdb.Collection.Shard0].[xdb_collection].[ContactFacets]
  where FacetKey ='SalesforceAccount'
You should see a string in FacetData similar to below. It should match definition of custom facet that was deployed. In my case, it looked like:
Though through above you can check to see if the information you would like is being stored on contact. But, a more elegant way would be to actually see it on a special tab on Experience profile. There are couple blogs out there that can help you with this especially if the goal is to use Speak. But, if you do not care about using Speak, do check out this one. In my case, I wanted to stick with Speak to see how far I could go with this. It was quite a number of steps, but, a combination of resources and special steps helped me get there.
References that helped me:
https://www.konabos.com/blog/extending-sitecore-experience-profile-in-sitecore-9 -> This helped me get started and keep moving in right path till I reached this below. The link noted in there was a lot of information to digest and understand how to proceed next. I wish that area was expounded probably on another blog post. It would have probably helped me knock this down continuing in the same path.
Step where I stumbled and did not know how to proceed
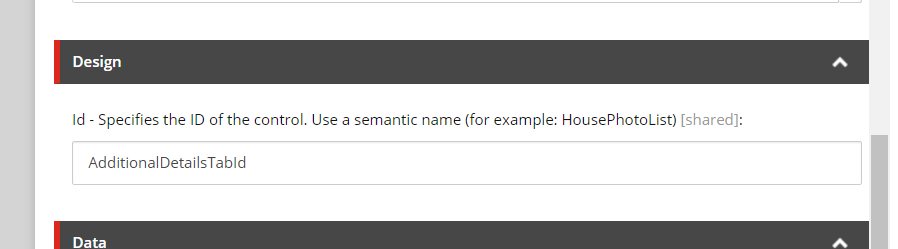
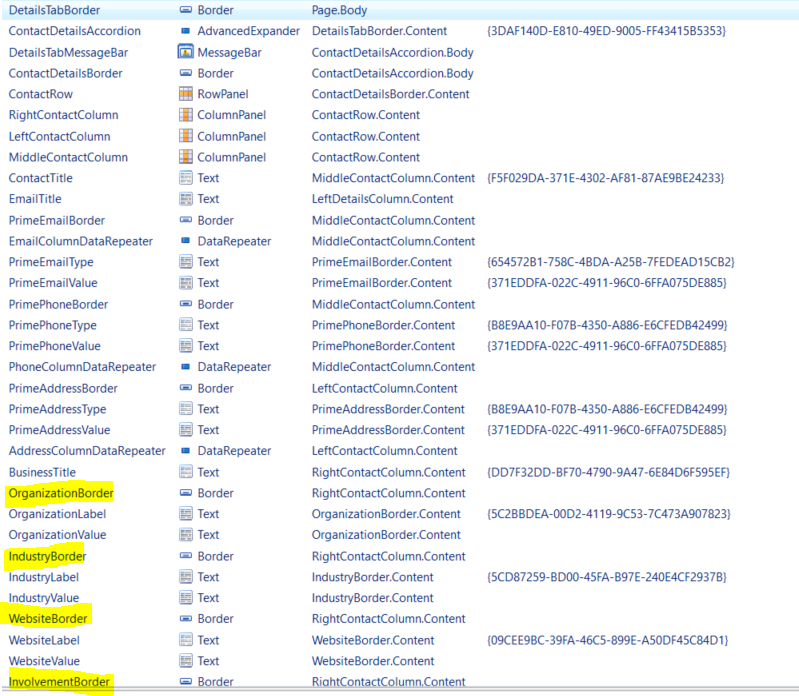
Step #4 on this blog gave me an idea to duplicate the tab and adjust presentation using Sitecore rocks as needed instead of creating brand new items and scramble what should be added to presentation. One gap in this blog which was not mentioned is – when you duplicate the Tab Item, ensure you change references in presentation on new tab item to point to appropriate internal items within the new tab item. For example, below needed to be swapped to ensure I do not break existing details tab and to ensure I show values that I would need to show on my new tab.
Change the above highlighted to self reference the newly created TabChange ID here to new TabID. If you leave it to old one, your existing details tab could potentially not work. 🙂On LoadOnDemandPanel, ensure the itemid matches the ID of DetailsPanel under newly created tab. This should be swapped using Sitecore Rocks. Change Target Control ID as well to ID of Border given on presentation.
Remember to change ID’s on all presentation components on Tab item. This is to ensure no overlap with existing Details Tab item. If I did not do above, my original details tab was broken and was not working.
Now that we finished changing presentation of main Tab item, lets move to Details Panel Item which is also based on Tab Template -‘/sitecore/client/Business Component Library/version 1/Templates/Common/Tab’. Open this item up on Sitecore rocks and play with presentation to update/inject new items. Also, ensure to add new datasource items and swap existing references to newly created items under details panel. Finally, my presentation looked like below.
Highlighted ones are actually new additional fields that I would like to show on my Additional Information Tab on Experience Profile.
Do not forget to add new label data sources needed. I took inspiration as to where the existing ones are and dropped my news ones in the path below: ‘/sitecore/client/Applications/ExperienceProfile/Common/System/Texts’
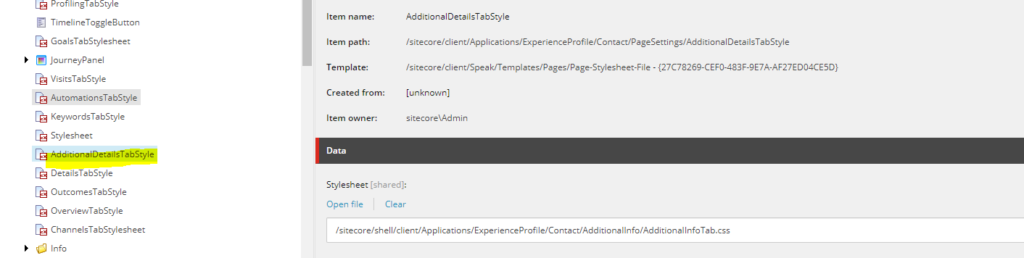
I added additional css needed for this tab by adding a new style sheet item as shown below
Additional css needed for this tab and new elements
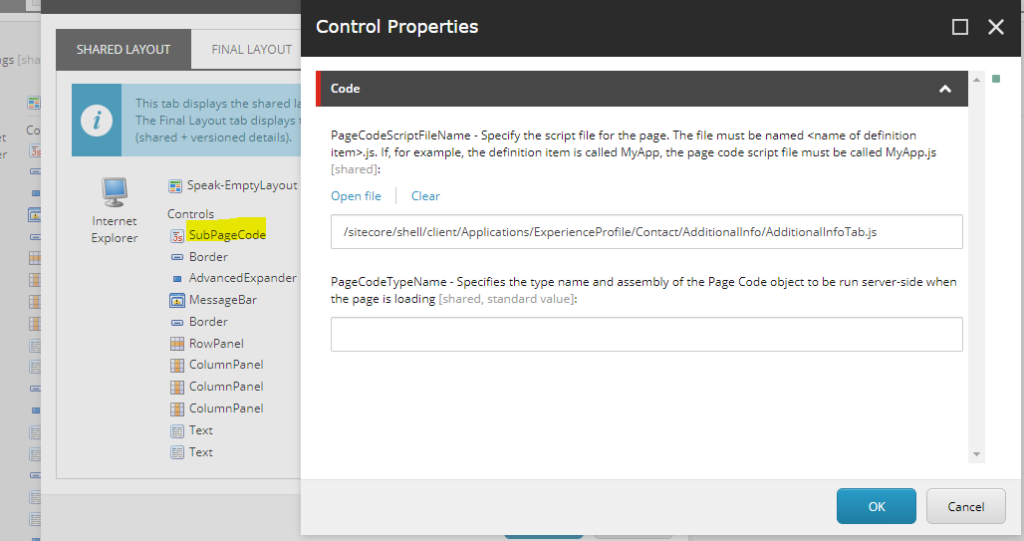
Finally, last step is to hone our js that is needed to make the right calls and read/display from JSON data. To configure which JS to use, edit the Subcode presentation component’s details.
Add file path to shiny new JS
//Here is JS Code for my new tab
define(["sitecore", "/-/speak/v1/experienceprofile/DataProviderHelper.js", "/-/speak/v1/experienceprofile/CintelUtl.js"], function (sc, providerHelper, cintelUtil) {
    var intelPath = "/intel",
        dataSetProperty = "dataSet";

    var cidParam = "cid";
    var intelPath = "/intel";
    var getTypeValue = function (preffered, all) {
        if (preffered.Key) {
            return { Key: preffered.Key, Value: preffered.Value };
        } else if (all.length > 0) {
            return { Key: all[0].Key, Value: all[0].Value };
        }

        return null;
    };

    var app = sc.Definitions.App.extend({
        initialized: function () {
            var transformers = $.map(
                [
                    "default"
                ], function (tableName) {
                    return { urlKey: intelPath + "/" + tableName + "?", headerValue: tableName };
                });

            providerHelper.setupHeaders(transformers);
            providerHelper.addDefaultTransformerKey();
            this.setupContactDetail();
            this.setupContactAdditionalDetails();

        },

        setEmail: function (textControl, email) {
            if (email && email.indexOf("@") > -1) {
                cintelUtil.setText(textControl, "", true);
                textControl.viewModel.$el.html('<a href="mailto:' + email + '">' + email + '</a>');
            } else {
                cintelUtil.setText(textControl, email, true);
            }
        },

        setupContactAdditionalDetails: function () {
            var contactId = cintelUtil.getQueryParam(cidParam);
            var tableName = "additionalcontactinfo";
            var baseUrl = "/sitecore/api/ao/v1/contacts/" + contactId + "/intel/" + tableName;

            providerHelper.initProvider(this.ContactDetailsDataProvider,
                tableName,
                baseUrl,
                this.DetailsTabMessageBar);

            providerHelper.getData(this.ContactDetailsDataProvider,
                $.proxy(function (jsonData) {
                    if (jsonData.data.dataSet != null && jsonData.data.dataSet.additionalcontactinfo.length > 0) {
                        // Data present set value content
                        var dataSet = jsonData.data.dataSet.additionalcontactinfo[0];
                        cintelUtil.setText(this.OrganizationValue, dataSet.Organization, false);
                        cintelUtil.setText(this.IndustryValue, dataSet.Industry, false);
                        cintelUtil.setText(this.WebsiteValue, dataSet.Website, false);
                        cintelUtil.setText(this.InvolvementValue, dataSet.Involvement, false);
                        cintelUtil.setText(this.SelectedCityValue, dataSet.SelectedCity, false);
                        cintelUtil.setText(this.ProposedCityValue, dataSet.ProposedCity, false);
                        cintelUtil.setText(this.AdditionalDetailsValue, dataSet.AdditionalDetails, false);
                    }
                }, this));
        },


        setupContactDetail: function () {
            var getFullAddress = function (data) {
                var addressParts = [
                    data.streetLine1,
                    data.streetLine2,
                    data.streetLine3,
                    data.streetLine4,
                    data.city,
                    data.country,
                    data.postalCode
                ];

                addressParts = $.map(addressParts, function (val) { return val ? val : null; });
                return addressParts.join(", ");
            };

            providerHelper.initProvider(this.ContactDetailsDataProvider, "", sc.Contact.baseUrl, this.DetailsTabMessageBar);
            providerHelper.getData(
                this.ContactDetailsDataProvider,
                $.proxy(function (jsonData) {
                    this.ContactDetailsDataProvider.set(dataSetProperty, jsonData);
                    var dataSet = this.ContactDetailsDataProvider.get(dataSetProperty);
                    var email = getTypeValue(jsonData.preferredEmailAddress, dataSet.emailAddresses);
                    if (jsonData.emailAddresses.length === 0 && email != null)
                        jsonData.emailAddresses.push(email);

                    var phone = getTypeValue(jsonData.preferredPhoneNumber, dataSet.phoneNumbers);
                    if (jsonData.phoneNumbers.length === 0 && phone != null)
                        jsonData.phoneNumbers.push(phone);

                    var address = getTypeValue(jsonData.preferredAddress, dataSet.addresses);
                    if (jsonData.addresses.length === 0 && address != null)
                        jsonData.addresses.push(address);

                    this.EmailColumnDataRepeater.viewModel.addData(jsonData.emailAddresses);
                    this.PhoneColumnDataRepeater.viewModel.addData(jsonData.phoneNumbers);
                    this.AddressColumnDataRepeater.viewModel.addData(jsonData.addresses);

                    cintelUtil.setText(this.FirstNameValue, jsonData.firstName, false);
                    cintelUtil.setText(this.MiddleNameValue, jsonData.middleName, false);
                    cintelUtil.setText(this.LastNameValue, jsonData.surName, false);

                    cintelUtil.setTitle(this.FirstNameValue, jsonData.firstName);
                    cintelUtil.setTitle(this.MiddleNameValue, jsonData.middleName);
                    cintelUtil.setTitle(this.LastNameValue, jsonData.surName);

                    cintelUtil.setText(this.TitleValue, jsonData.jobTitle, false);

                    cintelUtil.setText(this.GenderValue, jsonData.gender, false);
                    cintelUtil.setText(this.BirthdayValue, jsonData.formattedBirthDate, false);

                    if (email) {
                        cintelUtil.setText(this.PrimeEmailType, email.Key, true);
                        this.setEmail(this.PrimeEmailValue, email.Value.SmtpAddress);
                        cintelUtil.setTitle(this.PrimeEmailValue, email.Value.SmtpAddress);
                    }

                    if (phone) {
                        cintelUtil.setText(this.PrimePhoneType, phone.Key, true);
                        cintelUtil.setText(this.PrimePhoneValue, cintelUtil.getFullTelephone(phone.Value), true);
                    }

                    if (address) {
                        cintelUtil.setText(this.PrimeAddressType, address.Key, true);
                        cintelUtil.setText(this.PrimeAddressValue, getFullAddress(address.Value), true);
                    }
                }, this)
            );

            this.EmailColumnDataRepeater.on("subAppLoaded", function (args) {
                cintelUtil.setText(args.app.Type, args.data.Key, true);
                this.setEmail(args.app.Value, args.data.Value.SmtpAddress);
                cintelUtil.setTitle(args.app.Value, args.data.Value.SmtpAddress);
            }, this);

            this.PhoneColumnDataRepeater.on("subAppLoaded", function (args) {
                cintelUtil.setText(args.app.Type, args.data.Key, true);
                cintelUtil.setText(args.app.Value, cintelUtil.getFullTelephone(args.data.Value), true);
            }, this);

            this.AddressColumnDataRepeater.on("subAppLoaded", function (args) {
                cintelUtil.setText(args.app.Type, args.data.Key, true);
                cintelUtil.setText(args.app.Value, getFullAddress(args.data.Value), true);
            }, this);
        }
    });
    return app;
});
Only difference in code between the above and out of the box details tab is the method this.setupContactAdditionalDetails(). This function is wired up to call newly configured end point with tablename ‘additionalcontactinfo’ This is essentially the specific name you have given in your configuration element noted below.
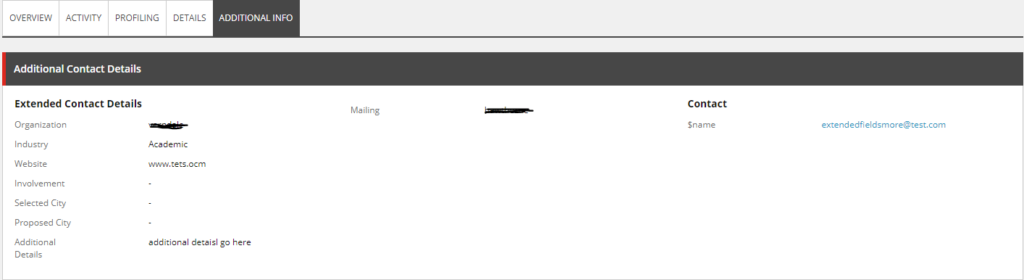
That is it, if all goes well and you did the configuration and steps mentioned above correctly you should see the new tab loaded with information you need.
New Tab showing all the additional information
That is it, now I don’t have to open SQL Manager or run a query to check and ensure the data is updated fine in Sitecore when form is submitted with all data or when Salesforce is updated and synced back to Sitecore. Happy and Productive!
Next up, few hiccups post live and how we solved it.
What would you do when basic foundation of what you would like to achieve is done and is done right? I happen to never get an opportunity to say thats it! There is always a next page, next step and moving on to next challenge. To be honest, I do not want it any other way, love to keep building next awesome things. 🙂
That is exactly what happened when I wrapped up the data flow that I noted on my post here. To continue on path to enhance and extend the data we had to look at variety of other information that we collect from end users on our forms. We want to ship this rich data back to Salesforce, I mean why not right? So, let’s see how we could do that.
Firstly, Sitecore has some awesome documentation around how you can get started to extend both Sitecore contact and Salesforce to accommodate your data needs. As always I will not repeat the information, but, will try to highlight the challenges that I had to resolve to make this happen. Also, fill in any gaps that are not covered in documentation here.
Abstract steps we need to do to get this rolling: 1. Add fields needed on Contact in Salesforce 2. Extend XConnect contact with new fields needed based on longer forms 3. Extend models on collection, follow steps noted here to extend facets on both XConnect and extend models of Salesforce on DEF: https://doc.sitecore.com/developers/salesforce-connect/21/sitecore-connect-for-salesforce-crm/en/walkthrough–creating-a-custom-contact-facet.html 4. Add additional mapping on forms, so, the back-end can retrieve values entered on form fields that are noted. 5. Ensure XConnect contact has the new info 6. Run pipelines needed. 7. Ensure salesforce has the new data 8. Backward flow of data from Salesforce to Sitecore on new facet fields
Few Gaps:
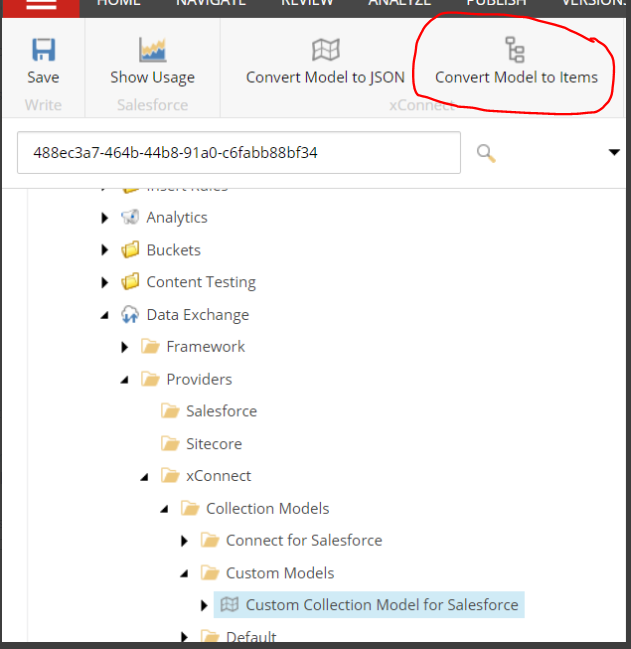
In Documentation, it does not call out that it is needed to click on the option available called ‘Convert Model in to Items’ after a custom model item is created and corresponding path to namespace and dll is set on field ‘Collection Model Type’. This is really important, if you do not do this stuff will simply not work. See screenshot for guidance.
Click on highlighted option to create items from model.
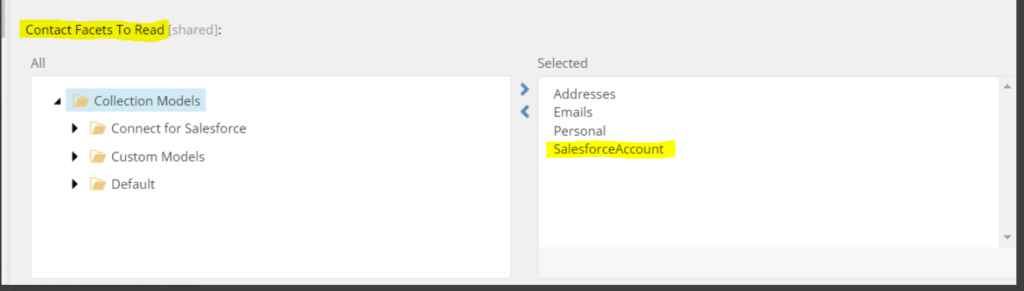
Ensure new custom facet is selected on Contact Facets under pipeline step: /sitecore/system/Data Exchange/yourtenant/Pipelines/xConnect Contacts and Interactions to Salesforce Sync/Custom Read Contacts from xConnect Pipeline/Read Contacts from xConnect
Pick facets to read, otherwise new mappings will not work
Also, note if you try to package your custom model located under /sitecore/system/Settings/Data Exchange/Providers/xConnect/Collection Models/Custom Models/ to upper environments, the mappings do not work. It has to be created from each environments and all references to these items should be changed/swapped as well. If you do not do this, the mappings might not work. It took me lot of back tracking to figure this out. It is painful to change references, but, most references to custom model specific items should be in here -> /sitecore/system/Data Exchange/your tenant/Data Access/Value Accessor Sets/Providers/xConnect/xConnect Contact Additional Information Facet OR which ever name you used to create item based on ‘xConnect Entity Facet Value Accessor Set’ while following instructions here
That is all! if you are lucky enough, new value mappings added to location -> /sitecore/system/Data Exchange/your tenant/Value Mapping Sets/xConnect Contact to Salesforce Contact Mappings/Contact Model to Salesforce Contact should work. Good luck!
Now, lets ensure we know what to do while ensuring the additional data can flow backwards as well which is from Salesforce to Sitecore. Most of the steps should be covered as part of link from Sitecore above. But, again few things below which need to be done to ensure this works.
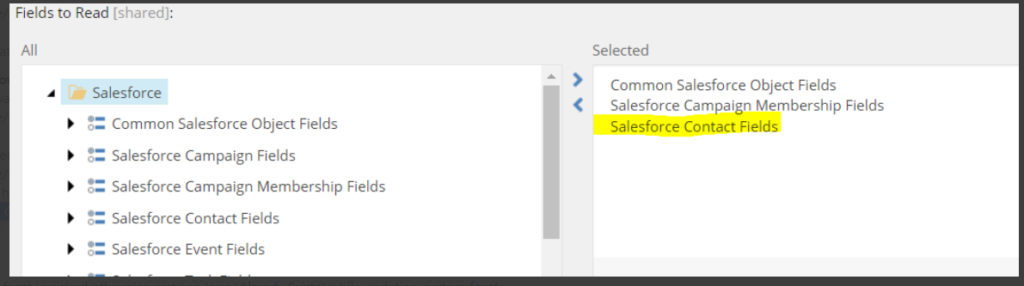
Ensure on pipeline step ‘Read Contacts From Salesforce’ below, its pointing to your tenant Salesforce Contact Fields. In my case, it was pointing to branch specific fields when I toggle the view to show raw fields.
Ensure it points to correct set of extended fields from your tenant
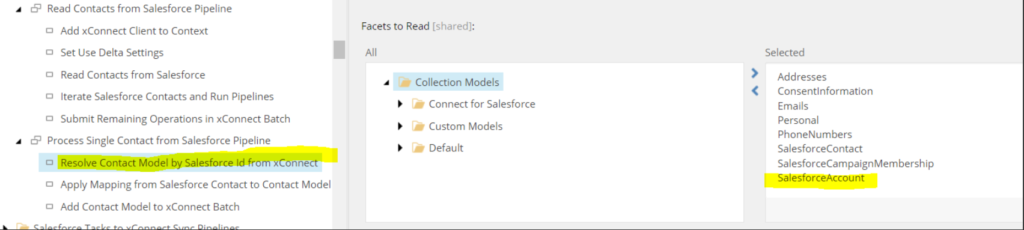
Ensure on below highlighted new custom facet is picked otherwise error on logs “Already Exists” while updating custom facet.
That is all! If all goes well, you should now the custom xConnect contact data back in Salesforce and vice versa. Now, what? Well, we can check to see if the data is updating properly on xConnect shard databases, but, why not show this additional values on Experience Profile for ease of use? Also, we had a hiccup on previous functionality that was shipped live, will see how we debugged and resolved the same. We will see how to do these in next set of blogs.
I literally jumped with enthusiasm when I got the connector working. I could now see my xConnect contacts back in Salesforce. What a joy to see the data flowing. I enjoyed the victory for almost a day and I know we had long way to go before we could ship this out live. So, I moved on to next set of challenges and tasks on hand. I am a hugely inclined towards algorithmic solving to any problem on hand. I truly believe in – If I know how to solve it, half of the problem is solved. 🙂
Below is what we were hoping to do with data flow:
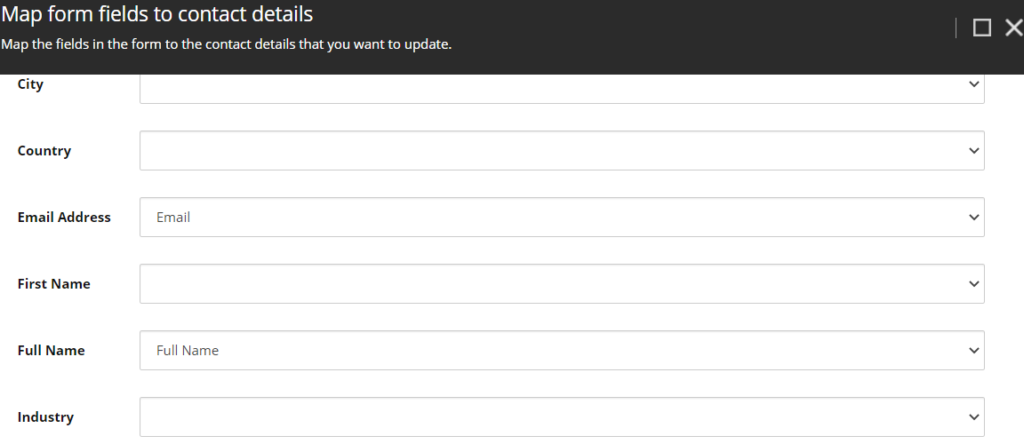
Sitecore Forms: On our Sitecore website, we had bunch of forms, all behind the scenes using Sitecore Forms. We were using custom submit action step to send an email to the end user who submitted the form. Now, we wanted to actually save contact in Sitecore when a form is submitted, To achieve this, I followed instructions noted here: https://doc.sitecore.com/developers/91/sitecore-experience-manager/en/walkthrough–creating-a-custom-submit-action-that-updates-contact-details.html Special Note: While you follow the steps on document above, especially while using Sitecore Rocks, ensure to remember that renderings you pick, they should all be speak 2, if you pick something of speak 1 version, it might not work Once you successfully complete this setup and apply mappings to form fields back in Form editor, if you are lucky, you will see your form submission data on Experience Profile.
Mappings on UpdateContact Submit action
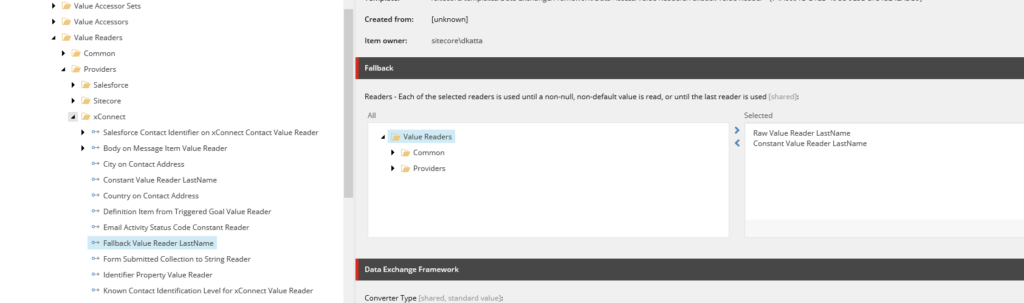
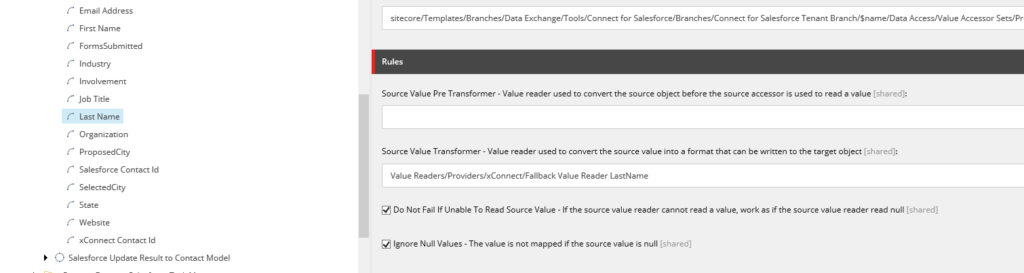
Implement fallback: Remember their could be fields that are not required from Sitecore or forms perspective, but, could be required from Salesforce perspective. One such field is Last Name in our case. To ensure we push these contacts out to Salesforce, we implemented a fall back reader and hooked this up on Value Mapping configuration.
Fall Back reader which will try reading the raw value and then will read constant value such as ‘unknown’ if raw value is emptyThen use the reader in source value transformer on value mapping corresponding to last name
At this point, it is important to ensure data can flow in either direction. From Sitecore to Salesforce via pipeline batch run ‘XConnect Contacts to Salesforce’ and from Salesforce to Sitecore via pipeline batch run ‘Salesforce Contacts to xConnect Sync’
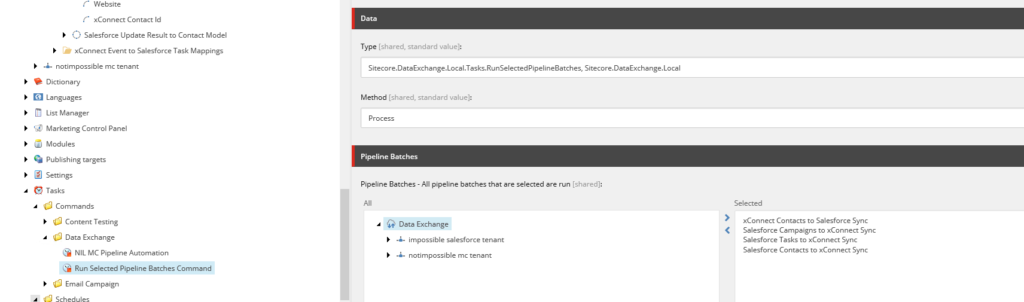
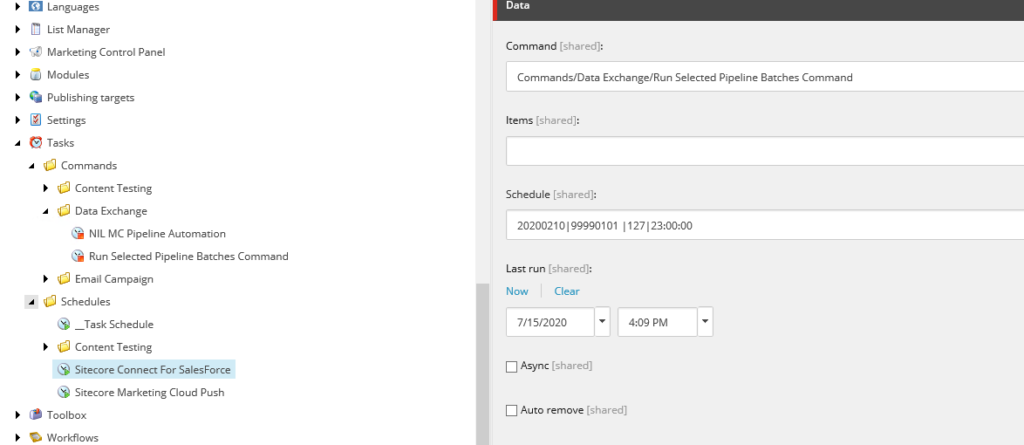
If all is well we should be ready to wire up scheduled job that will try to keep the two systems in sync as often as needed. More information here: https://doc.sitecore.com/developers/def/20/data-exchange-framework/en/scheduling-a-pipeline-batch.html
Create a new command based on ‘/sitecore/templates/Data Exchange/Framework/Tasks/Run Selected Pipeline Batches Command’Create a new schedule and make this run in interval as needed
Time to take this to level up. Lets send more information both to contact on Sitecore and back in Salesforce. To do this we must extend the Contact Facet and also figure out how we can map this additional information back to Salesforce. That would be my next blog.
This post is continuation to my last one in regards to first steps, you can check it out here. Now, that you made all the decisions, hopefully all the right ones, then, you would go to the immediate next step which is -“Get it installed and start pushing the data”. Sitecore as always tried their best to provide clear instructions. You will find basic instructions there, but, like always there are few gaps which you can only learn by actually doing it. 🙂
In this post, I will cover few gaps and how I worked around, figured it out and finally got the connector to work.
First and most important thing is you do not have to google to install the packages that are needed for the connector to work. Downloads section on official link of Sitecore Connect actually has all packages. When I was reviewing the installation guide, it lists all of the packages that need to installed and my quick instinct was to do a Google Search lol. I wish Sitecore just added a helpful hint of where to find them to make my life easy. 🙂 But, if you are doing this step, look no further than here
As we follow along the instructions on the guide, one important thing to call out for section 5.2 which is in regards to adding connection string for salesforce in sitecore instance. There is a note right at the bottom of this section and if you are like me may be you will skip right over it and that is why wanted to advise caution to not skip it. 🙂 In my case, I did create a sandbox and I would personally always recommend to create a sandbox for lower environments just to ensure data is kept clean on production instance of Salesforce.
Note from Documentation for section 5.2 on Installation guide
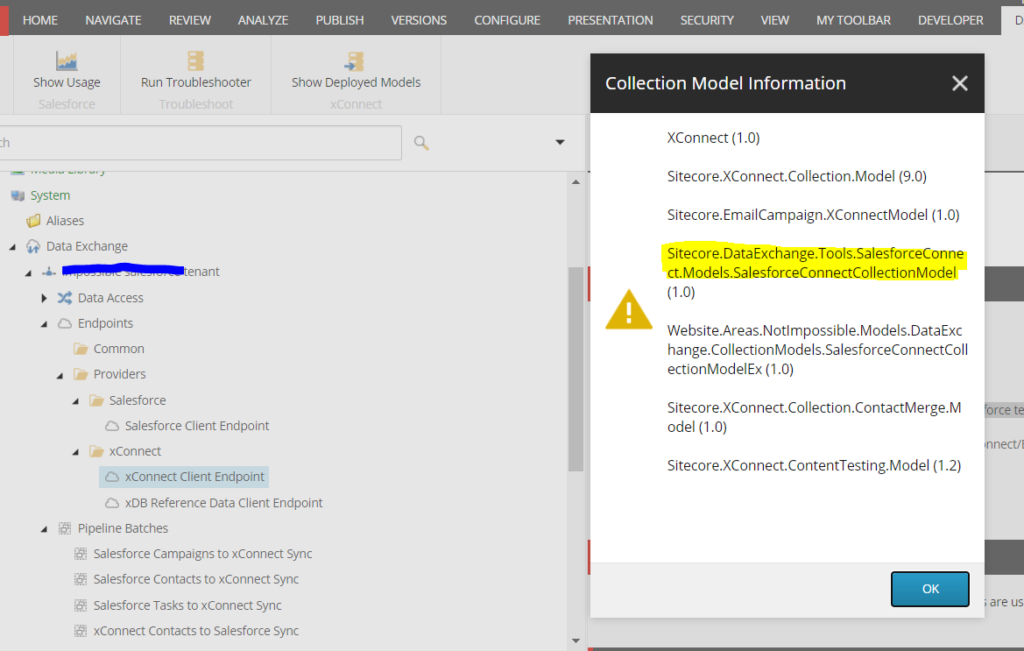
Now, lets say you finished all the steps noted on Installation guide to the tea. But, you quickly find you are stuck at step 5.5. This step is about configuring your endpoints on newly created tenant and ensure the trouble shooter successfully runs. Always remember after model is generated (json file) and it is dropped on locations the guide calls out for, this step below should not be forgotten, if it was, the newly generated model will not be available in ‘Show Deployed Models’ under xConnect Client end point. So, here is the magic step:
“Restart all windows services and do a app pool recycle on IIS xConnect site and your main website instance as well(why not)”
Now, when you click on ‘Deployed Models’ on XConnect endpoint you should see the shiny new model and the trouble shooter will also run just fine. A screenshot for reference:
Showing view of ‘Show Deployed Models’ ribbon click on xConnect Client Endpointview showing click on ‘Run Troubleshooter’ on xConnect Client End point
We all assume to some extent, right? We should not blame Sitecore for assuming we all know that we do that many installation steps and line up several different package installations the assumption is we do a decent size publish to ensure all the good stuff we just loaded gets to web database as well. It is important to do this just in case if there are any dependencies they all make it to destination live database as well.
Now, this bits below took a lot of toll on me because in my case Sitecore instance was not set up correctly on upper environments with regards to xConnect. Had to do some SOLR related corrections. I will not go in to super detail around what happened, but, just on abstract level those indexes and configurations of indexes for xConnect were not done right. But, bottom line for this installation to work as expected below should be ensured and assured.
Experience Profile should load xConnect contacts with out any errors
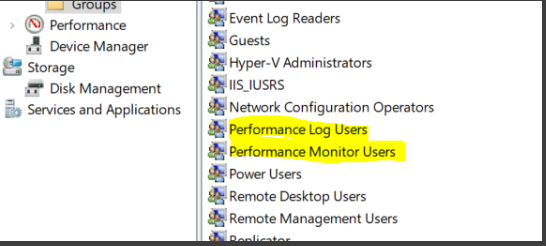
Ensure your xconnect logs are clean – even basic global key access denied errors should be cleaned upAdd IIS Apppool\xconnectapppool name to performance related groups.
showing user groups that need permissions set up
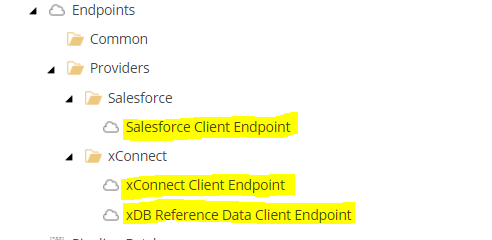
Now, last but not least a pesky little issue that ate more than half of my day. I ensured all steps were a wrap everything was configured per plan, but, when I ran the pipeline batch ‘xConnect Contacts to Salesforce Sync’, nothing happened. Logs generated were super not helpful and almost felt like it failed before even it started. Which brought my attention to end points, but, wait, I just verified that my end points troubleshooters ran fine for all three highlighted below:
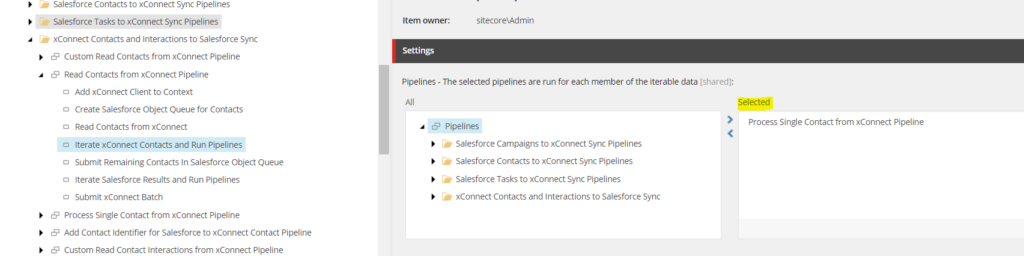
After hours of scrambling, I found that my individual pipeline steps were using branch specific end point references which obviously will fail because we did not configure them, we configured tenant specific end points. The only way I could find this out was using ‘View Raw’ option in ribbon and searching that GUID otherwise from the regular view everything would look alright as the names are same between tenant and branch. I had similar issues for references to other pipelines within pipelines. For instance, the below pipeline step highlighted below was actually from default branch and not from tenant, so, any changes I made to my pipeline step or end point configuration was not being read and instead batch was reading branch content.
I am just glad I could find this issue. Now, it could be because I am the unlucky one, but, this is what made me look more deeply at the DEF tenant and pipeline steps on a more intimate level, so, yeah, it was annoying, but, yep it was worth it. 🙂
After initial connectivity is proven and core data was being pushed to Salesforce from Sitecore, we are on to the next step which is attacking custom implementation that would be needed to meet our end goals and requirements. It was sigh of relief that the connector is working and yet deep suspense by the end of this as I was aware of the next adventures. I will continue this blog series to depict the journey that happened next.