Tenant Service In Action – Form data to Salesforce

DEF Tenant Process

If you have not reviewed my other blogs on re-inventing the Salesforce CRM connector, I encourage you to give them a read before you jump deep in to this one. It will give an idea as to why we landed at this very solution to achieve our goals and satisfy the requirements. Below are the links to the blog posts for reference –

Now, let us continue where we left off. I really wanted Tenant Service to work since it is a win-win for us. Firstly, we do not have to store all form submission information on Sitecore Contact card. We should strive to keep only useful and personalizable information on xConnect Contact card to keep xDB clean. Secondly, it would be a scalable solution. Let’s say if a new form is added to the website and the information entered need to make it to Salesforce on submission, it does not dev involvement. All it would need is a new Tenant pipeline and bunch of new value accessors for form and Salesforce. Isn’t this much more elegant than extending a custom update contact action every single time a new form is added? An absolute Yes!

Let us see how we made it happen. Do note that the set up is tedious, but, also note that this is one time thing. Once the set up is complete, all you would need is do maintenance by dropping/deploying latest binaries if you have some custom code in action. Alright here we go –

Installation and Setup

There is some good starter documentation out there that will get you started with Tenant Service, DEF and form submit action to fire the tenant service pipeline. Give that a read here.

Our case is more complicated than that, we need to fire a pipeline that would take that form context and submit that information to Salesforce instead, so, it would need bunch of other steps. Below is what was needed on our Sitecore Managed Cloud environment to give you an idea.

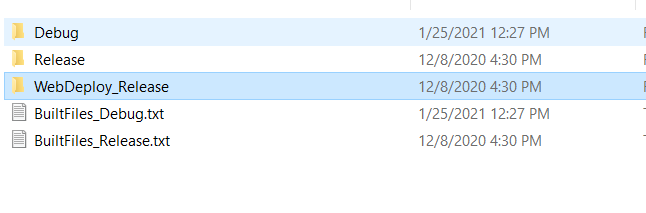
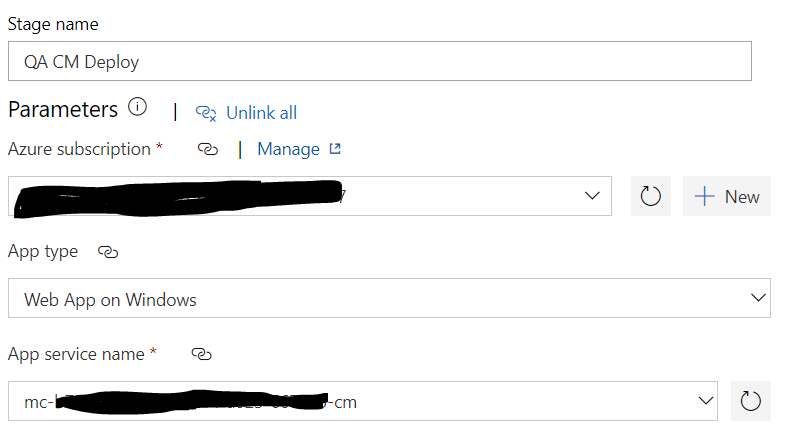
  • A new web app created on Azure environment – Configuration depends on your needs and traffic. On our end, we decided it was a smart idea to match configuration of new web app to other web app’s on the environment such as CM/CD for instance. Once web app is ready, manually deploy the files. You can follow Manual deployment instructions noted on ‘Installation guide for Data Exchange Tenant Web Service’ document here. Another important thing to note here is to add ‘WEBSITE_LOAD_USER_PROFILE’ in Application Settings on web app created and set the value to ‘1’. If you do not do this you will get errors on Tenant Service that suggest data protection was unsuccessful.
  • Also drop Tenant Service plugin for CRM Connector on Tenant service root location. Install package for ‘Salesforce CRM Plugin for Tenant Service’ from here and extract files and drop them in your tenant service root folder. Note, it is also required to drop Salesforce.Common and Salesforce.Force dll’s on to your Tenant Service root folder. With out this, you will see some errors when Tenant pipeline runs.
  • Configure your connection string properly on Tenant Service web application to ensure it can talk to CM server properly.
  • Ensure DEF and Salesforce CRM Connector both are installed and configured on CM server and CD server of the environment. The instructions should already be documented in corresponding downloads section for Data Exchange Framework and CRM Connector. Also, enable CM to talk to Tenant Service web application created in above steps. It is done via changing Sitecore.Services.Client.config setting ‘Sitecore.Services.SecurityPolicy’ to ‘Sitecore.Services.Infrastructure.Web.Http.Security.ServicesOnPolicy,Sitecore.Services.Infrastructure’.
  • Finally for tenant service communication and SF activation ensure you have connection strings added to both CM and CD servers. Note down the connection string name for tenant service. Publish all core Sitecore nodes and restart all web app’s that have been touched on steps above.
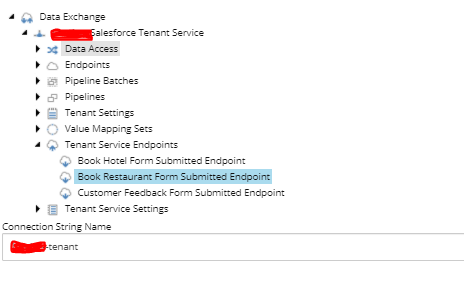
  • Ensure Tenant Service and CM can communicate well by going to {TenantservicewebappURL}/api/Tenant – If all is well, you should see all tenant service end points under main DEF tenant and if they are enabled
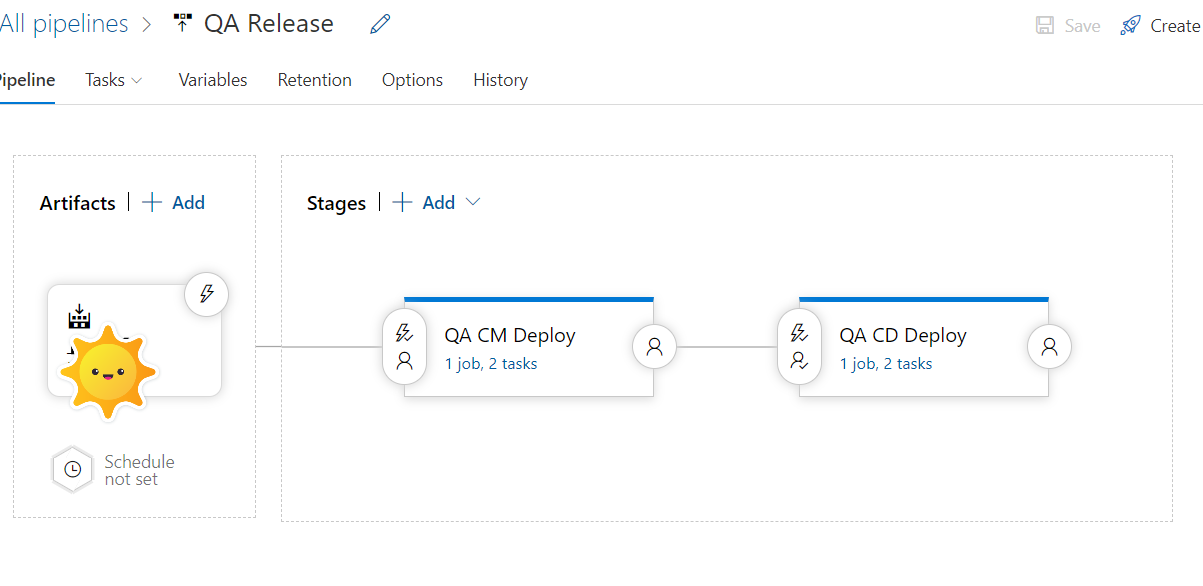
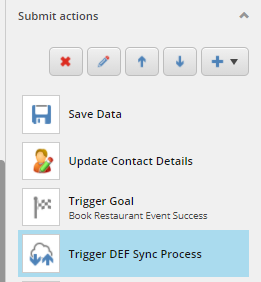
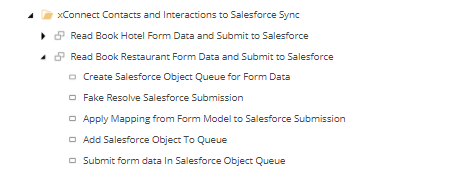
  • Lastly ensure your form submit actions fires appropriate Tenant Service pipeline which internally has a step to submit the same to Salesforce. Use your connection string name copied on setting in the action. Your pipeline would look something similar to the screenshot below. Most of the pipeline steps are re-used/borrowed from out of the box CRM connector pipeline. All I had to do was to ensure queue settings and objects loaded are correct. Plus create all value accessors and mapping sets needed to ensure I map form data to correct object definition on Salesforce. All of this steps are already noted in my previous blog here
Pipeline that is triggered on form submission
Form submit action to trigger Tenant Service end point

Note: As of this writing and the version of Tenant Service used, there was a bug that was preventing me to select certain field types on Form Value Accessors. I had to edit this item on Sitecore to include the field types that were missing – /sitecore/system/Settings/Validation Rules/Field Rules/Data Exchange Framework/Forms/Required Valid Form Field

If all goes well, you should now see form submission data on Salesforce as intended object. You might not get everything right on first go, so, to debug what is cooking you can go to Tenant Service root folder and check logs up there. You may have to check CD logs as well sometimes if Tenant Service logs are not showing anything useful.

All in all, Tenant Service is a great way to push information to third parties and scalability with zero code needed to do everything I just talked about is just super amazing. It will leave your Marketing team happy for sure. Only issue I found in this is performance impact due to all the processing happening on Form Submission, so, if you or your team is concerned about adding additional overhead/time to process form submissions, then, I recommend looking in to storing the information else where or on Contact. Form Submit Action responsible for triggering Tenant Service currently waits for the processing to complete before continuing with next form submit action step and redirecting the user to thank you page.

There are ways to convert some of this pipeline steps to be asynchronous by making custom processors using Tasks per Sitecore support, but, I have not tried it just yet. May be a post for later when I can get to that.

Experience profile search not working

Do you remember an issue that took almost a month to resolve which constantly was in the back of you head bothering you and reminding you that it is still pending? This case is one such incident.

Here it goes the whole deal ! I appreciate Sitecore support team’s resilience and how they had been proactive in responding. But, I also feel that this should be like known or documented because guess what who ever used xDB before knows there could be challenges and they have to solved quickly to mitigate data latency issues.

Problem: Experience Editor search was not working on older Contacts as PII indexing was not enabled and later enabled.

Story: Human error, it happens even after you have documented painfully every single step that need to be done manually after a deployment. Unfortunately config edits on Processing server or Search Indexer side of things are manual deployments on our end at this time. Anything we push to CM/CD roles is absolutely one click deployments using patches as a standard. So, I missed doing this step noted here during production deployment. I realized the problem noted above could be because of that and changed it to ‘true’ on applicable roles/locations on Managed Cloud and hoped for the best. When I did this search did start to work, but, was only working on newer Contacts that got added to xDB post the change I had made. Why?

Resolution: I had this issue before when I first started playing with xDB, Experience profile and various other xConnect related services. I was pretty confident I need to rebuild xDB Index that is usually answer for such funky behaviors. I did that by doing the below steps:

  • Open up Azure portal and open up resource group of concern
  • Go to specific resource for xc-search app service
  • Open up Advanced Tools and hit Go -> this will take you to Kudu
  • Selected Powershell option -> Drilled down all the way in to Index Worker location and followed steps noted here
  • It said the rebuild succeeded, but, nope issue is not resolved and still search does not work on older contacts.

I was not sure on what else to do, I logged a support ticket with Sitecore and tried explaining what I tried so far. They confirmed that rebuild is what I should be doing in order to resolve the issue on hand. Strange, but, I did that exactly what is written on documentation. It turns out, rebuild has to be run subtly differently and in different location when the matter is about Managed Cloud. Support suggested that I do the rebuild command on location below such as below –

D:\local\Temp\jobs\continuous\IndexWorker\<Random Web Job Name>

Command is also subtly different from documentation it should be .\Sitecore.XConnectSearchIndexer.exe -rr

And then I started patiently monitoring the rebuild process using instructions here https://doc.sitecore.com/developers/100/sitecore-experience-platform/en/monitor-the-index-rebuild-process.html

You can also monitor the same from SOLR following below steps that were shared by Sitecore support :

  • Go to the admin panel
  • Switch to the xdb collection and click “query”
  • Then run the query: id:”xdb-rebuild-status”
  • This will tell us the exact current rebuild status of your xdb index.

Yep, I did all of that and every single time I tried it was stuck at 95% in finishing state, it never processed completely. So, Sitecore support asked me to do lot of steps to debug further to enhance the logging and log more things to index worker logs to help us understand why it is stuck and not completing. They identified the issue to be a setting that is higher than default one. The funny thing is, we did not set these settings up, they came with Managed Cloud. Any way below is the setting that I had to swap

Go to location below on Kudu: “D:\home\site\wwwroot\App_Data\jobs\continuous\IndexWorker\App_Data\config\sitecore\SearchIndexer\sc.Xdb.Collection.IndexWriter.SOLR.xml” )

I could see the config below:
<Solr.SolrWriterSettings>
<Type>Sitecore.Xdb.Collection.Search.Solr.SolrWriterSettings, Sitecore.Xdb.Collection.Search.Solr</Type>
<LifeTime>Singleton</LifeTime>
<Options>
<ConnectionStringName>solrCore</ConnectionStringName>
<RequireHttps>true</RequireHttps>
<MaximumUpdateBatchSize>1000</MaximumUpdateBatchSize>
<MaximumDeleteBatchSize>1000</MaximumDeleteBatchSize>
<MaximumCommitMilliseconds>600000</MaximumCommitMilliseconds>
<ParallelizationDegree>4</ParallelizationDegree>
<MaximumRetryDelayMilliseconds>5000</MaximumRetryDelayMilliseconds>
<RetryCount>5</RetryCount>
<Encoding>utf-8</Encoding>
</Options>
</Solr.SolrWriterSettings>

“MaximumCommitMilliseconds” value was too high and it was recommended to change it to “1000” . This apparently was the default value. Suspicion is when best practices were followed according to KB article by Managed Cloud team they must have swapped it as part of default set up steps.

I did the above change and queued rebuild process again for nth time and monitored patiently. Worked!!! I almost cried out loud given I had to do these steps so many steps, waited so many days to get the issue resolved.

Hoping Sitecore team can update documentation around this specifically for Managed cloud, until then, hope this helps some one else loosing sleep over similar problem and needs to queue in that rebuild index.

Know your responsibility with Sitecore Managed Cloud

I have worked with several different Sitecore implementations, each one is unique in it’s own way. Teams are different, responsibilities are different, people – definitely different 😉 Managed cloud is also subtly different when it comes to few mundane chores that you may have done differently in the past. With managed cloud, it is a partnership between Clients, Implementation partners and yes Sitecore Managed Cloud team. So, we got to keep each other posted, it is definitely challenging and need to be well planned out, especially on tight timelines like in our case.

I must have logged around 50 tickets as of my last count when I combine traditional Sitecore tickets and Managed Cloud tickets. In retrospect, though it feels like I spammed Sitecore, some of the questions were purely understanding the responsibility and where to draw the lines between all the teams involved. Documentation does not call this out unfortunately! Also, typical circle back time noted on these type of support tickets is 3 days which a great percentage for a one sprint go live project like ours. lol So, the effort from my end was to log ticket and keep working on the side to figure it out as we wait for Sitecore team to respond.

I will start with easy ones first. So, as we started building more confidence from code and content perspective, especially when we were ready to hand off our features for content load, it was super important to ensure restore is turned on and is per our requirements in terms of backup frequency and retention based on environment in question. These are handled by Sitecore Managed Cloud team via service cloud request creation.

Backup Schedule for Azure App Services

Use this request to back up your app services, basically code/configs and pretty much file system. I ensured I requested this for example on production, daily as back up frequency and week for retention. You can relax the requirement if its an environment that is less of a concern.

Backup Schedule for Azure SQL databases

Use this request to back up your databases, your content and anything in Sitecore basically. For our production instance, I requested backup for core, master and web with backup frequency daily and retention for 4 weeks. Usually, this type of retention should be enough for most of the solutions.

Quick Tip : As a perfectionist (at least I would like to call myself that lol), I wanted to ensure all health checks noted here pass on all my CM and CD(web roles) instances per documentation out there, but, it turns out that it is okay for /healthz/ready to fail and it does not mean anything. So, if you see your instance giving “Unhealthy” status on these url’s, do not fret, you did nothing wrong as long as /healthz/live is good on CM and CD. It turns out /healthz/ready check is more for other roles such as processing or reporting for instance. Documentation could be out of date, but, hope this saves you some time.

Need a custom domain to ensure your url’s on lower environments and production are end user friendly and not hash looking ones that come with initial set up? Sitecore Managed Cloud team does not own this, its you and probably client team depending on the specific scenario. Below links might help:

https://docs.microsoft.com/en-us/azure/static-web-apps/custom-domain

https://docs.microsoft.com/en-us/azure/app-service/configure-ssl-bindings

SOLR

Can not answer this with confidence. But, Sitecore team said different things in regards to this on different tickets. But, one thing I clearly remember was when I debugging an issue which was related to indexes, I was very tempted to kick the SOLR and restart it. Typically, if your team owns infrastructure, you can login on Putty or Powershell and run some quick commands. Luckily, issue got resolved and I did not need to perform this step, but, Sitecore team did mention, I had to create a ticket if I need to do this. Also, Sitecore team sets SOLR up when they set up brand new resource group per contract, so, I guess it’s mostly Sitecore that owns SOLR. Only access we had was admin console of SOLR and to be honest, there are so many things you can’t do using the console. Need more command power when it comes to SOLR.

Security Hardening, Session Set up and Tuning

Wondering who would do the whole nine yards – performance tuning, hardening, session state, etc., etc., I did too. When I reached out to Sitecore, they said that is going to be me. I was bummed, why doesn’t this come like already set up was my first thought.

But, since I got the confirmation, I started full speed only to find out, the hard way that session setup was already done by Sitecore teams lol. Just so you do not waste your time understanding behind the scenes what are the correct decisions for out of proc session and so on. By default, CD roles are set to use out of proc session state with Redis as provider. So, no action was needed by me to set anything related to session. Crossed that off my list.

Now coming to security hardening, I noted that some were already in place and done by Managed cloud. How ever most were not done, so, I encourage the regular drill of going over the stuff we typically do noted here for experience platform security chores. I have some detailed notes with me if some one is curious, reach out!

Almost forgot, for tuning none of the old rules apply for Azure SQL. So, it is important to give these links below a read and do what you can:

https://doc.sitecore.com/developers/100/sitecore-experience-manager/en/monitoring-and-maintaining-azure-sql.html

https://kb.sitecore.net/articles/909298

I could actually do a bunch mentioned up on the links above and some are actually again already done. 🙂

I remember also having to do this one – https://kb.sitecore.net/articles/858026 to ensure I overcome a pesky error such as below that kept creeping in my logs. After I did change the value to suggested error did go away.

Whitelist Authoring

This is actually related to some of the steps we need to do on security hardening when authoring is exposed publicly. If authoring is not exposed out there, you can relax some of those requirements, again Sitecore recommends we do those steps regardless, so, I do not want to give incorrect recommendation. But, having only finite set of people get to authoring is much secure anyway. To do this, I read documentation out there, but, was mostly confused, Sitecore Cloud team was sweet enough to actually do this chore for us. Once they actually did it, I figured it was not as complicated as it sounded on documentation. Basically run a PowerShell script it is on documentation to fetch what authoring would need to talk to and whitelist all of them as outbound addresses on CM app service. Plus, they actually added outbound IP addresses of reporting in SQL server firewall. I would still think its smart to ask Sitecore team to do this. You are good with this set up until your app service is not scaled up or down or change the pricing tier in which case. So far, it’s been a month and we see no issues with initial set up done.

Another important thing to note, we have to add authoring IP also on outbound addresses on CM app service, this is because we noted that a request back to authoring from authoring server was not being processed and blocked with forbidden message lol. To avoid this, I had to add couple more outbound IP addresses to list already existing, it was not fun because I had to manually add a bunch more.

Debugging Tricks

Last section of this blog, but, definitely most important one. Minus this knowledge, I felt crippled. It was super hard to keep track of logs using Kudu, timestamps are not right and you never know if you are looking at correct log file. So, I recommend even if it takes couple extra minutes to review latest logs at all times follow steps here

I was so much more confident once I got the handle over latest logs in terms of debugging issues. Also, make sure your app settings are correct so Application Insights always receives the logs properly.

Alright this is it for now! Next up, I will sum up how Sitecore helped me solve an issue in regards to Index worker. Took us a good month or so, but, hey, it is now fixed. This is also very much so related to managed cloud, but, deserves a special blog entry. 🙂

Get your work on to Managed Cloud

release pipeline

If you have not checked out the beginning of my journey with Sitecore Managed Cloud. Please start there to truly understand the basics. Now, if you already know your way around azure and your team has started the real work, you must be real itchy to get some code up there to your azure app services. Let’s roll up our sleeves and just do that.

First and foremost understand the app settings. With managed cloud, it is even more so important to ensure your patch config for settings has the right and expected values to not throw off things you would hardly imagine. Each one has significance and should be paid attention to. For instance, I had incorrect value placed for ‘role:define’ on my CM and it threw off indexing strategies, it was painful to debug. So, do pay attention to all the values. I am putting some samples and some guidelines, but, it all depends again on what your instance need to breathe and do so your right way.

SettingValue
role:defineAny of the below depending on role of the server:
ContentDelivery
ContentManagement
ContentDelivery, Indexing
ContentManagement, Indexing
Processing
Reporting
Standalone
Note – Though ContentManagement is a right value. Depending on your infrastructure set up, you may want to choose ContentManagement, Indexing
env:defineThis is up to you really – depending on how your patch file usage. In my case, I like using them with {envnamerolename}.
Example: PRODCD, UATCM etc.,
search:defineAny of the below:
Solr
Azure
In my case it was Solr
messagingTransport:defineAzureServiceBus
Note – I took a peek at what Sitecore set up for us on this on Managed cloud and ensured we use the same. In UAT, I saw some issues on Marketing automation because I had this value incorrectly set up.
AllowInvalidClientCertificatesYou would think this should be false. But, for some reason it threw off lot of things and Sitecore Managed Cloud team had set this up to be true, so, I left it as ‘True’
useApplicationInsights:defineTrue
with out this logging will not work properly. As you will realize on managed cloud, all logs tie back to Application Insights. So, it is super duper important to have this flag set correctly.
exmEnabled:defineno
Turn this off if not using it. You can always turn this back up when you do choose to use EXM.
aspnet:RequestQueueLimitPerSession25
This value may need to be tuned if you see errors on your logs constantly. Good article
Important application settings to pay attention to

Next step is to set up TDS Web Deploy to ship your code and items to your shiny new Sitecore Managed Cloud instances. You can set this up to be manual or trigger automagically when some one merges to specific branch on Azure Devops. In our case, we had lot of hands at a single given point of time due to super tight timeline, so, we kept this to be manual to ensure we know to make choices depending on the impact. Below are two links that really helped me get through this –

Step 1: Set up TDS project for Web Deploy. Follow the steps here, last step is optional and I do not remember doing that bit. You are good to move to step #2 as long as you see Web Deploy package and PS script in your TDS project bin folder. https://www.teamdevelopmentforsitecore.com/Blog/TDS-5-8-Local-Set-Up

Quick screenshot of where the web deploy output would go on building your solution

Step 2 – Set up and configure Azure build pipeline and release pipeline. Steps noted here are pretty thorough to get you started

https://www.teamdevelopmentforsitecore.com/Blog/TDS-5-8-Configuring-Azure-Build-Pipeline
https://www.teamdevelopmentforsitecore.com/Blog/TDS-5-8-Configuring-Release-Pipelines

Only catch is in release pipeline set up, you will need Azure subscription. This step is a must to connect to your app service of concern and actually deploy stuff. To get this, you have to do couple things in order.

Log a cloud support request titled – “Get Access to Azure – Service Principal”. Give details in regards to your resource group and this type of ticket is usually completed within minutes and you will get information such as below on your ticket.

Note this and keep this handy for next step

Go to azure devops project and click on Project Settings down below on the left. It is hard to find, so, adding a screenshot.

Project Settings

Next click on Service Connections on left menu, you should now see an option to add a new one. Select Azure Resource Manager and pick Service Principal (manual option) and load it up with all the proper values from support ticket resolution comment. Below is a quick table of mapping that could help you.

Azure Service principleValue/Sitecore Support ticket labelNotes
EnvironmentAzure CloudShould be picked by default
Scope LevelSubscriptionShould be picked by default
Subscription IdSubscription IdYou can also get that from Publish Settings File – Subscription Id
Subscription Namesee notesYou can also get that from Publish Settings File – Subscription Name
Service Principal IdApplication(client)IdThis will be on the ticket – get from label titled as noted.
CredentialService principle keyshould be left option and should be default
Service Principal KeyService Principle Password/API KeyThis will be on the ticket – get from label titled as noted.
Tenant IDTenant IDThis will be on the ticket – get from label titled as noted.
Give it a meaningful Service connection name – I like giving {project name- instance type – last 5 of resource group}

Refresh your azure subscription section on release pipeline configuration and you should now see the new option. Select it and now you should see familiar options of App Services on your resource group under App Service Name field. Select that as well and you are pretty much golden. Follow rest of the steps on links noted above and test your build and release pipelines.

If you were lucky like me and you did all your steps right, you should now see your sweat and blood on Sitecore Managed Cloud instance.

App service name and Azure subscription settings on Release configuration

Next up, we will see some ways to protect your code and items, boundaries as to what are you responsible for and what is Sitecore responsible for, debugging tricks. Stay tuned!

Sitecore Managed Cloud – The Beginning

New Beginning

Towards end of last year, I got an opportunity to lead a project which has to go live in a sprint. Basically, a sprint to architect, develop, test and go live. It was something I thought was impossible even if it is MVP version. But, I took it as a challenge and wanted to see how far I can go along side of my team. We had a real steep learning curve here, below are some of them and of course Managed Cloud stood out because this is the first time I was owning the implementation and deployment on such infrastructure.

  • Sitecore 10
  • Brand new Zodiac/Constellation foundation solution
  • Development team who is new to Experience first paradigm
  • Sitecore Managed Cloud
  • Many many more first time things from front end development team as well

When I am given something new to own, learn and deliver. My first thought is to understand the basics no matter how many hours I have to spend on it. With out this, I have found myself struggle, unable to break walls and move/steer the team and myself with confidence in the past. So, I never do it any other way now, I started there and slowly, but, surely I could see myself gaining momentum.

First things First….

Understanding Terminology and Mapping backwards to knowledge I have based on previous experiences. Below are the steps and notes on every first step I took to get us to where we stand right now. It would really help you if this is your first time like me and you do not have direct mentor who you can reach to internally in your company.

Get in there!

To get access to Azure portal, you first need access to Sitecore support portal “Create Service Requests” section. You should reach to your Sitecore direct contact and request them to get you that. Once, you have that, you should see below section on your sitecore support login. More details on the process on this article.

second section that will appear once you have permission to the cloud organization

You should now be able to create service request to get access to resource groups available on the account. You can read more details about this request on Sitecore’s KB article.
This ticket should be processed mostly instantly and now if you login on your Azure portal, you should see Sitecore in your subscriptions

Sitecore subscription now visible on Azure login

Azure Resource Groups

Alright, you are in. First step is sorted. Now what? If you are like me first time inside Paas based Azure, you are probably lost and there is so much documentation out there, but, sometimes too much of it could be confusing. So, here is what you got to do and understand. Every environment that was created on your subscription, typically one for QA, staging/UAT and production is called ‘Resource Group’. If you have sufficient permissions, you can actually create a service request to set up a new resource group for your needs, this request is called ‘Create New Environment‘. Of course, there could be more created or need to be created based on your contract with Sitecore. We had three of them for this specific client. You can access resource groups from your azure portal by clicking on below.

Ensure you have selected Sitecore subscription before clicking this.
Three resource groups one for each environment on contract

Understand what you see

Now, every resource group would have several resources of several types in them. The first time I saw this, I was like – what are all these? I had no idea and I really wanted to understand these before I go to any further steps. So, I created a mapping of every resource to what it means and what is it responsible for.

view of resource group resources. As you can see there would be around 44 of them of different types

I like to build on what I am familiar with, so, I started here, an article that explains what are the different roles on Sitecore architecture. Pay real attention to ‘scaled XP’. Now, all I had to do is to map everything I see on resources back to that diagram. Visual always helps! This understanding is really important to ensure you know what to expect, how to debug and beyond. I took pain of actually mapping each resource and adding a line or two of what it means. I am sharing it in hopes of helping some one else. Check it out here

Next up is to know how to deploy your code and items.