The feeling you get something live on which you poured hours and hours of work and sweat, priceless! But, what if you are not happy completely? Something is curbing the feeling of being happy a notch or so down? This is exactly what happened to me when I pushed the whole deal of using Tenant Service live. You can read more about how we used Tenant service on my previous blog here
It was just such a relief! Launch was super smooth, I honestly did not expect it to be. Was prepared to be a warrior to fight with any issues that would come by way. But, I was a lucky warrior who simply had to pose with the armor on and no real fight lol
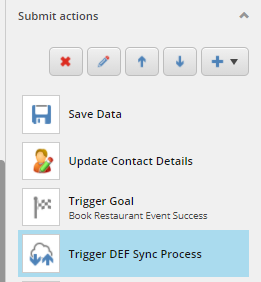
Performance of the form submission after adding ‘Trigger DEF Sync Pipeline’ was bitter. It was taking on average around 8 – 11 seconds for form submission to be successful. Upon more research, turns out custom form submit actions are synchronous, they run one after the other before friendly thank you page or note is shown to end user.
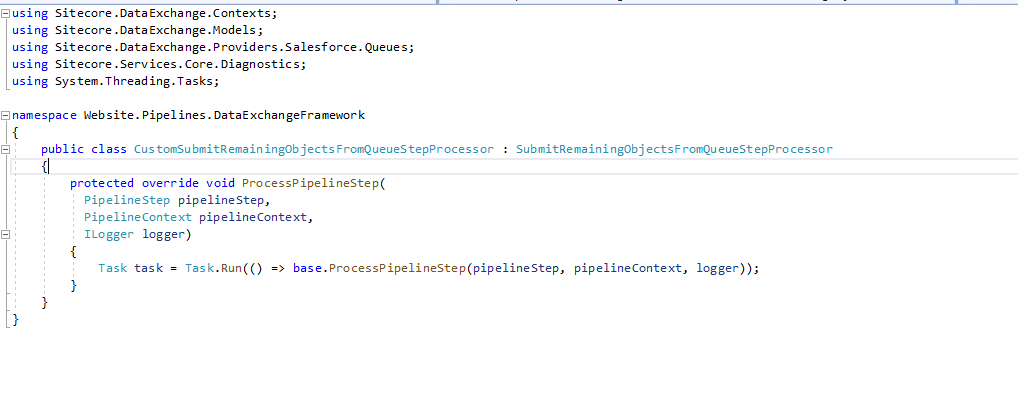
Other way I could think of is to make the most expensive pipeline step Asynchronous. It was easy to point the culprit in my case, it was the step responsible to submit the form submission information to Salesforce that was adding all the time for processing. I logged in a ticket with Sitecore to understand how exactly I can transform a pipeline step to be asynchronous. They suggested that I do something like below:
Make a custom pipeline processor inheriting the OOTB processor for the step of concern
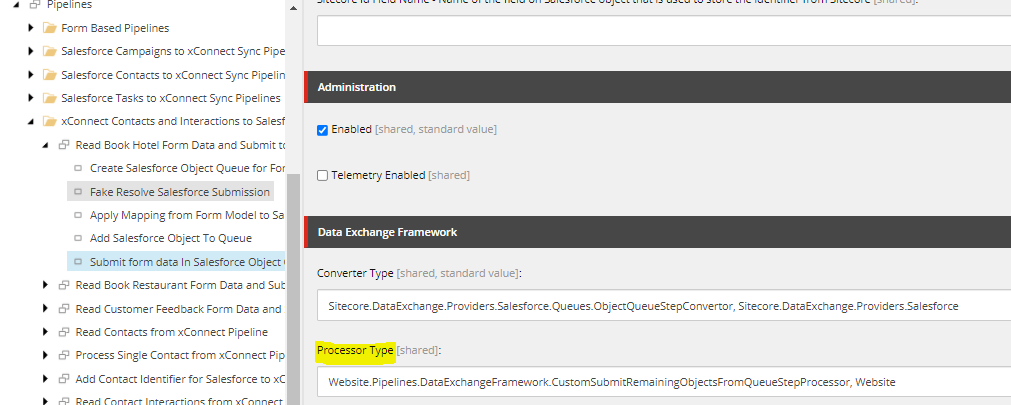
And then, on the pipeline step of concern, point to the custom processor instead of OOTB one. Something like below:
Swap processor type to custom one created on the solution
I was not confident it would work, but, tried my luck and performance was much better afterward. It was averaging between 3 to 6 seconds and later submissions were even quicker. This is a huge improvement from where things were, so, I am one completely happy person after pushing this fix live. 🙂
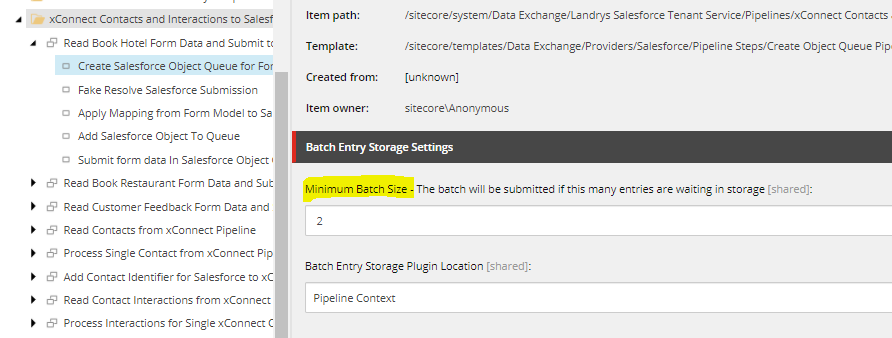
Do note that for this pipeline to fire, on first pipeline step based on template below, ensure the Minimum batch size is set higher than the current scenario. In our case, the queue size will be ‘1’ always because we are firing the pipeline on single submission. In my case, as screenshot shows below, I set that to ‘2’. Only then our custom processor will run, if you are curious decompile the code to see why I said this.
Showing minimum batch size recommended for form submission use case. Value dependent on your scenario.
Now, I can relax and enjoy the successful launch! Also, I can recommend Tenant Service and CRM Connector with more confidence to scenarios that need them.
If you have not reviewed my other blogs on re-inventing the Salesforce CRM connector, I encourage you to give them a read before you jump deep in to this one. It will give an idea as to why we landed at this very solution to achieve our goals and satisfy the requirements. Below are the links to the blog posts for reference –
Now, let us continue where we left off. I really wanted Tenant Service to work since it is a win-win for us. Firstly, we do not have to store all form submission information on Sitecore Contact card. We should strive to keep only useful and personalizable information on xConnect Contact card to keep xDB clean. Secondly, it would be a scalable solution. Let’s say if a new form is added to the website and the information entered need to make it to Salesforce on submission, it does not dev involvement. All it would need is a new Tenant pipeline and bunch of new value accessors for form and Salesforce. Isn’t this much more elegant than extending a custom update contact action every single time a new form is added? An absolute Yes!
Let us see how we made it happen. Do note that the set up is tedious, but, also note that this is one time thing. Once the set up is complete, all you would need is do maintenance by dropping/deploying latest binaries if you have some custom code in action. Alright here we go –
Installation and Setup
There is some good starter documentation out there that will get you started with Tenant Service, DEF and form submit action to fire the tenant service pipeline. Give that a read here.
Our case is more complicated than that, we need to fire a pipeline that would take that form context and submit that information to Salesforce instead, so, it would need bunch of other steps. Below is what was needed on our Sitecore Managed Cloud environment to give you an idea.
A new web app created on Azure environment – Configuration depends on your needs and traffic. On our end, we decided it was a smart idea to match configuration of new web app to other web app’s on the environment such as CM/CD for instance. Once web app is ready, manually deploy the files. You can follow Manual deployment instructions noted on ‘Installation guide for Data Exchange Tenant Web Service’ document here. Another important thing to note here is to add ‘WEBSITE_LOAD_USER_PROFILE’ in Application Settings on web app created and set the value to ‘1’. If you do not do this you will get errors on Tenant Service that suggest data protection was unsuccessful.
Also drop Tenant Service plugin for CRM Connector on Tenant service root location. Install package for ‘Salesforce CRM Plugin for Tenant Service’ from here and extract files and drop them in your tenant service root folder. Note, it is also required to drop Salesforce.Common and Salesforce.Force dll’s on to your Tenant Service root folder. With out this, you will see some errors when Tenant pipeline runs.
Configure your connection string properly on Tenant Service web application to ensure it can talk to CM server properly.
Ensure DEF and Salesforce CRM Connector both are installed and configured on CM server and CD server of the environment. The instructions should already be documented in corresponding downloads section for Data Exchange Framework and CRM Connector. Also, enable CM to talk to Tenant Service web application created in above steps. It is done via changing Sitecore.Services.Client.config setting ‘Sitecore.Services.SecurityPolicy’ to ‘Sitecore.Services.Infrastructure.Web.Http.Security.ServicesOnPolicy,Sitecore.Services.Infrastructure’.
Finally for tenant service communication and SF activation ensure you have connection strings added to both CM and CD servers. Note down the connection string name for tenant service. Publish all core Sitecore nodes and restart all web app’s that have been touched on steps above.
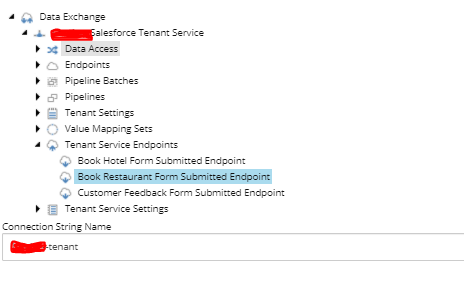
Ensure Tenant Service and CM can communicate well by going to {TenantservicewebappURL}/api/Tenant – If all is well, you should see all tenant service end points under main DEF tenant and if they are enabled
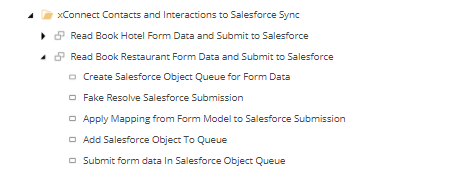
Lastly ensure your form submit actions fires appropriate Tenant Service pipeline which internally has a step to submit the same to Salesforce. Use your connection string name copied on setting in the action. Your pipeline would look something similar to the screenshot below. Most of the pipeline steps are re-used/borrowed from out of the box CRM connector pipeline. All I had to do was to ensure queue settings and objects loaded are correct. Plus create all value accessors and mapping sets needed to ensure I map form data to correct object definition on Salesforce. All of this steps are already noted in my previous blog here
Pipeline that is triggered on form submissionForm submit action to trigger Tenant Service end point
Note: As of this writing and the version of Tenant Service used, there was a bug that was preventing me to select certain field types on Form Value Accessors. I had to edit this item on Sitecore to include the field types that were missing – /sitecore/system/Settings/Validation Rules/Field Rules/Data Exchange Framework/Forms/Required Valid Form Field
If all goes well, you should now see form submission data on Salesforce as intended object. You might not get everything right on first go, so, to debug what is cooking you can go to Tenant Service root folder and check logs up there. You may have to check CD logs as well sometimes if Tenant Service logs are not showing anything useful.
All in all, Tenant Service is a great way to push information to third parties and scalability with zero code needed to do everything I just talked about is just super amazing. It will leave your Marketing team happy for sure. Only issue I found in this is performance impact due to all the processing happening on Form Submission, so, if you or your team is concerned about adding additional overhead/time to process form submissions, then, I recommend looking in to storing the information else where or on Contact. Form Submit Action responsible for triggering Tenant Service currently waits for the processing to complete before continuing with next form submit action step and redirecting the user to thank you page.
There are ways to convert some of this pipeline steps to be asynchronous by making custom processors using Tasks per Sitecore support, but, I have not tried it just yet. May be a post for later when I can get to that.
Hello! If you have not read my first post in regards to challenging new proof of concept we did in order to confirm if we can use Sitecore CRM connector given our requirements, please give that a read here. In this blog post, I will cover first two goals I had on mind to test the waters and see if connector can be leveraged or if we need to switch our game plan. Short answer is, Yes, I was successful and though we had few gaps that needs addressing if we roll forward, it felt doable given the initial findings.
Let us look more deeper as to how I configured Sitecore CRM connector to be able to ship Contacts as custom Salesforce objects. In our case, they were custom Salesforce objects, but, the same steps could be applied to map Sitecore Contact information to any defined object on Salesforce. Below are the steps in order you would need to do in order to ship Sitecore Contacts to Salesforce as specific objects.
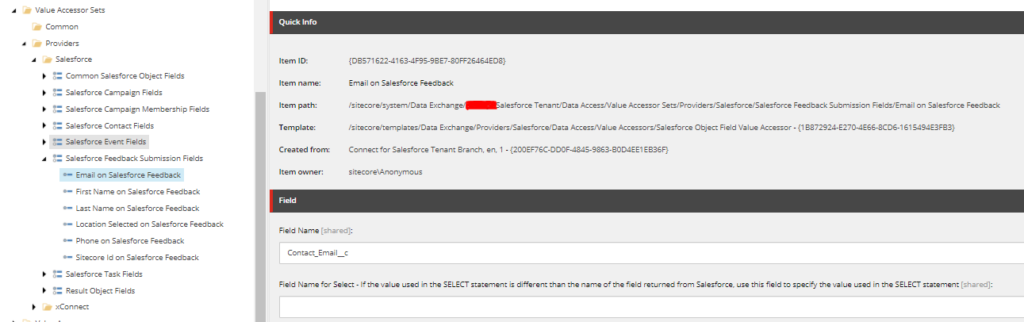
First things first, define value accessors for your Salesforce object and ensure to add proper API field name or any other settings that are needed for every field in question. See a quick screenshot that should help understand this step better
Screenshot depicting value accessors for custom object in Salesforce
Ensure you have value accessors on Sitecore Contact as well if say some custom facet model and properties were defined on your Sitecore Contact. This has been done many times in the past and I have blog posts covering this topic if you like to give that a read. Check out these posts.
Now that you know what data to read and what exactly it maps to both objects in question. Let us define the pipeline steps. It is always best to duplicate default one that comes OOTB when you install the CRM connector. It would be this one in the path below, duplicate and call it your own. /sitecore/system/Data Exchange/Landrys Salesforce Tenant/Pipelines/xConnect Contacts and Interactions to Salesforce Sync
Alright, now below specific steps would need some edits to accomplish what we are after.
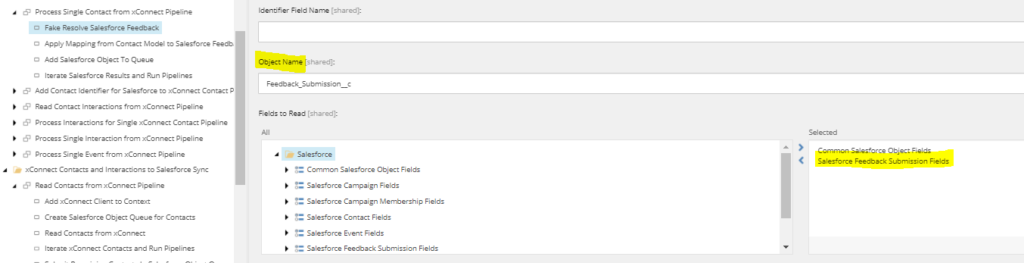
Go to your duplicated pipeline step called ‘Fake Resolve Salesforce Contact’ which should be inside pipeline ‘Process Single Contact from xConnect pipeline. Ensure to give proper name for object and pick your shiny new value accessors defined for Salesforce object. It would look something like below.
depicts pipeline change to read new object fields and object name should be API name for the object of concern in Salesforce.
Create new value mapping set that connects which field from Sitecore Contact should map to which field on Salesforce custom object. Once you have that sorted ensure the step called ‘Apply Mapping from Contact Model to Salesforce Feedback” inside of ‘Process Single Contact from xConnect Pipleline’ has the correct mapping set picked.
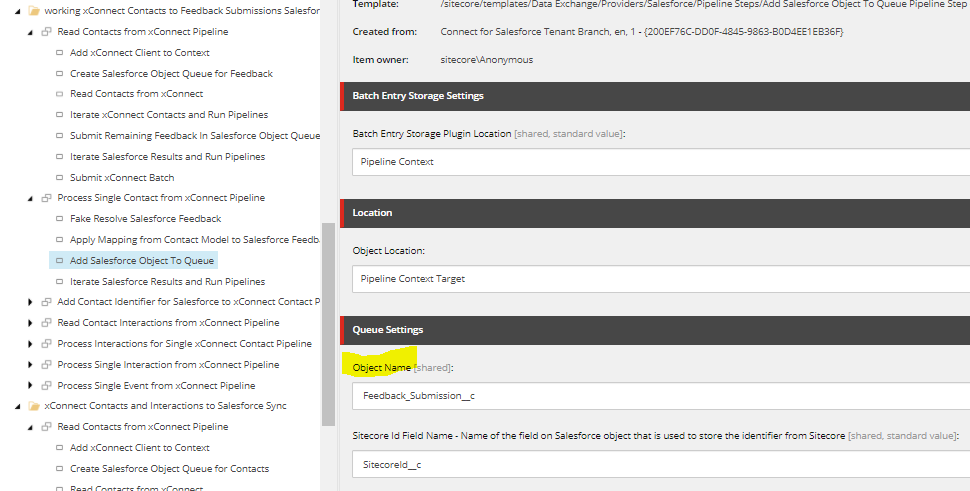
Now, go to pipeline step ‘Add Salesforce Object to Queue Pipeline Step’ and ensure ObjectName is correctly noted on Queue Settings. You may decide to leave this as default, but, it is better to always have different queue names to resonate what truly is present on the queue. It should then look like below.
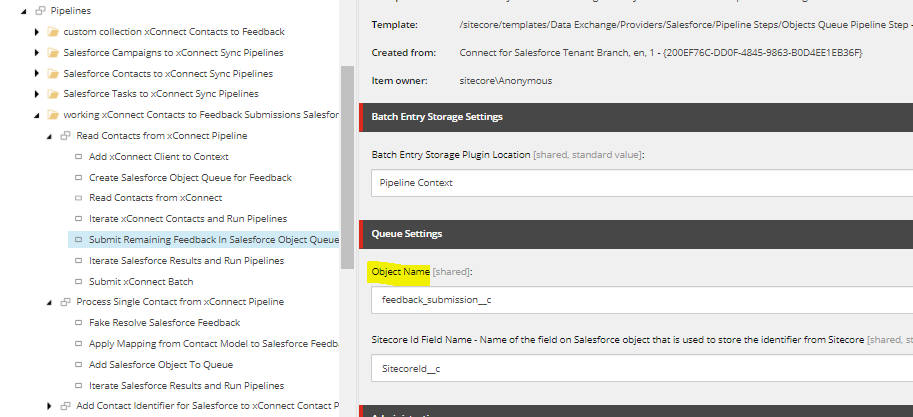
Last, but, important. If you do not do this, only batch size defined number of contacts will be shipped to Salesforce due to bug as of this writing on latest version of Connector. Note the case, it should be completely lower case on highlighted. Go to pipeline step ‘Submit Remaining Contacts In Salesforce Object Queue’ inside of pipeline ‘Read Contacts from xConnect Pipeline’ and ensure ‘Object Name’ field has right settings.
Depicts object name in lower case to avoid missing contacts on Salesforce
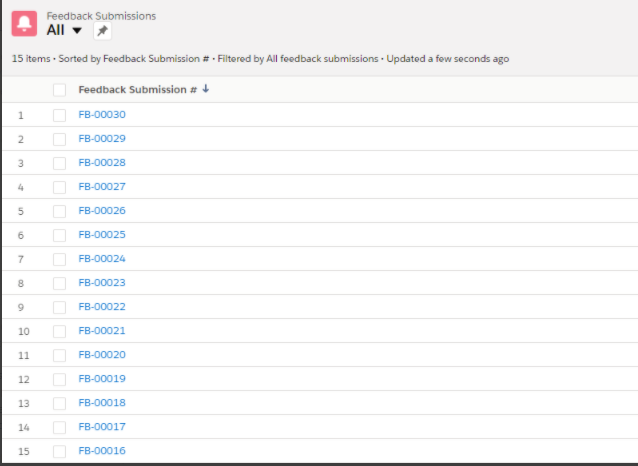
And that is pretty much it, if all goes well if you go to a tab that displays custom objects on Salesforce, you should now see created objects of type you wish for on Salesforce.
screenshot depicting custom objects created
Now, if you have custom facets and fields that would need mapping, it is super important to ensure to load corresponding facets on step ‘Read Contacts from xConnect’ step inside ‘Read Contacts from xConnect Pipeline’
Depicts custom facet that is picked while loading xConnect Contact
Also, it is important to have your custom collection model loaded on end points if you have one. I think I covered some of this in my previous blogs as well. So, you can refresh those up here if needed.
So far so good, I see what I need on Salesforce, but, the solution of stowing away all that information on Custom Facets on xDB contact record seems like overkill and messy. In our case, our goal was to send every single form submission of a Contact on to Salesforce. To do this in the path suggested above which is mapping Sitecore Contact to Salesforce object, we have to store literally every single form submission information on xDB Contact record though doable seemed pointless. We do not see value in what we are storing as we may only personalize on latest form submission and rest of the data is waste of memory and could quickly grow our xDB indexes.
I am all about efficient solution and this did not seem like one. Something caught my eye on Sitecore downloads link -> Tenant plugin for Sitecore CRM Connector.
What does Salesforce CRM plugin for Tenant Service do?
My mind started wondering, what if I can use the connector to push all the information user entered on forms using Connector, but, with out having to save all of it on Contact record. That would be amazing, right?
In my next blog post, I will talk about how far we got on using Tenant plugin and DEF framework submit action to actually do what we had on mind to align with win win solution.
Almost an year ago, I embarked on a journey to explore Sitecore Connect to Salesforce CRM connector. Almost instantaneously, in my first week, one of the initial questions I had was , can I map Sitecore Contacts to some other objects in Salesforce, such as Leads, for example? Upon researching, I figured there is no OOTB way to map to something else other than Salesforce Contact. Back then, the client was okay for us to push Sitecore Contacts as Salesforce Contacts and have a special view in Salesforce to ensure Sitecore pushed Contacts are in their own special bubble inside of Salesforce Contacts, so, their end users on Salesforce view does not get cluttered with Sitecore Contacts. So, that door of if we can push Sitecore Contacts as different Salesforce objects was left unopened.
End of last year, same question came our way during discovery with another client and this time around the client’s data architecture was much more complicated and can not abide to simple workarounds, they wanted us to be able to ship form submission data as custom object/s to Salesforce. This though doable in theory was never tried or never really documented as a use case in Sitecore world. So, the only way to prove the theory is to actually, well, to do it.
We convinced the client to allow us to roll with POC and my gut was I could pull this off based on all the learning I did so far on the connector. Check out my experience with Sitecore connect with Salesforce CRM blogseries and my VDD session on the same.
I was happy and nervous to take up this challenge couple weeks ago. I know there is actually nothing out there that can help me once I go in that path, so, though it was exciting that I will be the potential first one doing this on record, but, at the same time, I could not stop thinking of all the walls that would come by way. 🙂
In coming blogs, I will share the experience with you all what my strategy was, what problems I solved, milestones, happy moments and couple bugs I excavated while I was at it. Let’s get started, to begin with, on such type of projects, I like to jot down my thoughts and an outline that will help me stay focused, but, also helps to look back on steps if need be. It is always proven to be my best friend, staying organized.
Here are the goals for POC I had on my mind –
Prove that Sitecore Connect for Salesforce CRM can ship Sitecore Contact Information as a Custom object/s on Salesforce.
Configure Connector to map Custom Facets on Sitecore Contact and send those Custom Facets as Custom objects to Salesforce. Meaning, no longer Contact to Contact mapping on two systems, it would be completely custom.
Explore ‘Salesforce CRM Plugin for Tenant Service’ option noted on Download section here and see what it has to offer. There was not much documentation on this one, so, it is a bit of suspense, but, again my sixth sense was hinting me that it might prove to be useful.
I got these goals jotted in my document and in my heart and kept moving through milestones. As I passed through every single milestone, I got more and more excited to reach to the end of POC. I will take you through how I achieved each of these goals and hopefully it will help you achieve something similar in future.
It is always a great feeling when you did not mess up or cause an issue and it was parceled along with the installation you had done. Can not explain it, but, hey still it was not me. 🙂
So, I bumped in to this issue while doing super thorough tests on new facet fields I just added to my facet and did an effort to push that additional information when available all through the town to Salesforce CRM and to SFMC. While running this tests, I wanted to quickly ensure a Salesforce contact is flagged as “Updated”, so, the next connector run will try and update the record on Sitecore. In effort to flag that I cleared a field that has data in it.
The connector ran as expected, picked up contact as I just edited, but, I did not see field get updated on xConnect. It still had old CRM value and was not updated to Null/Empty. Which is super weird and not expected. At the end of the day, the role of connector is to keep data in sync between platforms. So, empty data should map to empty data and not outdated old data from CRM. This to me is a data integrity issue if it really matters to clients to keep them the contacts truly in sync. So, I loaded a support ticket just to confirm if this is connector current behavior or did I do a grave mistake some where in my setup or configuration or mapping.
Today, Sitecore support confirmed that this indeed is a bug and created a bug on their system. I do not know why, but, I feel like I accomplished some thing by uncovering this pesky data issue. lol Here is the ticket number 441899 and I am all excited to track this probably in couple next releases – KB853187 and KB951718.
I recently had a requirement that I was building upon which requires me to store couple additional fields on my xConnect Facet. I had to also show them on Experience profile, push this data when available from Sitecore to Salesforce and back. This additional information should also be available on SFMC when it is available. I knew the drill and did what I had to make this happen. String fields mapping was pretty straight forward and had done it couple times before this drill, so, will not focus on that, you can have a look at my other blog posts which should cover this information.
So, with this requirement we had different types of data that we had to map. For example, we had Boolean, DateTime, Currency and Number to new a few. For every single type of this, we need different handling to ensure the data maps to Salesforce and back successfully. Let’s see how its done:
Step 1: Extend your Facet with all the additional information
        public bool HasDonated { get; set; }
        public DateTime? MostRecentGiveLivelDonationDate { get; set; }
        public DateTime? MostRecentVoicifyDonationDate { get; set; }
        public int EngagementScore { get; set; }
        public decimal GiveLivelyDonationAmount { get; set; }
        public decimal VoicifyDonationAmount { get; set; }
As you can see we have bool, datetime (ensure this is defined nullable, if not, you will be in deep shit and mappings wont work to CRM and SFMC). Now, next up, lets see how mappings should be handled differently and special use of transformers might be needed. Let’s see on each case, how to properly handle. Do note this also depends on data direction, that is, if mapping is from Sitecore to Salesforce or from Salesforce to Sitecore. I will not cover steps needed to ensure this new additional fields are available to be utilized by updating custom collection model json and items. There is a whole different blog post for that.
Boolean Mapping:
This is the easiest one. 🙂 No special handling needed, it should simply work with same process we followed before here
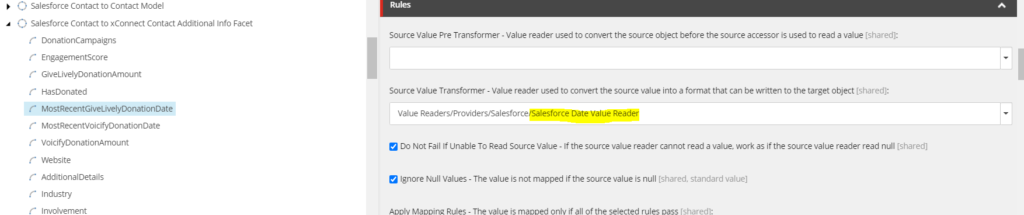
DateTime Mapping:
I would like to stress again how important it is to define this property as nullable. See code snippet above and follow that. Do not waste hours of debugging like I did. 🙂
From Salesforce to Sitecore – See highlighted, it is available OOTB, just ensure you add this to ensure mapping worksFrom Sitecore to Salesforce – See highlighted, it is available OOTB, just ensure you add this to ensure mapping works
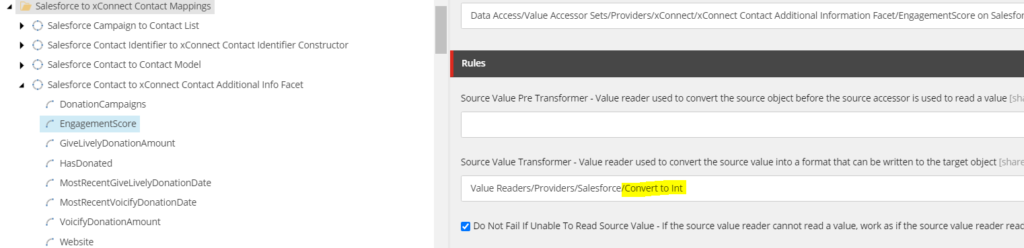
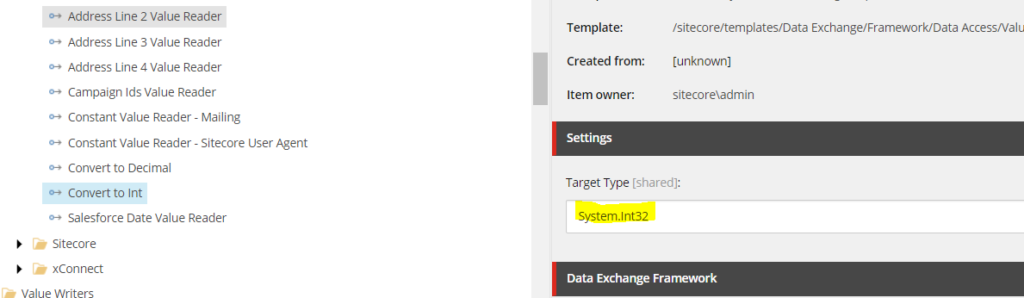
Int mapping:
From Salesforce to Sitecore – See highlighted, this is a new value reader that I had to add to ensure the mapping works and data flows properly. Definition of value reader that is used as transformer in the step above. It is very important that Target type entered matches .Net type exactly as format shown. If you give just Int or Int32, it will not work.
Note: No special handling is needed to push this type from Sitecore to Salesforce, it just works just fine.
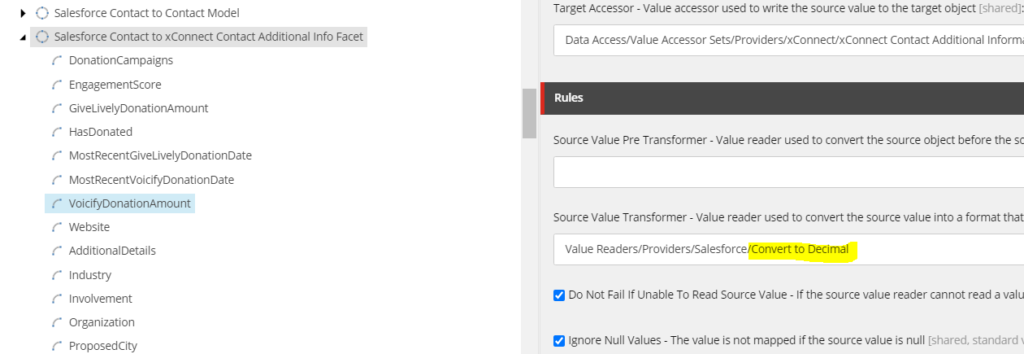
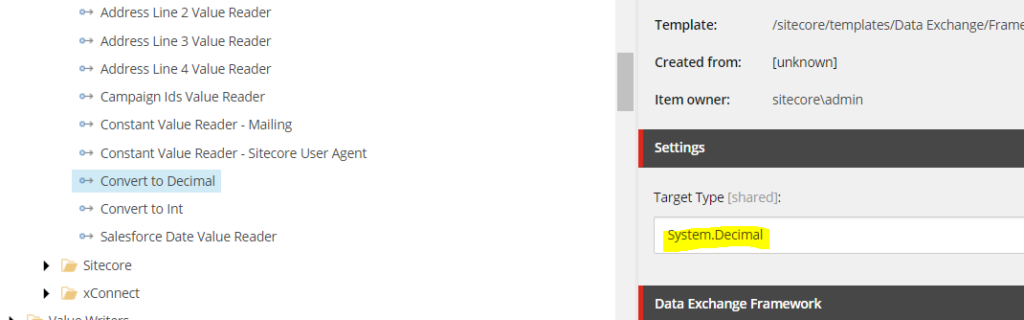
Decimal Mapping:
Very similar to int mapping noted above. I will add few screenshots for reference.
Note: No special handling is needed to push this type from Sitecore to Salesforce, it just works just fine.
Now this might seem pretty straight forward, but, this took me hours to figure out why something is not working as expected. Because there multiple point of failures and I was not able to put a finger on to why. When mappings fail, the logs were not very helpful, so, this required lot of trial and error to actually come up with solution for each of this use case. Hope this helps some one doing some gymnastics with Salesforce and SFMC.
I took my first steps back in February this year with a mission to connect two amazing systems together – Sitecore and Salesforce. Little did I know back then that I will learn so much, get to break so many walls and reach the final(for now) data destination we had on our mind. It was a fun ride! Not only did I learn about the Sitecore Connect for Salesforce CRM and the scope of what we can do with it, but, also learned a ton of other things with Sitecore xConnect, Analytics, xDB SOLR indexes, custom contact facets, Sitecore Forms, Custom collections and models, Salesforce leads, objects and fields in Salesforce, Data Exchange Framework, custom readers and converters, pipeline batches and scheduled tasks. I mean I can go on and on and on. It was awesome and yet quite painful when things would not work. But, hey, I am here writing this last post on this series that covered how and why I did what I did. I made every effort to reference the blogs/links that inspired and helped me solve a problem on hand. But, I also managed to figure some kinks myself and I documented those to potentially help some one else who is amidst of implementing their data journey between the two systems.
Below are links to all of my blog posts that are part of this series. Hoping this would help any one facing similar challenges or potentially kicked off their journey stitching the two most powerful platforms out there – Sitecore and Salesforce.
I was also able to connect with Salesforce Marketing Cloud and do some extensions up there as well. I will talk about that side of things in my next blog post. Until then, take it easy. 🙂
We managed to ship the whole deal of data flow noted so far in my blog posts related to this journey. When you deploy a new system, the journey does not end so soon. Even if you did your best while implementing, testing and deploying, their could still be unknowns which we will need to keep an eye for and solve to ensure the data continues to flow smoothly between the systems. We had couple of such issues that we needed to battle. Gist of problems and corresponding solutions below:
Problem – ‘Contacts stopped syncing to Salesforce’: One not so fine day, the connector broke and contacts did not sync to Salesforce.
Debugging & Solution – This needed a lot of debugging as logs were not helpful. Below is the message on pipeline batch log that is responsible to sync contacts from Sitecore to Salesforce. Lets look at the error
ManagedPoolThread #4 20:05:04 DEBUG [Data Exchange] at System.Threading.Tasks.Task`1.GetResultCore(Boolean waitCompletionNotification)
at Sitecore.DataExchange.Providers.Salesforce.Queues.BaseSubmitQueuePipelineProcessor.SubmitBatch(PipelineStep pipelineStep, PipelineContext pipelineContext, OperationType operationType, List`1 inputList, ILogger logger)
ManagedPoolThread #4 20:05:04 ERROR [Data Exchange] InvalidBatch
ManagedPoolThread #4 20:05:04 DEBUG [Data Exchange] at Salesforce.Common.XmlHttpClient.<HttpGetAsync>d__4`1.MoveNext()
--- End of stack trace from previous location where exception was thrown ---
at System.Runtime.ExceptionServices.ExceptionDispatchInfo.Throw()
at System.Runtime.CompilerServices.TaskAwaiter.HandleNonSuccessAndDebuggerNotification(Task task)
at System.Runtime.CompilerServices.TaskAwaiter`1.GetResult()
at Salesforce.Common.XmlHttpClient.<HttpGetAsync>d__0`1.MoveNext()
--- End of stack trace from previous location where exception was thrown ---
at System.Runtime.ExceptionServices.ExceptionDispatchInfo.Throw()
at System.Runtime.CompilerServices.TaskAwaiter.HandleNonSuccessAndDebuggerNotification(Task task)
at System.Runtime.CompilerServices.ConfiguredTaskAwaitable`1.ConfiguredTaskAwaiter.GetResult()
at Salesforce.Force.ForceClient.<GetBatchResultAsync>d__52.MoveNext()
--- End of stack trace from previous location where exception was thrown ---
at System.Runtime.ExceptionServices.ExceptionDispatchInfo.Throw()
at System.Runtime.CompilerServices.TaskAwaiter.HandleNonSuccessAndDebuggerNotification(Task task)
at System.Runtime.CompilerServices.TaskAwaiter`1.GetResult()
at Salesforce.Force.ForceClient.<GetBatchResultAsync>d__4f.MoveNext()
--- End of stack trace from previous location where exception was thrown ---
at System.Runtime.ExceptionServices.ExceptionDispatchInfo.Throw()
at System.Runtime.CompilerServices.TaskAwaiter.HandleNonSuccessAndDebuggerNotification(Task task)
at System.Runtime.CompilerServices.TaskAwaiter`1.GetResult()
at Salesforce.Force.ForceClient.<RunJobAndPollAsync>d__1e`1.MoveNext()
First look at error, Second look at error, I mean looked at it for like two hundred times, I have no clue why it would break. Log entries were not helpful at all in this case. Since all was well couple days ago, it gives a subtle hint that it could be data. I made reports from Experience Analytics and exported all the data in to excel from the day contact syncing had stopped and started looking for anything offbeat. I found the below two entries with few special characters, I had a hunch that that might be causing issues with pipeline batch. I removed the specific field that had special characters from value mappings and ran the pipeline again and boom, the contacts started syncing back again. Also, identified the special character that the process had problem with is ‘&’.
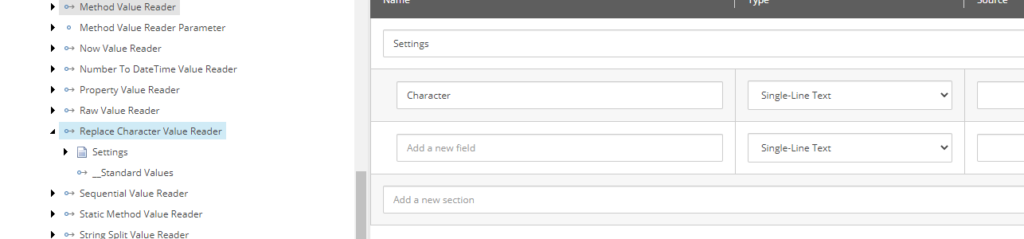
Now, we can not remove the mapping permanently, we need to find a solution to avoid this situation on any other field mappings and data collected on xConnect contact in general. To do this, we need a new reader and converter that do exactly what you are guessing – replace our bad character with space. We would also need a template to make this happen. Below are key components needed for this solution:
Template that has place to enter the character and points to custom reader defined on code.
New Template for reader that accepts character of concernStandard Values of new template which has default character and Converter type that points to custom namespace where model resides and dll corresponding to the same
Next is to actually define the Converter and Reader. I included the code for both below
using Sitecore.DataExchange.DataAccess;
using Sitecore.DependencyInjection;
using Sitecore.Marketing.Definitions;
using Sitecore.XConnect;
using System;
using System.Globalization;

namespace yournamespace
{
    public class ReplaceCharacterValueReader : IValueReader
    {

        public string SpecialCharacter { get; protected set; }

        public ReplaceCharacterValueReader(string character)
        {
            if (string.IsNullOrEmpty(character))
                throw new ArgumentOutOfRangeException(nameof(character), (object)character, "Empty Character");
            this.SpecialCharacter = character;
        }

        public virtual ReadResult Read(object source, DataAccessContext context)
        {
            if (!(source is string str))
                return ReadResult.NegativeResult(DateTime.Now);
            return string.IsNullOrWhiteSpace(str) || !str.Contains(SpecialCharacter) ? ReadResult.PositiveResult(source, DateTime.Now) : ReadResult.PositiveResult((object)str.Replace(SpecialCharacter,string.Empty), DateTime.Now);
        }
    }
}
using Sitecore.DataExchange;
using Sitecore.DataExchange.Attributes;
using Sitecore.DataExchange.Converters;
using Sitecore.DataExchange.DataAccess;
using Sitecore.DataExchange.Repositories;
using Sitecore.Services.Core.Model;

namespace yournamespace
{
    [SupportedIds(new string[] { "{7ABD90E0-5FC4-4547-8962-C0094F8A7CF7}" })]
    public class ReplaceCharacterValueReaderConverter : BaseItemModelConverter<IValueReader>
    {

        public const string FieldNameCharacter = "Character";

        public ReplaceCharacterValueReaderConverter(IItemModelRepository repository)
          : base(repository)
        {
        }

        protected override ConvertResult<IValueReader> ConvertSupportedItem(
          ItemModel source)
        {
            return this.PositiveResult((IValueReader)new ReplaceCharacterValueReader(this.GetStringValue(source, FieldNameCharacter)));
        }
    }
    }
Last piece to the puzzle is to actually use a reader created based on template above as source value transformer on value mappings which could potentially have this special character or where applicable. In our case ‘Title’ field could definitely lead to this character. So, we ensured we plugged above in for this value mapping for sure.
Source Value Transformer injected on mapping of concern
That is it, we finally do not have to worry about this pesky little character stopping the data flow.
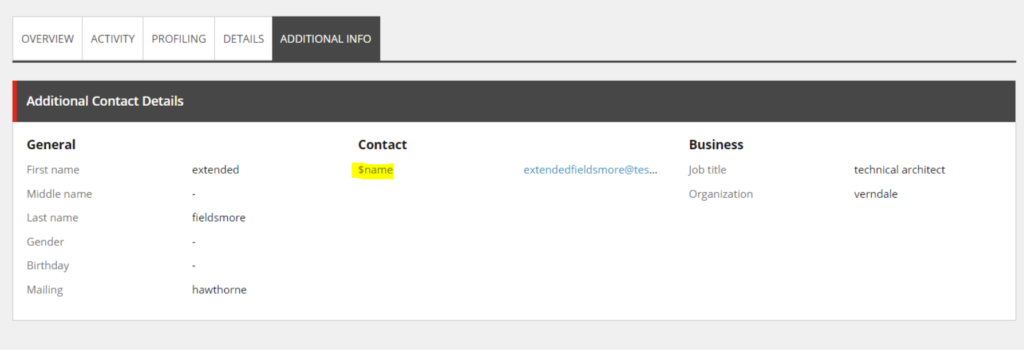
Problem: I noticed an issue on Experience Profile where on contacts instead of seeing ‘Preferred’ on Contact Email address, it started showing $name. Like below:
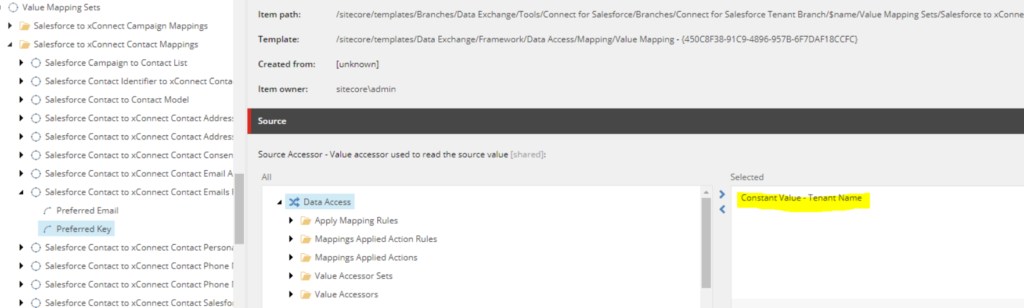
Debugging and Solution: It was important in this case to understand when does the issue happen. Does it happen when we submit a form and load xConnect contact information? or does it happen later when sync job runs. In our case, it was happening when pipeline batch that is responsible to sync data from Salesforce to Sitecore runs. Now that we know this, we have to investigate value mappings and value accessors responsible for this. Upon investigating in that path, below is what I see set on this item /sitecore/system/Data Exchange/my tenant/Value Mapping Sets/Salesforce to xConnect Contact Mappings/Salesforce Contact to xConnect Contact Emails Facet/Preferred Key. This definitely did not seem right, see screenshot below:
Incorrect mapping on Preferred Key
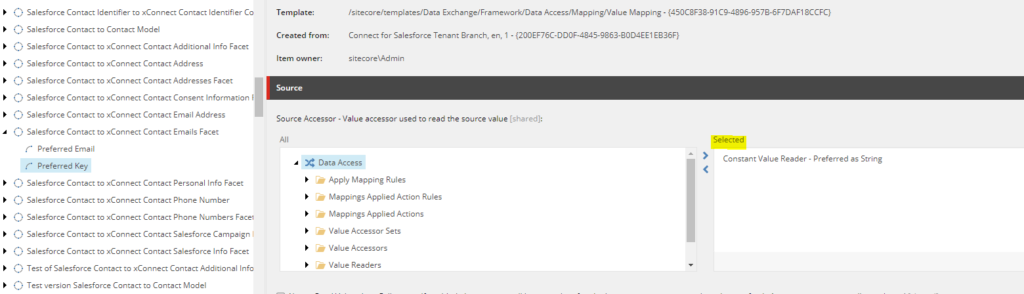
Swapped the above with a new reader created which will constantly return a string called ‘Preferred’ which is what we need. This did the trick and we did not see the ‘$name’ issue any more.
Swapped with new constant value reader that will always return string prefferred
In my last blog, we talked about how we could extend xConnect contact facet with additional information and add details to it when a user submits a form for instance. We can check to ensure the data is saved properly by running few quick SQL commands like below.
SELECT TOP (1000) [ContactId]
      ,[FacetKey]
      ,[LastModified]
      ,[ConcurrencyToken]
      ,[FacetData]
  FROM [notimpossible_Xdb.Collection.Shard0].[xdb_collection].[ContactFacets]
  where FacetKey ='SalesforceAccount'
You should see a string in FacetData similar to below. It should match definition of custom facet that was deployed. In my case, it looked like:
Though through above you can check to see if the information you would like is being stored on contact. But, a more elegant way would be to actually see it on a special tab on Experience profile. There are couple blogs out there that can help you with this especially if the goal is to use Speak. But, if you do not care about using Speak, do check out this one. In my case, I wanted to stick with Speak to see how far I could go with this. It was quite a number of steps, but, a combination of resources and special steps helped me get there.
References that helped me:
https://www.konabos.com/blog/extending-sitecore-experience-profile-in-sitecore-9 -> This helped me get started and keep moving in right path till I reached this below. The link noted in there was a lot of information to digest and understand how to proceed next. I wish that area was expounded probably on another blog post. It would have probably helped me knock this down continuing in the same path.
Step where I stumbled and did not know how to proceed
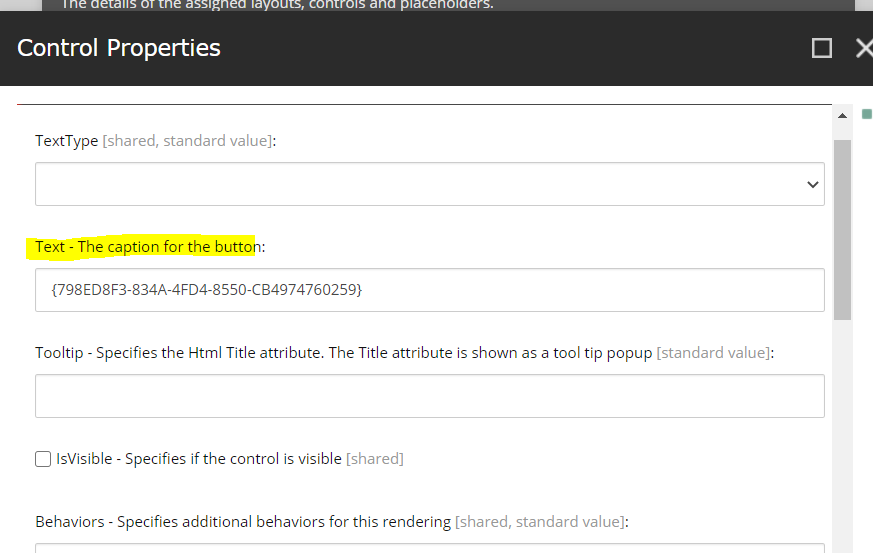
Step #4 on this blog gave me an idea to duplicate the tab and adjust presentation using Sitecore rocks as needed instead of creating brand new items and scramble what should be added to presentation. One gap in this blog which was not mentioned is – when you duplicate the Tab Item, ensure you change references in presentation on new tab item to point to appropriate internal items within the new tab item. For example, below needed to be swapped to ensure I do not break existing details tab and to ensure I show values that I would need to show on my new tab.
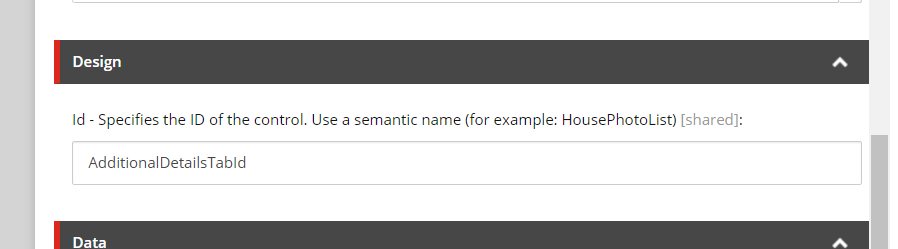
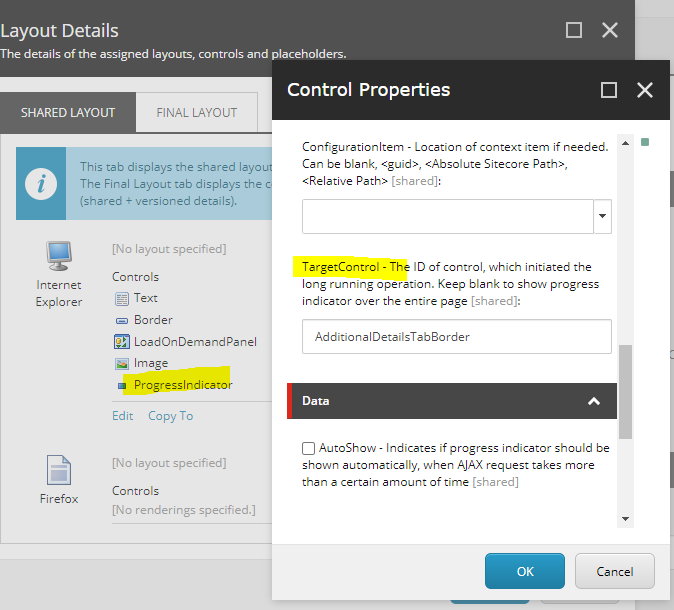
Change the above highlighted to self reference the newly created TabChange ID here to new TabID. If you leave it to old one, your existing details tab could potentially not work. 🙂On LoadOnDemandPanel, ensure the itemid matches the ID of DetailsPanel under newly created tab. This should be swapped using Sitecore Rocks. Change Target Control ID as well to ID of Border given on presentation.
Remember to change ID’s on all presentation components on Tab item. This is to ensure no overlap with existing Details Tab item. If I did not do above, my original details tab was broken and was not working.
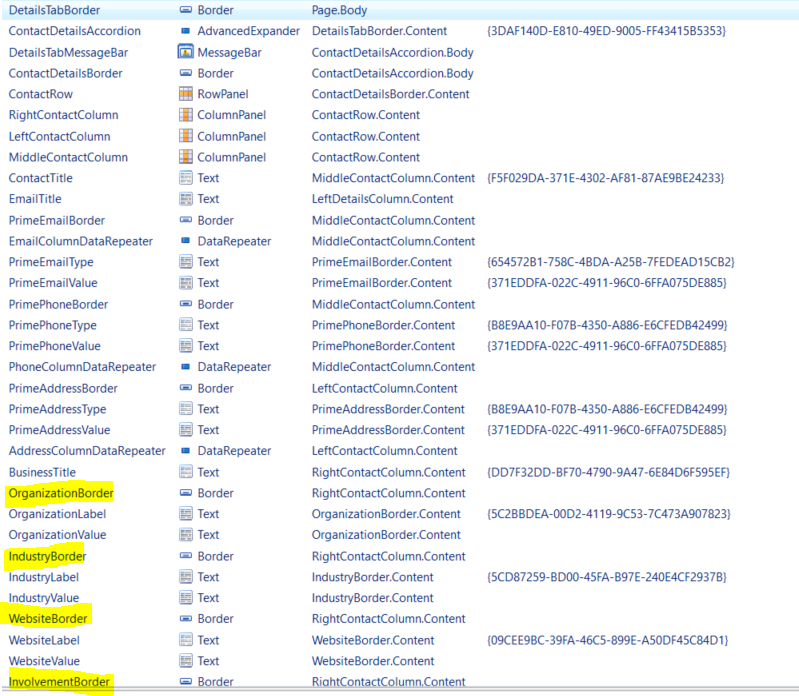
Now that we finished changing presentation of main Tab item, lets move to Details Panel Item which is also based on Tab Template -‘/sitecore/client/Business Component Library/version 1/Templates/Common/Tab’. Open this item up on Sitecore rocks and play with presentation to update/inject new items. Also, ensure to add new datasource items and swap existing references to newly created items under details panel. Finally, my presentation looked like below.
Highlighted ones are actually new additional fields that I would like to show on my Additional Information Tab on Experience Profile.
Do not forget to add new label data sources needed. I took inspiration as to where the existing ones are and dropped my news ones in the path below: ‘/sitecore/client/Applications/ExperienceProfile/Common/System/Texts’
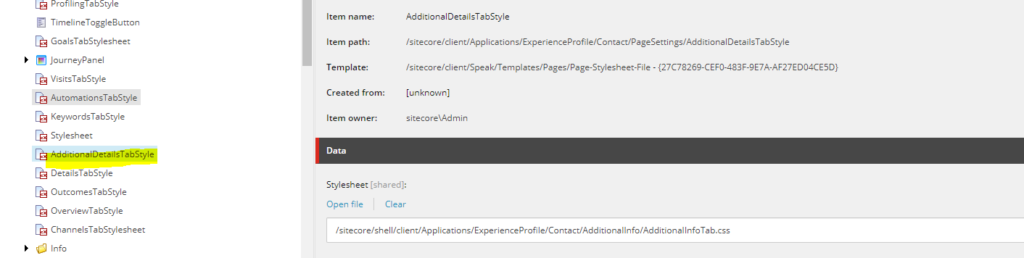
I added additional css needed for this tab by adding a new style sheet item as shown below
Additional css needed for this tab and new elements
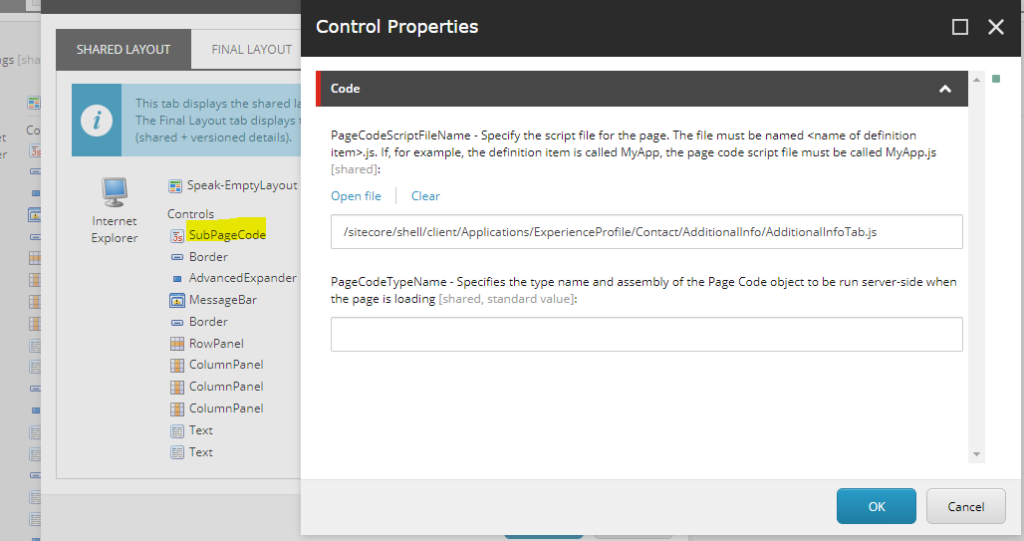
Finally, last step is to hone our js that is needed to make the right calls and read/display from JSON data. To configure which JS to use, edit the Subcode presentation component’s details.
Add file path to shiny new JS
//Here is JS Code for my new tab
define(["sitecore", "/-/speak/v1/experienceprofile/DataProviderHelper.js", "/-/speak/v1/experienceprofile/CintelUtl.js"], function (sc, providerHelper, cintelUtil) {
    var intelPath = "/intel",
        dataSetProperty = "dataSet";

    var cidParam = "cid";
    var intelPath = "/intel";
    var getTypeValue = function (preffered, all) {
        if (preffered.Key) {
            return { Key: preffered.Key, Value: preffered.Value };
        } else if (all.length > 0) {
            return { Key: all[0].Key, Value: all[0].Value };
        }

        return null;
    };

    var app = sc.Definitions.App.extend({
        initialized: function () {
            var transformers = $.map(
                [
                    "default"
                ], function (tableName) {
                    return { urlKey: intelPath + "/" + tableName + "?", headerValue: tableName };
                });

            providerHelper.setupHeaders(transformers);
            providerHelper.addDefaultTransformerKey();
            this.setupContactDetail();
            this.setupContactAdditionalDetails();

        },

        setEmail: function (textControl, email) {
            if (email && email.indexOf("@") > -1) {
                cintelUtil.setText(textControl, "", true);
                textControl.viewModel.$el.html('<a href="mailto:' + email + '">' + email + '</a>');
            } else {
                cintelUtil.setText(textControl, email, true);
            }
        },

        setupContactAdditionalDetails: function () {
            var contactId = cintelUtil.getQueryParam(cidParam);
            var tableName = "additionalcontactinfo";
            var baseUrl = "/sitecore/api/ao/v1/contacts/" + contactId + "/intel/" + tableName;

            providerHelper.initProvider(this.ContactDetailsDataProvider,
                tableName,
                baseUrl,
                this.DetailsTabMessageBar);

            providerHelper.getData(this.ContactDetailsDataProvider,
                $.proxy(function (jsonData) {
                    if (jsonData.data.dataSet != null && jsonData.data.dataSet.additionalcontactinfo.length > 0) {
                        // Data present set value content
                        var dataSet = jsonData.data.dataSet.additionalcontactinfo[0];
                        cintelUtil.setText(this.OrganizationValue, dataSet.Organization, false);
                        cintelUtil.setText(this.IndustryValue, dataSet.Industry, false);
                        cintelUtil.setText(this.WebsiteValue, dataSet.Website, false);
                        cintelUtil.setText(this.InvolvementValue, dataSet.Involvement, false);
                        cintelUtil.setText(this.SelectedCityValue, dataSet.SelectedCity, false);
                        cintelUtil.setText(this.ProposedCityValue, dataSet.ProposedCity, false);
                        cintelUtil.setText(this.AdditionalDetailsValue, dataSet.AdditionalDetails, false);
                    }
                }, this));
        },


        setupContactDetail: function () {
            var getFullAddress = function (data) {
                var addressParts = [
                    data.streetLine1,
                    data.streetLine2,
                    data.streetLine3,
                    data.streetLine4,
                    data.city,
                    data.country,
                    data.postalCode
                ];

                addressParts = $.map(addressParts, function (val) { return val ? val : null; });
                return addressParts.join(", ");
            };

            providerHelper.initProvider(this.ContactDetailsDataProvider, "", sc.Contact.baseUrl, this.DetailsTabMessageBar);
            providerHelper.getData(
                this.ContactDetailsDataProvider,
                $.proxy(function (jsonData) {
                    this.ContactDetailsDataProvider.set(dataSetProperty, jsonData);
                    var dataSet = this.ContactDetailsDataProvider.get(dataSetProperty);
                    var email = getTypeValue(jsonData.preferredEmailAddress, dataSet.emailAddresses);
                    if (jsonData.emailAddresses.length === 0 && email != null)
                        jsonData.emailAddresses.push(email);

                    var phone = getTypeValue(jsonData.preferredPhoneNumber, dataSet.phoneNumbers);
                    if (jsonData.phoneNumbers.length === 0 && phone != null)
                        jsonData.phoneNumbers.push(phone);

                    var address = getTypeValue(jsonData.preferredAddress, dataSet.addresses);
                    if (jsonData.addresses.length === 0 && address != null)
                        jsonData.addresses.push(address);

                    this.EmailColumnDataRepeater.viewModel.addData(jsonData.emailAddresses);
                    this.PhoneColumnDataRepeater.viewModel.addData(jsonData.phoneNumbers);
                    this.AddressColumnDataRepeater.viewModel.addData(jsonData.addresses);

                    cintelUtil.setText(this.FirstNameValue, jsonData.firstName, false);
                    cintelUtil.setText(this.MiddleNameValue, jsonData.middleName, false);
                    cintelUtil.setText(this.LastNameValue, jsonData.surName, false);

                    cintelUtil.setTitle(this.FirstNameValue, jsonData.firstName);
                    cintelUtil.setTitle(this.MiddleNameValue, jsonData.middleName);
                    cintelUtil.setTitle(this.LastNameValue, jsonData.surName);

                    cintelUtil.setText(this.TitleValue, jsonData.jobTitle, false);

                    cintelUtil.setText(this.GenderValue, jsonData.gender, false);
                    cintelUtil.setText(this.BirthdayValue, jsonData.formattedBirthDate, false);

                    if (email) {
                        cintelUtil.setText(this.PrimeEmailType, email.Key, true);
                        this.setEmail(this.PrimeEmailValue, email.Value.SmtpAddress);
                        cintelUtil.setTitle(this.PrimeEmailValue, email.Value.SmtpAddress);
                    }

                    if (phone) {
                        cintelUtil.setText(this.PrimePhoneType, phone.Key, true);
                        cintelUtil.setText(this.PrimePhoneValue, cintelUtil.getFullTelephone(phone.Value), true);
                    }

                    if (address) {
                        cintelUtil.setText(this.PrimeAddressType, address.Key, true);
                        cintelUtil.setText(this.PrimeAddressValue, getFullAddress(address.Value), true);
                    }
                }, this)
            );

            this.EmailColumnDataRepeater.on("subAppLoaded", function (args) {
                cintelUtil.setText(args.app.Type, args.data.Key, true);
                this.setEmail(args.app.Value, args.data.Value.SmtpAddress);
                cintelUtil.setTitle(args.app.Value, args.data.Value.SmtpAddress);
            }, this);

            this.PhoneColumnDataRepeater.on("subAppLoaded", function (args) {
                cintelUtil.setText(args.app.Type, args.data.Key, true);
                cintelUtil.setText(args.app.Value, cintelUtil.getFullTelephone(args.data.Value), true);
            }, this);

            this.AddressColumnDataRepeater.on("subAppLoaded", function (args) {
                cintelUtil.setText(args.app.Type, args.data.Key, true);
                cintelUtil.setText(args.app.Value, getFullAddress(args.data.Value), true);
            }, this);
        }
    });
    return app;
});
Only difference in code between the above and out of the box details tab is the method this.setupContactAdditionalDetails(). This function is wired up to call newly configured end point with tablename ‘additionalcontactinfo’ This is essentially the specific name you have given in your configuration element noted below.
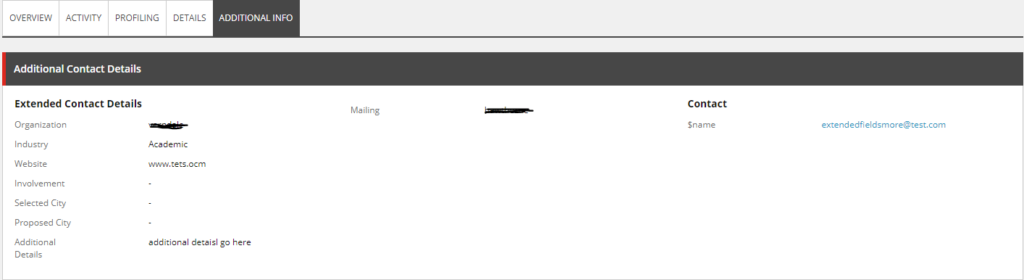
That is it, if all goes well and you did the configuration and steps mentioned above correctly you should see the new tab loaded with information you need.
New Tab showing all the additional information
That is it, now I don’t have to open SQL Manager or run a query to check and ensure the data is updated fine in Sitecore when form is submitted with all data or when Salesforce is updated and synced back to Sitecore. Happy and Productive!
Next up, few hiccups post live and how we solved it.
What would you do when basic foundation of what you would like to achieve is done and is done right? I happen to never get an opportunity to say thats it! There is always a next page, next step and moving on to next challenge. To be honest, I do not want it any other way, love to keep building next awesome things. 🙂
That is exactly what happened when I wrapped up the data flow that I noted on my post here. To continue on path to enhance and extend the data we had to look at variety of other information that we collect from end users on our forms. We want to ship this rich data back to Salesforce, I mean why not right? So, let’s see how we could do that.
Firstly, Sitecore has some awesome documentation around how you can get started to extend both Sitecore contact and Salesforce to accommodate your data needs. As always I will not repeat the information, but, will try to highlight the challenges that I had to resolve to make this happen. Also, fill in any gaps that are not covered in documentation here.
Abstract steps we need to do to get this rolling: 1. Add fields needed on Contact in Salesforce 2. Extend XConnect contact with new fields needed based on longer forms 3. Extend models on collection, follow steps noted here to extend facets on both XConnect and extend models of Salesforce on DEF: https://doc.sitecore.com/developers/salesforce-connect/21/sitecore-connect-for-salesforce-crm/en/walkthrough–creating-a-custom-contact-facet.html 4. Add additional mapping on forms, so, the back-end can retrieve values entered on form fields that are noted. 5. Ensure XConnect contact has the new info 6. Run pipelines needed. 7. Ensure salesforce has the new data 8. Backward flow of data from Salesforce to Sitecore on new facet fields
Few Gaps:
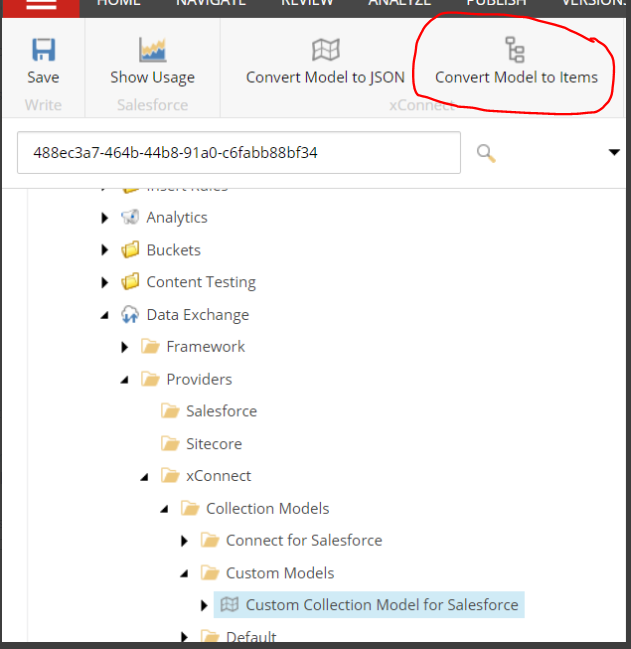
In Documentation, it does not call out that it is needed to click on the option available called ‘Convert Model in to Items’ after a custom model item is created and corresponding path to namespace and dll is set on field ‘Collection Model Type’. This is really important, if you do not do this stuff will simply not work. See screenshot for guidance.
Click on highlighted option to create items from model.
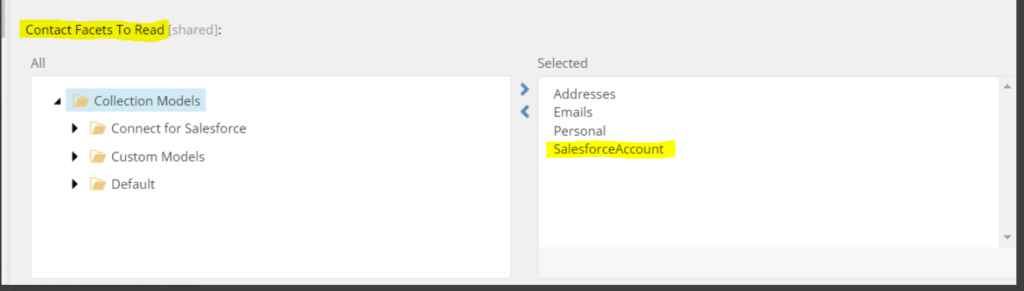
Ensure new custom facet is selected on Contact Facets under pipeline step: /sitecore/system/Data Exchange/yourtenant/Pipelines/xConnect Contacts and Interactions to Salesforce Sync/Custom Read Contacts from xConnect Pipeline/Read Contacts from xConnect
Pick facets to read, otherwise new mappings will not work
Also, note if you try to package your custom model located under /sitecore/system/Settings/Data Exchange/Providers/xConnect/Collection Models/Custom Models/ to upper environments, the mappings do not work. It has to be created from each environments and all references to these items should be changed/swapped as well. If you do not do this, the mappings might not work. It took me lot of back tracking to figure this out. It is painful to change references, but, most references to custom model specific items should be in here -> /sitecore/system/Data Exchange/your tenant/Data Access/Value Accessor Sets/Providers/xConnect/xConnect Contact Additional Information Facet OR which ever name you used to create item based on ‘xConnect Entity Facet Value Accessor Set’ while following instructions here
That is all! if you are lucky enough, new value mappings added to location -> /sitecore/system/Data Exchange/your tenant/Value Mapping Sets/xConnect Contact to Salesforce Contact Mappings/Contact Model to Salesforce Contact should work. Good luck!
Now, lets ensure we know what to do while ensuring the additional data can flow backwards as well which is from Salesforce to Sitecore. Most of the steps should be covered as part of link from Sitecore above. But, again few things below which need to be done to ensure this works.
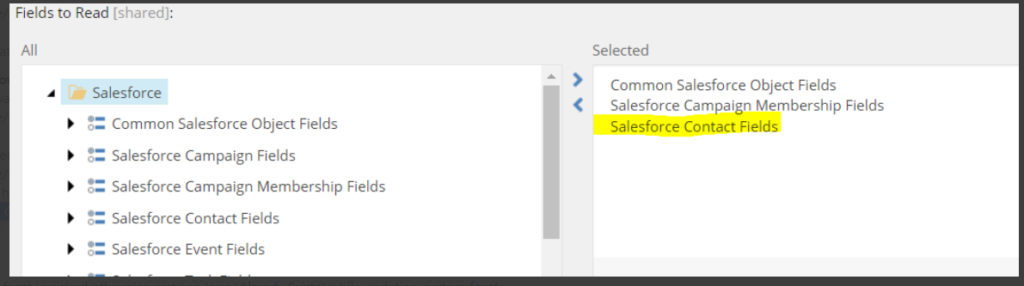
Ensure on pipeline step ‘Read Contacts From Salesforce’ below, its pointing to your tenant Salesforce Contact Fields. In my case, it was pointing to branch specific fields when I toggle the view to show raw fields.
Ensure it points to correct set of extended fields from your tenant
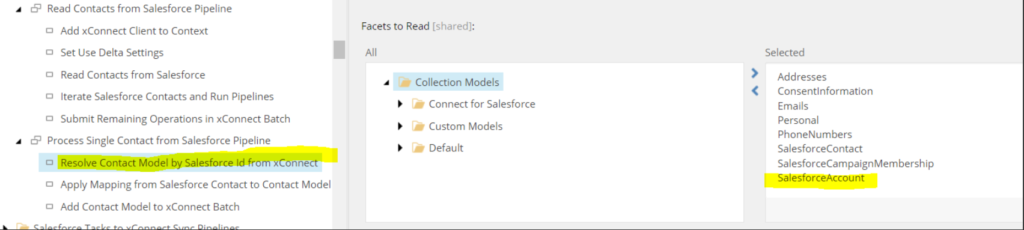
Ensure on below highlighted new custom facet is picked otherwise error on logs “Already Exists” while updating custom facet.
That is all! If all goes well, you should now the custom xConnect contact data back in Salesforce and vice versa. Now, what? Well, we can check to see if the data is updating properly on xConnect shard databases, but, why not show this additional values on Experience Profile for ease of use? Also, we had a hiccup on previous functionality that was shipped live, will see how we debugged and resolved the same. We will see how to do these in next set of blogs.
I literally jumped with enthusiasm when I got the connector working. I could now see my xConnect contacts back in Salesforce. What a joy to see the data flowing. I enjoyed the victory for almost a day and I know we had long way to go before we could ship this out live. So, I moved on to next set of challenges and tasks on hand. I am a hugely inclined towards algorithmic solving to any problem on hand. I truly believe in – If I know how to solve it, half of the problem is solved. 🙂
Below is what we were hoping to do with data flow:
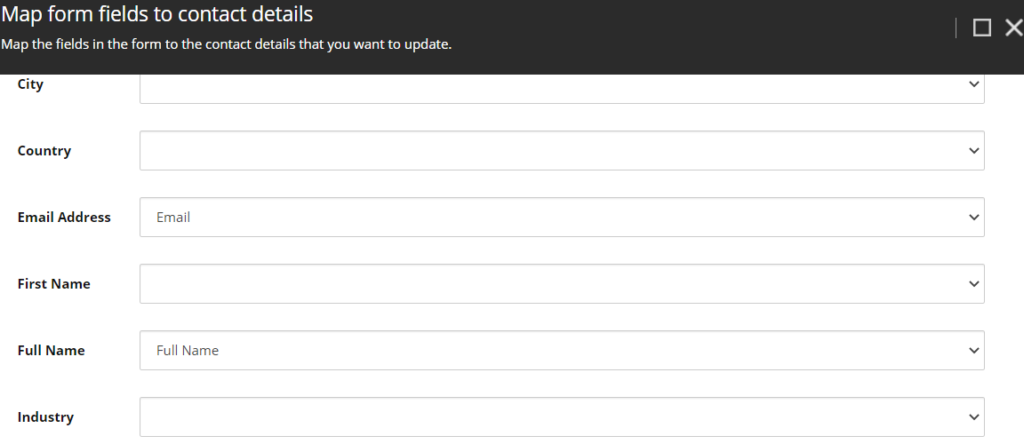
Sitecore Forms: On our Sitecore website, we had bunch of forms, all behind the scenes using Sitecore Forms. We were using custom submit action step to send an email to the end user who submitted the form. Now, we wanted to actually save contact in Sitecore when a form is submitted, To achieve this, I followed instructions noted here: https://doc.sitecore.com/developers/91/sitecore-experience-manager/en/walkthrough–creating-a-custom-submit-action-that-updates-contact-details.html Special Note: While you follow the steps on document above, especially while using Sitecore Rocks, ensure to remember that renderings you pick, they should all be speak 2, if you pick something of speak 1 version, it might not work Once you successfully complete this setup and apply mappings to form fields back in Form editor, if you are lucky, you will see your form submission data on Experience Profile.
Mappings on UpdateContact Submit action
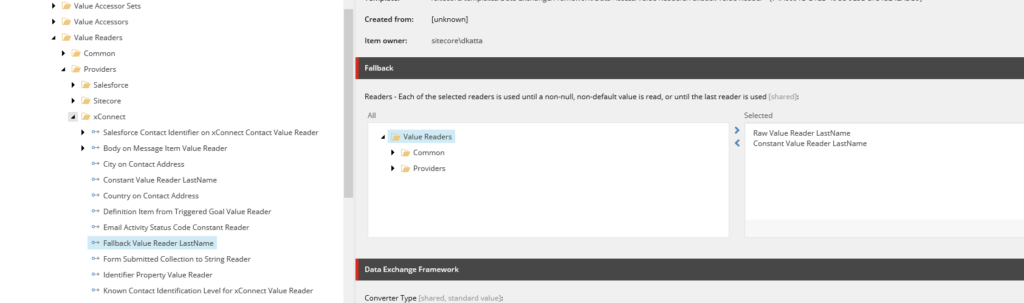
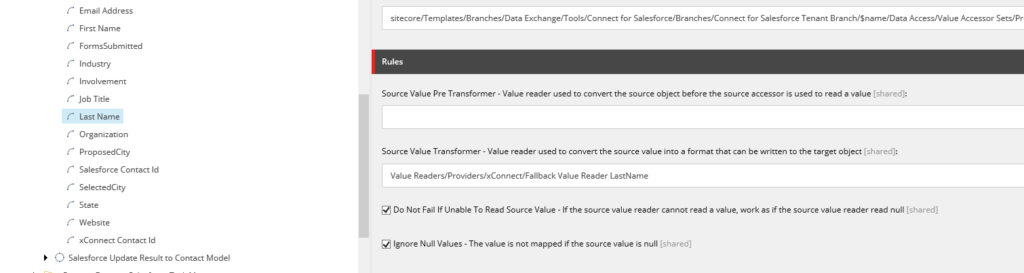
Implement fallback: Remember their could be fields that are not required from Sitecore or forms perspective, but, could be required from Salesforce perspective. One such field is Last Name in our case. To ensure we push these contacts out to Salesforce, we implemented a fall back reader and hooked this up on Value Mapping configuration.
Fall Back reader which will try reading the raw value and then will read constant value such as ‘unknown’ if raw value is emptyThen use the reader in source value transformer on value mapping corresponding to last name
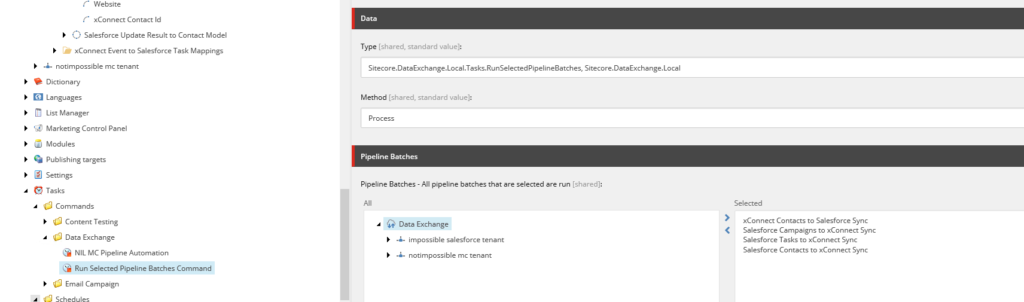
At this point, it is important to ensure data can flow in either direction. From Sitecore to Salesforce via pipeline batch run ‘XConnect Contacts to Salesforce’ and from Salesforce to Sitecore via pipeline batch run ‘Salesforce Contacts to xConnect Sync’
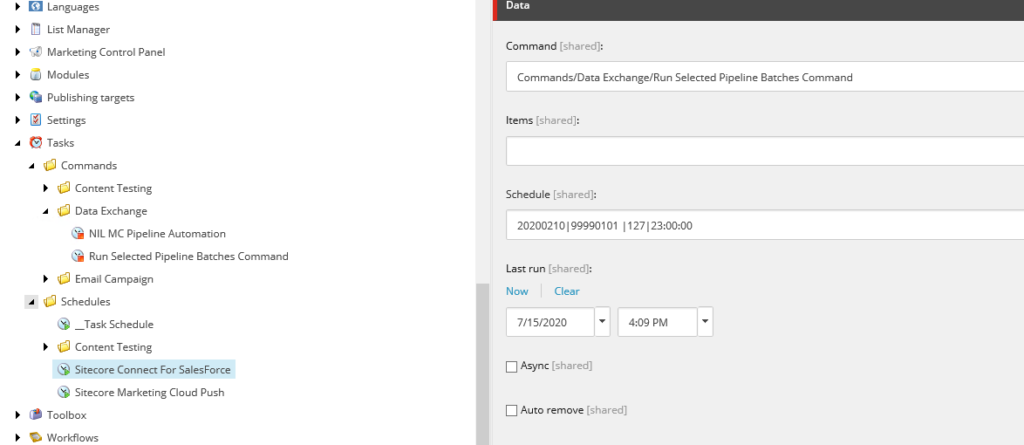
If all is well we should be ready to wire up scheduled job that will try to keep the two systems in sync as often as needed. More information here: https://doc.sitecore.com/developers/def/20/data-exchange-framework/en/scheduling-a-pipeline-batch.html
Create a new command based on ‘/sitecore/templates/Data Exchange/Framework/Tasks/Run Selected Pipeline Batches Command’Create a new schedule and make this run in interval as needed
Time to take this to level up. Lets send more information both to contact on Sitecore and back in Salesforce. To do this we must extend the Contact Facet and also figure out how we can map this additional information back to Salesforce. That would be my next blog.
This post is continuation to my last one in regards to first steps, you can check it out here. Now, that you made all the decisions, hopefully all the right ones, then, you would go to the immediate next step which is -“Get it installed and start pushing the data”. Sitecore as always tried their best to provide clear instructions. You will find basic instructions there, but, like always there are few gaps which you can only learn by actually doing it. 🙂
In this post, I will cover few gaps and how I worked around, figured it out and finally got the connector to work.
First and most important thing is you do not have to google to install the packages that are needed for the connector to work. Downloads section on official link of Sitecore Connect actually has all packages. When I was reviewing the installation guide, it lists all of the packages that need to installed and my quick instinct was to do a Google Search lol. I wish Sitecore just added a helpful hint of where to find them to make my life easy. 🙂 But, if you are doing this step, look no further than here
As we follow along the instructions on the guide, one important thing to call out for section 5.2 which is in regards to adding connection string for salesforce in sitecore instance. There is a note right at the bottom of this section and if you are like me may be you will skip right over it and that is why wanted to advise caution to not skip it. 🙂 In my case, I did create a sandbox and I would personally always recommend to create a sandbox for lower environments just to ensure data is kept clean on production instance of Salesforce.
Note from Documentation for section 5.2 on Installation guide
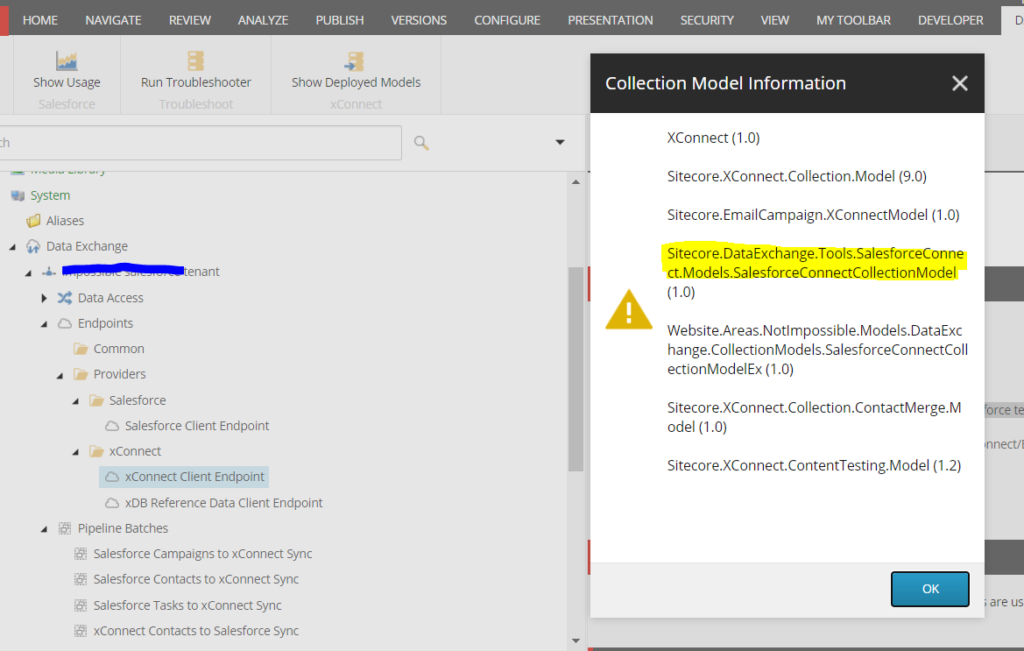
Now, lets say you finished all the steps noted on Installation guide to the tea. But, you quickly find you are stuck at step 5.5. This step is about configuring your endpoints on newly created tenant and ensure the trouble shooter successfully runs. Always remember after model is generated (json file) and it is dropped on locations the guide calls out for, this step below should not be forgotten, if it was, the newly generated model will not be available in ‘Show Deployed Models’ under xConnect Client end point. So, here is the magic step:
“Restart all windows services and do a app pool recycle on IIS xConnect site and your main website instance as well(why not)”
Now, when you click on ‘Deployed Models’ on XConnect endpoint you should see the shiny new model and the trouble shooter will also run just fine. A screenshot for reference:
Showing view of ‘Show Deployed Models’ ribbon click on xConnect Client Endpointview showing click on ‘Run Troubleshooter’ on xConnect Client End point
We all assume to some extent, right? We should not blame Sitecore for assuming we all know that we do that many installation steps and line up several different package installations the assumption is we do a decent size publish to ensure all the good stuff we just loaded gets to web database as well. It is important to do this just in case if there are any dependencies they all make it to destination live database as well.
Now, this bits below took a lot of toll on me because in my case Sitecore instance was not set up correctly on upper environments with regards to xConnect. Had to do some SOLR related corrections. I will not go in to super detail around what happened, but, just on abstract level those indexes and configurations of indexes for xConnect were not done right. But, bottom line for this installation to work as expected below should be ensured and assured.
Experience Profile should load xConnect contacts with out any errors
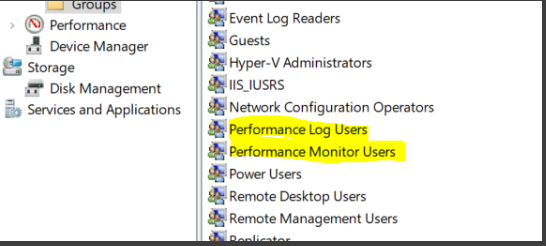
Ensure your xconnect logs are clean – even basic global key access denied errors should be cleaned upAdd IIS Apppool\xconnectapppool name to performance related groups.
showing user groups that need permissions set up
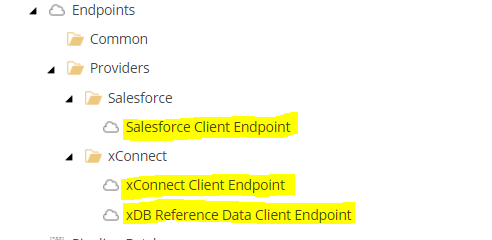
Now, last but not least a pesky little issue that ate more than half of my day. I ensured all steps were a wrap everything was configured per plan, but, when I ran the pipeline batch ‘xConnect Contacts to Salesforce Sync’, nothing happened. Logs generated were super not helpful and almost felt like it failed before even it started. Which brought my attention to end points, but, wait, I just verified that my end points troubleshooters ran fine for all three highlighted below:
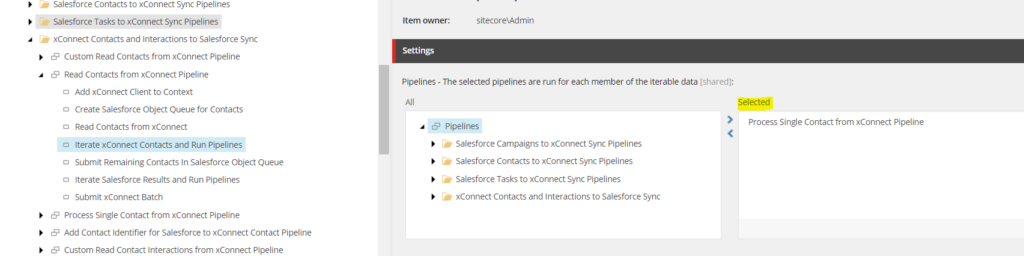
After hours of scrambling, I found that my individual pipeline steps were using branch specific end point references which obviously will fail because we did not configure them, we configured tenant specific end points. The only way I could find this out was using ‘View Raw’ option in ribbon and searching that GUID otherwise from the regular view everything would look alright as the names are same between tenant and branch. I had similar issues for references to other pipelines within pipelines. For instance, the below pipeline step highlighted below was actually from default branch and not from tenant, so, any changes I made to my pipeline step or end point configuration was not being read and instead batch was reading branch content.
I am just glad I could find this issue. Now, it could be because I am the unlucky one, but, this is what made me look more deeply at the DEF tenant and pipeline steps on a more intimate level, so, yeah, it was annoying, but, yep it was worth it. 🙂
After initial connectivity is proven and core data was being pushed to Salesforce from Sitecore, we are on to the next step which is attacking custom implementation that would be needed to meet our end goals and requirements. It was sigh of relief that the connector is working and yet deep suspense by the end of this as I was aware of the next adventures. I will continue this blog series to depict the journey that happened next.
By nature, I am extra cautious when I take my first steps on any project. This comes from experience, when a task is in front of you, many of us get tempted to jump and start working things out. I have a different take on this and even if I do burn couple of hours in the beginning, I would not change this style for no one or nothing! When you take your first steps right, when walls or falls happen, you are confident that you can get through them because you know that you are on right path.
So, on one of our projects, we decided that a tight integration with Salesforce would be a huge add on for this growing team. Now, the decision is clear that integration is needed, now, few key first decisions that should be made to ensure we will follow the right track to achieve our key goals.
Key Goal: We have a bunch of forms on the website that collect variety of information from end user based on purpose of the form. The stakeholders wanted to ship this collected information to Salesforce.
That’s a very abstract gist, I know. Not always would you have a dedicated Business Analyst that would document every single detail. Sometimes, you have to work with just a skeleton. Now, lets jot down the first set of questions:
What Connector should we use to ensure we have the tight integration between Sitecore and Salesforce?
What version of Connector should we be using?
What does this Connector do on a very abstract level and would it help us reach the key goal noted above?
Now, lets answer each one of those first before we jump deep and go crazy. Which we will trust me. I did run across quite a few walls and was able to successfully break or crack enough to get by, I will share that side of journey with you all as well.
But, first things first, answer to above key questions. So, for the first one, my boss, Liz Spranzani has a great collection of blogs which highlights Connectors that are available and which ones to use in which scenarios. Salesforce offers a whole stack of products and so does Sitecore, so, it is important to get your thoughts straightened out, so, you make wise and correct decisions.
Here are the blogs for your reference. I made my choice to be to use Sitecore Connect for Salesforce CRM because that fits all my boxes based on subscriptions the client has in regards to Salesforce. Now, your answer could be different, I am hoping its the same, so, my journey will help you. 🙂
Now, for the second one, folks who know Sitecore know that this question is very important to be answered because of just the way Sitecore product life cycle has been. To confirm this, I checked the compatibility KB article, but, unfortunately, it is not always up-to-date. So, I actually loaded a support ticket to understand what version of connector should I be using given my Sitecore version, got confirmation that I should be using: Sitecore Connect for Salesforce CRM 2.1.0 . Bottom line is latest and not always the right approach especially when you are dealing with multiple systems.
So, on a very abstract level the connector gives you ability to push various objects from Sitecore to Salesforce and vice versa. Most important one of course that most of us will be interested in would be Contacts. But, along side of Contacts, it can also ship Tasks, Events and Campaigns.
You nailed your first steps, Now, what to do next? Installation! Sitecore does have good documentation on Connector Installation and setup, but, like always there is few gaps and some helpful tips to get you over few humps. I will cover those in my next blog.
Do not underestimate the power of making right choices, take your own time and do not let anyone make them for you if you are the one who is going to own the implementation.


